You know what people always ask me about attic bedrooms? They usually start with something practical, like “Is it worth the cost?” or “How do I deal with the sloped ceiling?” But what they’re really asking, deep down, is “Can this weird, dusty space actually make my life better? Can it be a place I truly love?”
And my answer is always a resounding yes. But not in the way most design articles will tell you. They’ll show you glossy photos and talk about ROI. We’re going to talk about something far more valuable: your health and happiness. Your attic has the potential to be the most restorative, personal, and supportive room in your entire house precisely because of its quirks, not despite them. It’s a space away from the world, a true retreat. So let’s talk about how to do it right, without the corporate speak and generic advice. Let’s build you a sanctuary.
Foundation & Planning for Your Dream Attic Bedroom
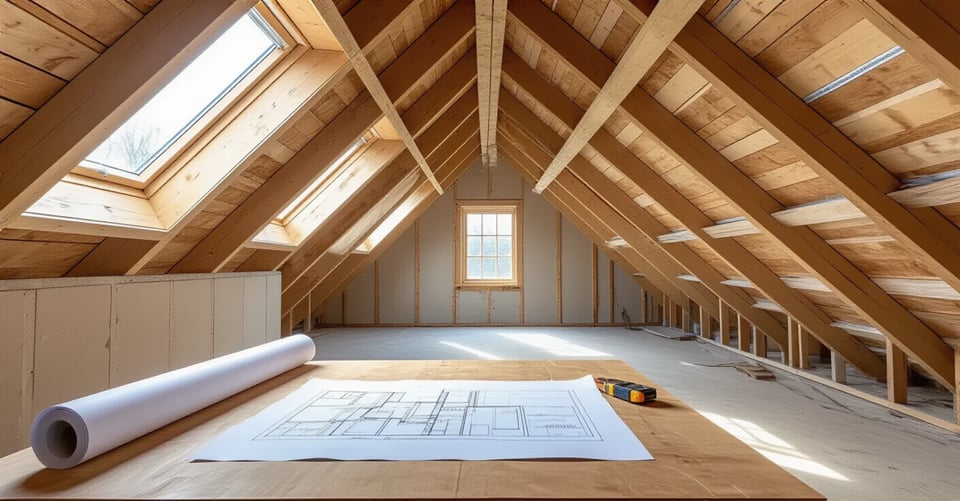
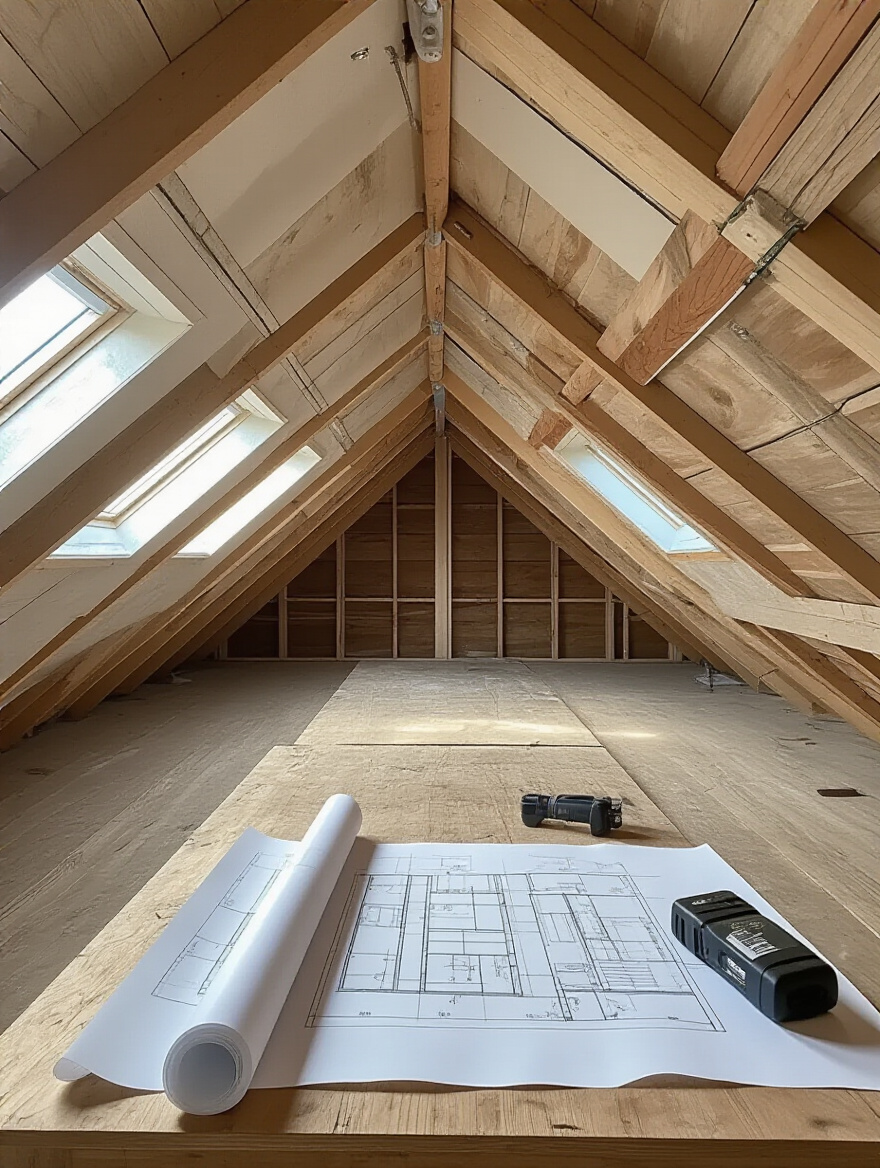
This is the un-sexy part, I know. But can we just be honest for a second? The real foundation of a wellness space isn’t a fluffy pillow; it’s peace of mind. Getting these core elements right means you’ll never have that nagging, low-grade anxiety about whether your beautiful new room is safe, legal, or about to cost you a fortune in surprise repairs. Think of this as the ultimate act of self-care for your future self.
1. Assess Structural Integrity and Foundation Load Capacity
Can we talk about what’s holding you up? Literally. Everyone gets so excited about paint colors and furniture, but the single biggest mistake I see is assuming the floor of your attic can hold a bedroom. I had a client—thankfully not on my watch—who forged ahead without a structural engineer. Six months later, they noticed hairline cracks spreading across their living room ceiling below. It was the weight of the new bedroom, slowly, silently, stressing the home’s structure. They ended up paying nearly double to fix the damage.
This isn’t just about avoiding disaster; it’s about creating a subconscious feeling of safety. You simply cannot relax in a space if your nervous system is subtly sensing instability. Hire a structural engineer. It’s not a “nice-to-have,” it is a non-negotiable. They’ll tell you if your ceiling joists (meant to hold drywall) need to be reinforced to become floor joists (meant to hold you, your bed, and a library of books). This is the single most important check you will write for the entire project.
Once you know the space is physically sound, the next layer of peace of mind comes from ensuring it’s legally sound.
2. Comply with Local Building Codes and Permitting Regulations
I know, I know. Permits and regulations feel like a bureaucratic nightmare designed to slow you down. But let me reframe this for you: building codes are your friend. They are a set of minimum safety standards developed over decades to prevent tragedies. They ensure your new bedroom has a window big enough to escape through in a fire and a staircase that won’t cause a fall in the middle of the night.
Ignoring permits is one of the most expensive shortcuts you can take. When it comes time to sell, an unpermitted attic conversion can be a deal-breaker. Buyers will walk away, or a home inspector will flag it, forcing you to either tear it out or go through an insanely expensive and stressful process of “retrospective permitting.” Getting it right from the start protects your family’s safety, your financial investment, and your future peace of mind. It’s not just paperwork; it’s proof that your sanctuary is built correctly.
With your structure safe and your plans approved, let’s talk about making the space truly comfortable and functional day-to-day.
3. Plan Essential Utility Extensions (Electrical, Plumbing, HVAC)
Imagine building your dream attic bedroom, only to find it’s an oven in the summer, an icebox in the winter, and the single outlet you installed is in the wrong place. Utility planning is what makes a space truly livable. I once consulted on a project where the homeowner winged the electrical plan. A year later, they had extension cords running everywhere—a constant visual clutter and a fire hazard. The problem wasn’t just aesthetics; the constant, low-level irritation of an impractical space was actively stressing them out.
You need to think about this holistically. Will you need a dedicated HVAC system, like a mini-split, to properly heat and cool the room without straining your main system? (The answer is almost always yes.) Where will your lights, switches, and outlets go to support how you actually live? If you’re adding a bathroom, where can the plumbing run with the least disruption and the most effective drainage? Getting licensed electricians, plumbers, and HVAC pros involved early saves you from tearing open walls later and ensures your new space doesn’t just look good, but feels good, all year round.
Once we know how you’ll power and heat the room, we need to figure out the best way to get into it.
4. Determine Optimal Access Points for Comfortable Movement
How you enter and move through a space has a profound impact on how you feel in it. A narrow, steep staircase or a doorway that opens into a walking path creates daily friction—those tiny moments of annoyance that build up over time. The goal is to create a sense of effortless flow, not a daily obstacle course.
The biggest culprit here is usually the staircase. It dictates so much of the layout, so it can’t be an afterthought. Where can it land upstairs without eating all your usable floor space? And where can it start downstairs without disrupting the flow of that floor? Spend time with your designer or architect mapping this out. Walk the potential paths. Imagine carrying laundry. This step ensures your attic retreat feels like a natural, welcoming extension of your home, not a clumsy add-on.
Now for the question that’s probably been on your mind from the start: what is all this actually going to cost?
5. Budget Accurately for Your Complete Attic Renovation Project
Here’s the raw truth: almost every renovation goes over budget. The number one reason? Unforeseen issues hidden in the walls. That’s why the biggest shortcut to financial wellness on a project like this is to build a generous contingency fund—at least 15-20%—into your budget from day one. This isn’t a “slush fund”; it’s a stress-reduction tool.
When you inevitably discover some old wiring that needs replacing or a joist that needs extra support, you won’t panic. You’ll simply approve the change order, use the contingency fund as intended, and sleep soundly. I’ve seen clients who skipped this step end up paralyzed by surprise costs, putting their project on hold for months and living in a construction zone. A detailed budget with a healthy contingency is the most important document you’ll create. It transforms the project from a source of financial anxiety into a predictable, manageable process.
Maximizing Space & Natural Light Effectively
Alright, the heavy lifting of planning is done. Now for the fun part—turning this unique space into a room that feels expansive, bright, and restorative. Light is a nutrient for our bodies, and in an attic, we get to be incredibly intentional about how we bring it in.
6. Leverage Dormer Windows for Added Square Footage and Views
If your attic has a steeply sloped roof, dormers are your new best friend. They are little bump-outs that create vertical walls and space for a traditional window. They don’t just add a bit of square footage; they fundamentally change the feeling of the room. A space that was once defined by an oppressive, angled ceiling suddenly has headroom, a place for a cozy armchair, and a real view of the trees or the sky.
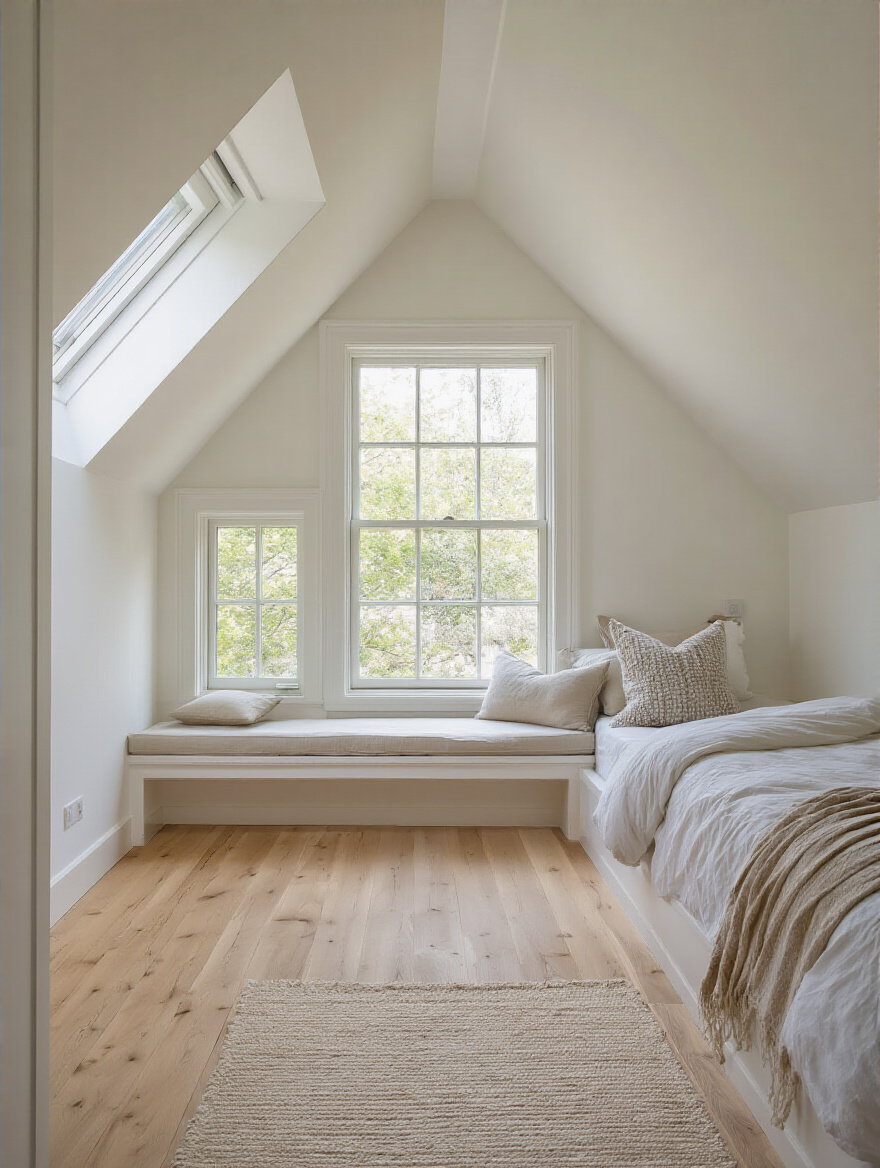
A dormer is a structural addition, so it needs to be part of that initial engineering and permitting plan. But the impact is profound. It turns a “converted attic” into a true room, connecting you to the outdoors and flooding the space with gentle, directional light. This is a game-changer for transforming a potentially claustrophobic space into an airy retreat.
In addition to side views, let’s talk about the incredible benefit of looking straight up.
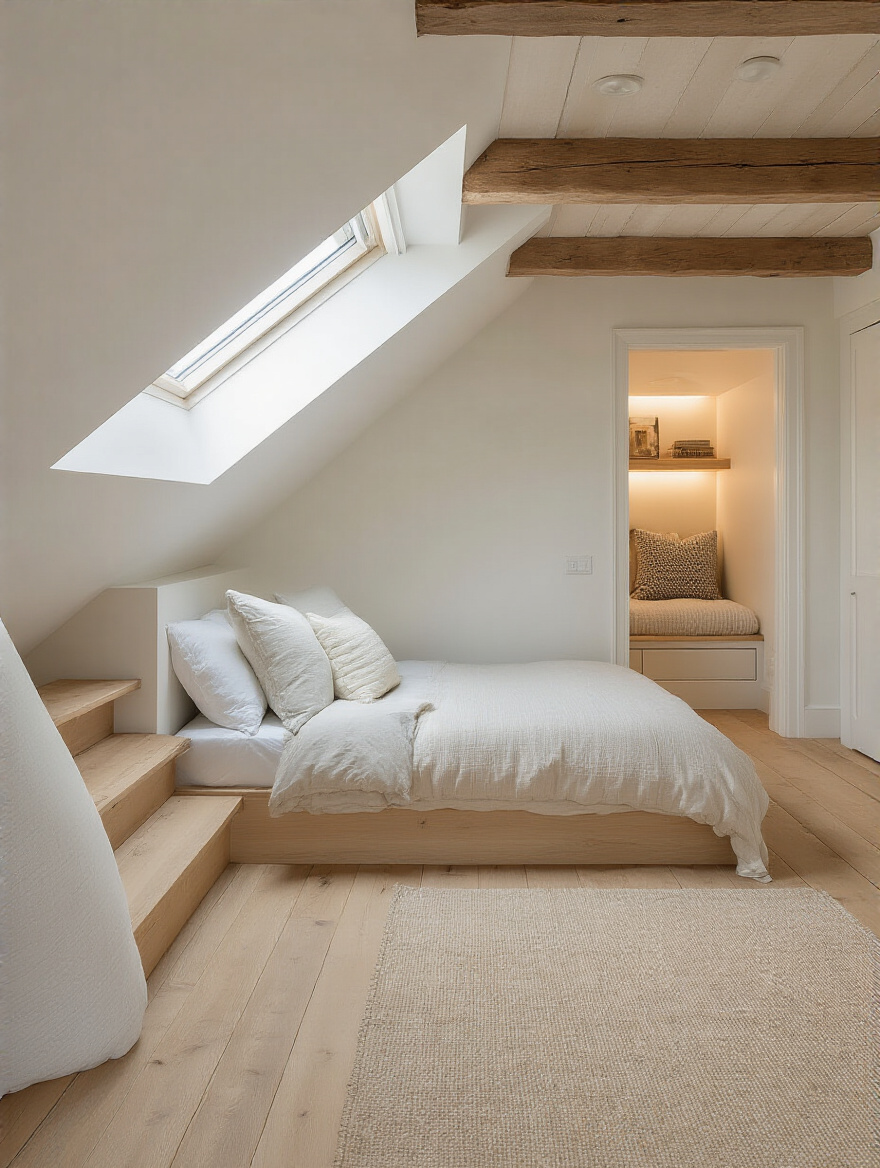
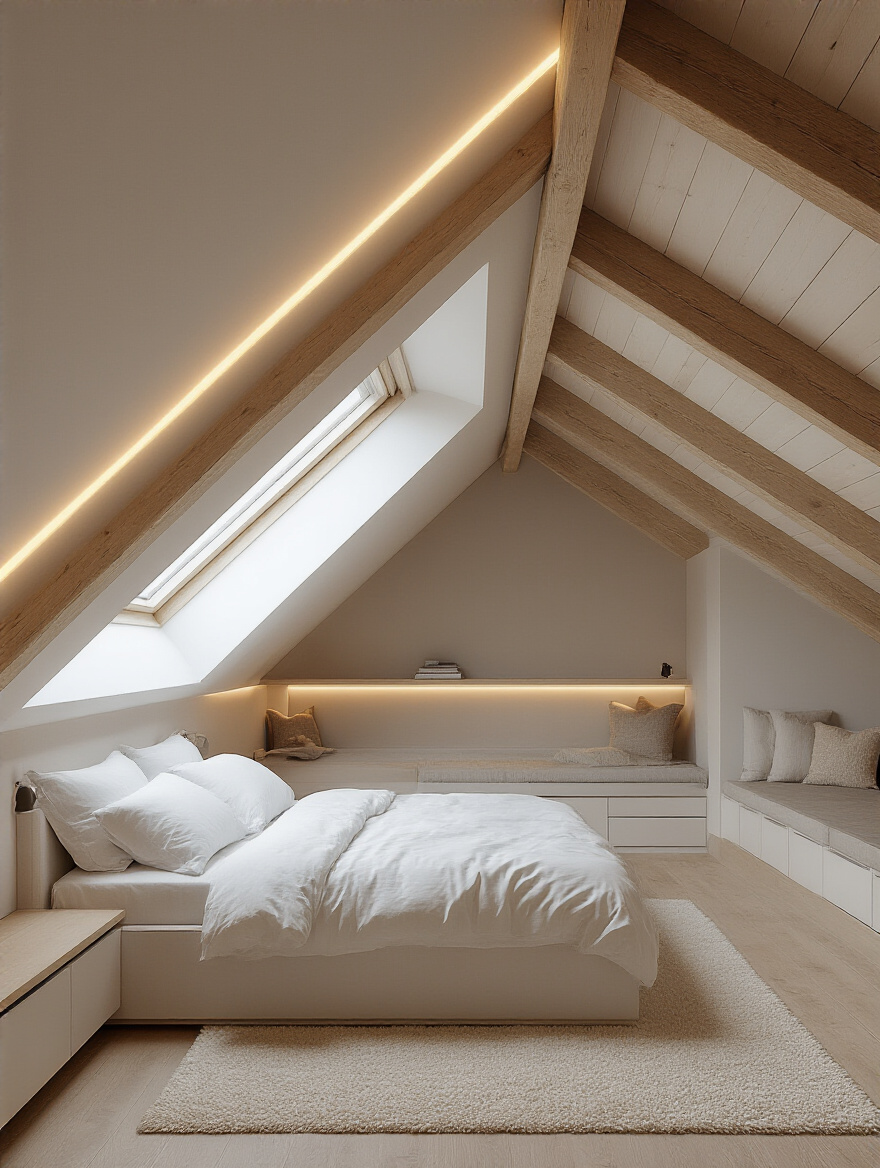
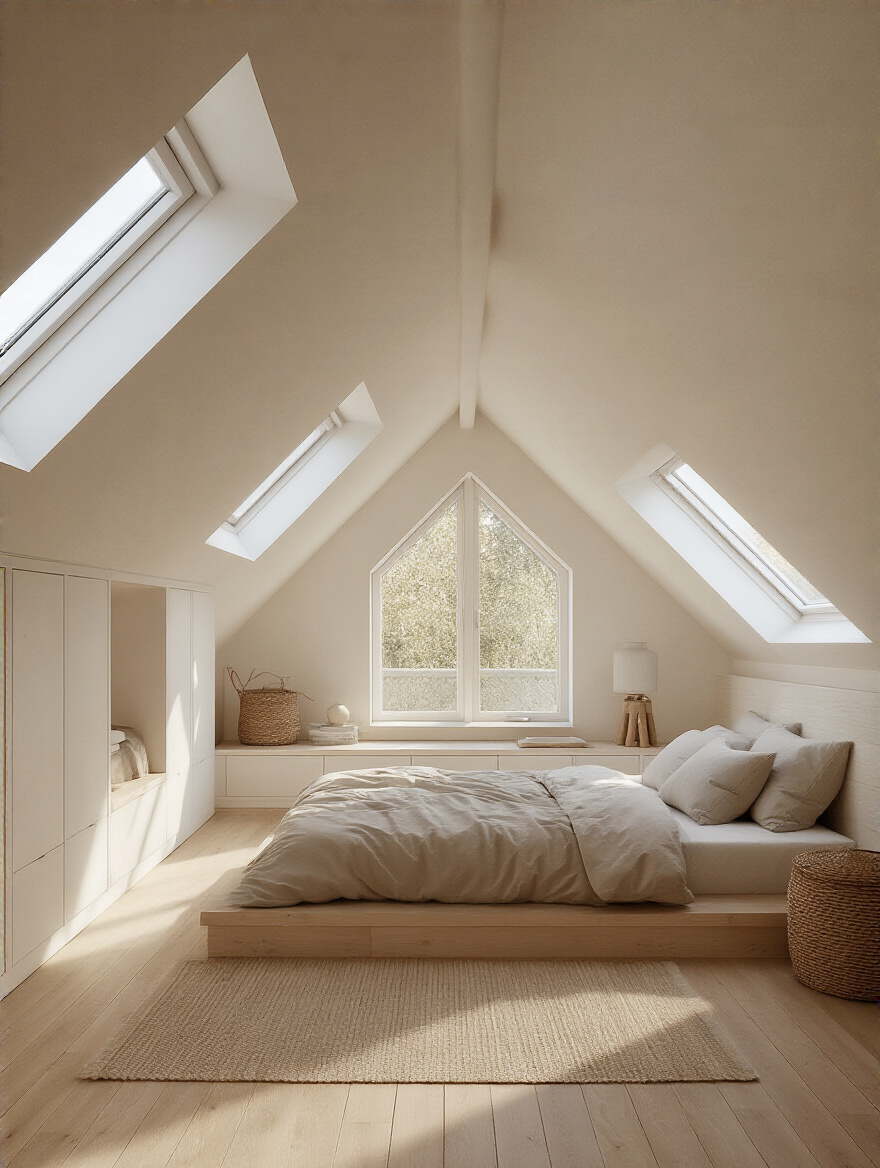
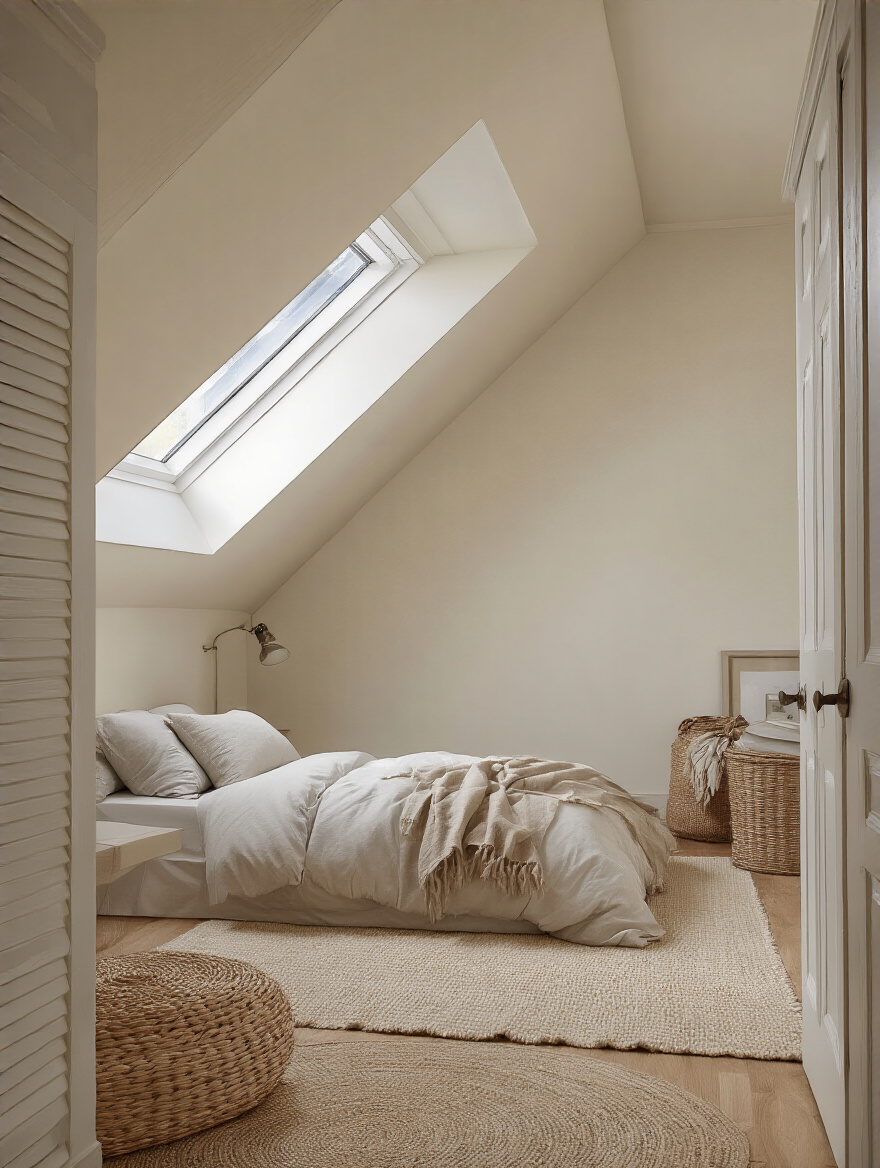
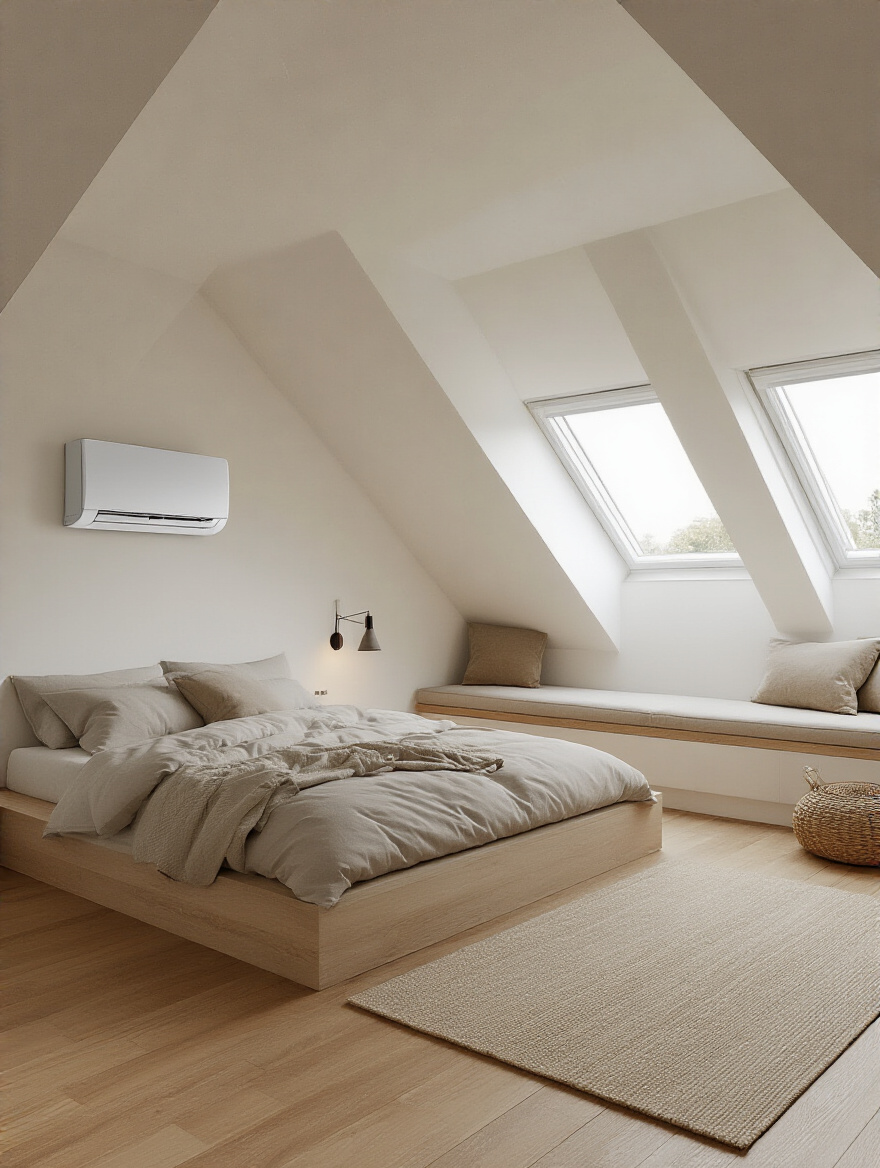
7. Install Strategic Skylights for Abundant Overhead Light Entry
Everyone says to add skylights, but they often get it wrong. They’ll just stick one in the middle of the room. The real magic happens when you place them strategically to support how you live. A skylight directly over your bed lets you fall asleep watching the stars and wake up with gentle, indirect morning light, which is phenomenal for regulating your circadian rhythm. One over a desk or a reading area provides focused, natural task lighting that reduces eye strain.
Here’s my confession: I used to think skylights were just glorified windows. Then I designed an attic bedroom for a painter. We placed two large, north-facing skylights to provide the consistent, diffuse light artists crave. The quality of light didn’t just improve her work; she told me it improved her mood on a daily basis. Venting skylights are also a secret weapon for comfort. On a hot day, you can open one to let rising hot air escape, creating natural ventilation. They’re not just a design feature; they are a wellness tool.
With the light pouring in, let’s make sure your furniture works with the space, not against it.
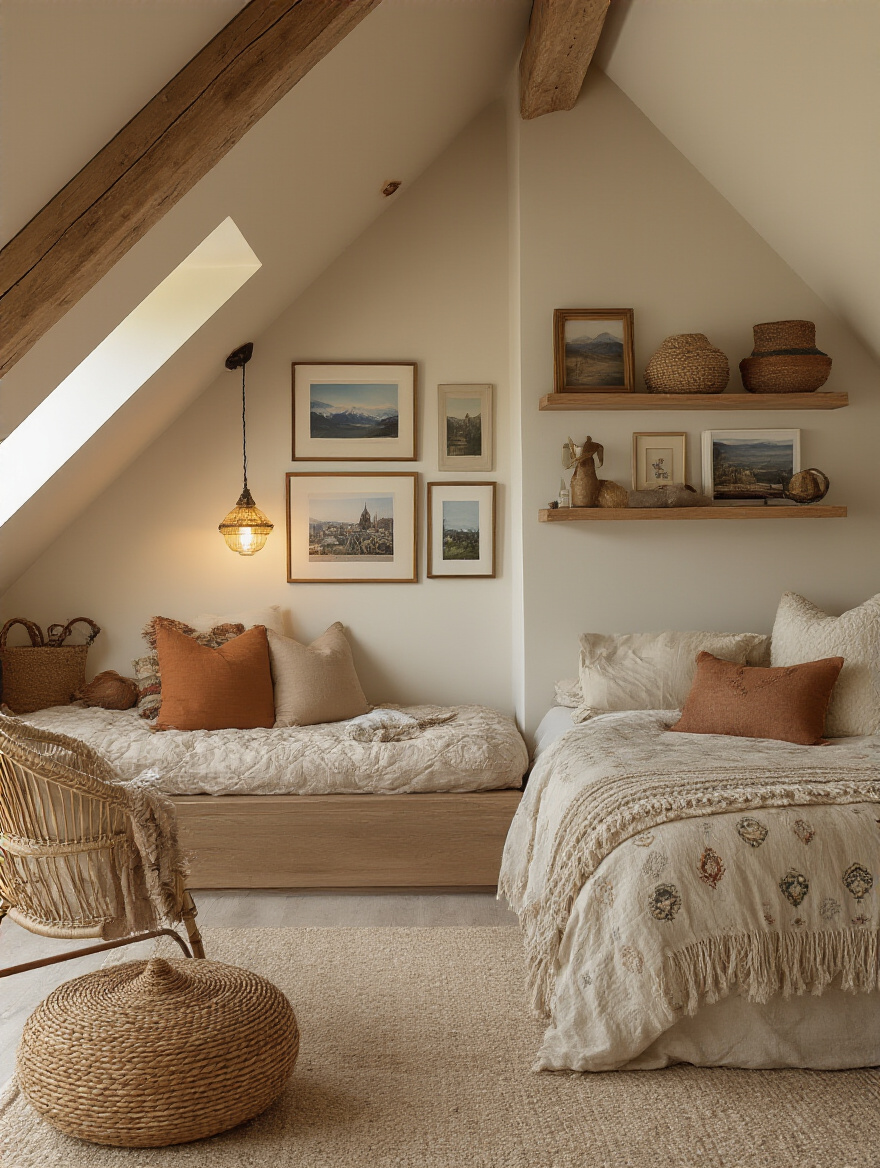
8. Optimize Sloped Ceilings with Clever Furniture Placement
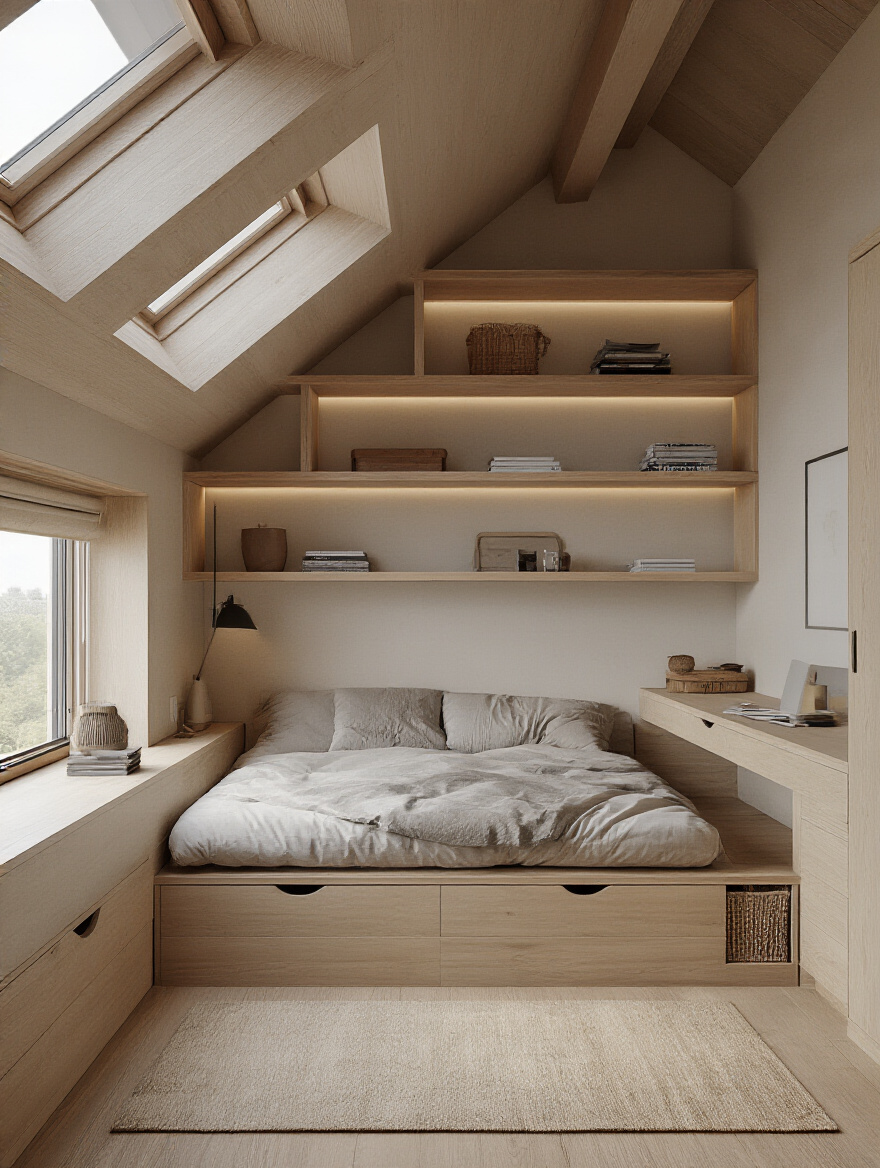
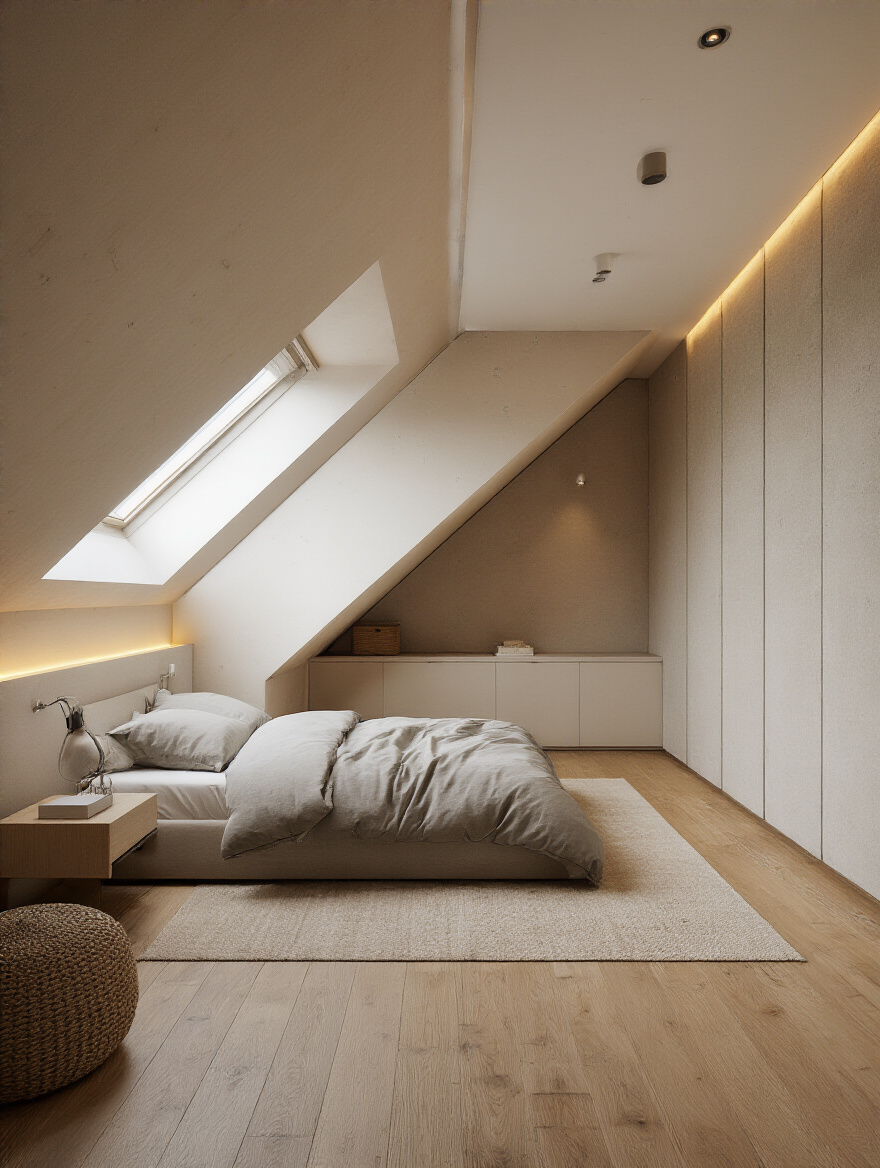
The sloped ceiling is the defining feature of an attic. The biggest mistake people make is trying to ignore it or fight it. You can’t. So, you have to embrace it. The lowest parts of the room, where you can’t stand up straight, are perfect for the things you do lying down. This is where your bed goes. A low-profile platform bed tucked under the eaves creates an incredibly cozy, den-like feeling. It’s a natural cocoon.
Once you’ve placed the bed, the rest of the room opens up. The central area with the most headroom becomes your clear path for walking and dressing. Lower walls are ideal for low-slung credenzas, long benches, or even a chaise lounge for reading. By working with the architecture, you create natural, intuitive zones. The room starts to make sense, and that visual and functional clarity is incredibly calming.
The sister to the sloped ceiling is the short wall it creates, which offers its own amazing opportunity.
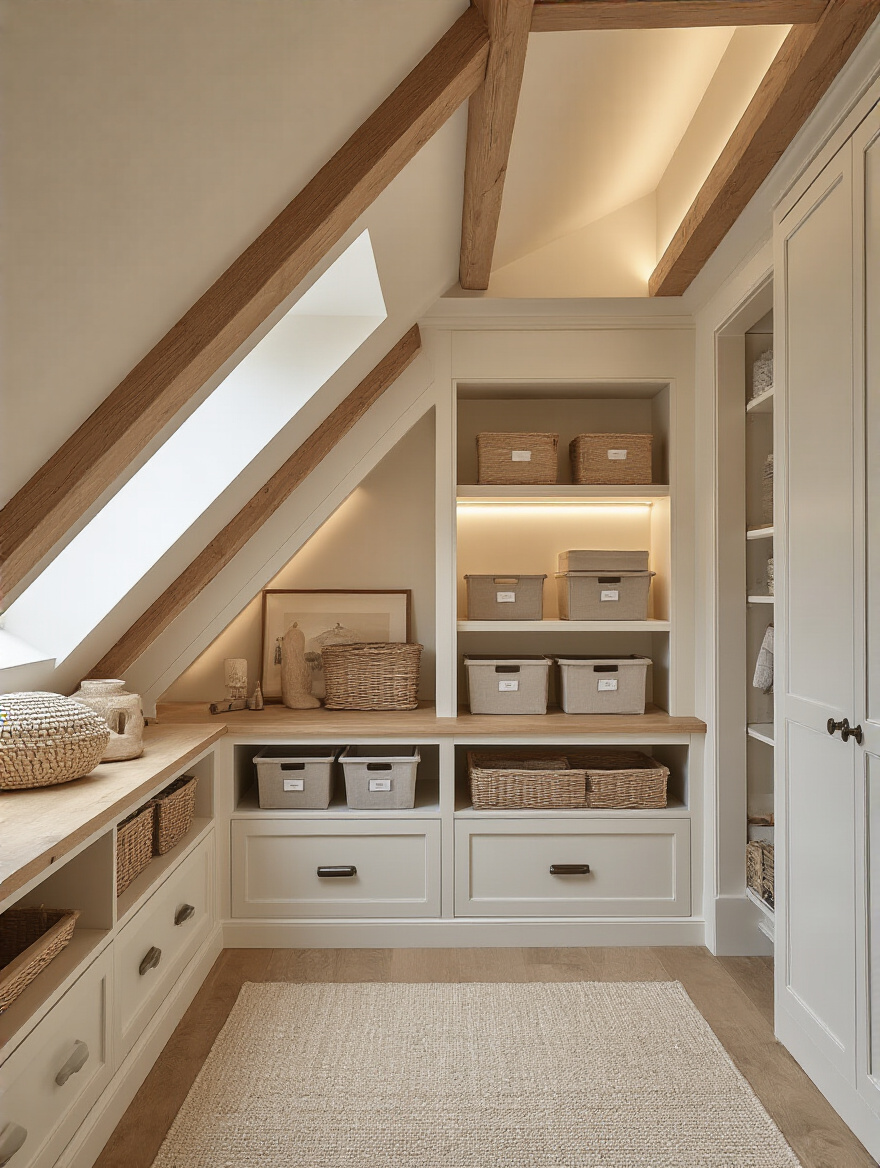
9. Utilize Knee Walls for Hidden Storage or Built-in Seating
Those short little walls under the slope of the roof are called knee walls, and they are pure gold. Most people see them as dead space. I see them as a massive opportunity for some of the best storage in your house. Instead of having a bulky dresser eating up precious floor space, you can install built-in drawers directly into the knee wall. Or create cabinets with hinged doors. Or even build in a window seat with a lift-up top.
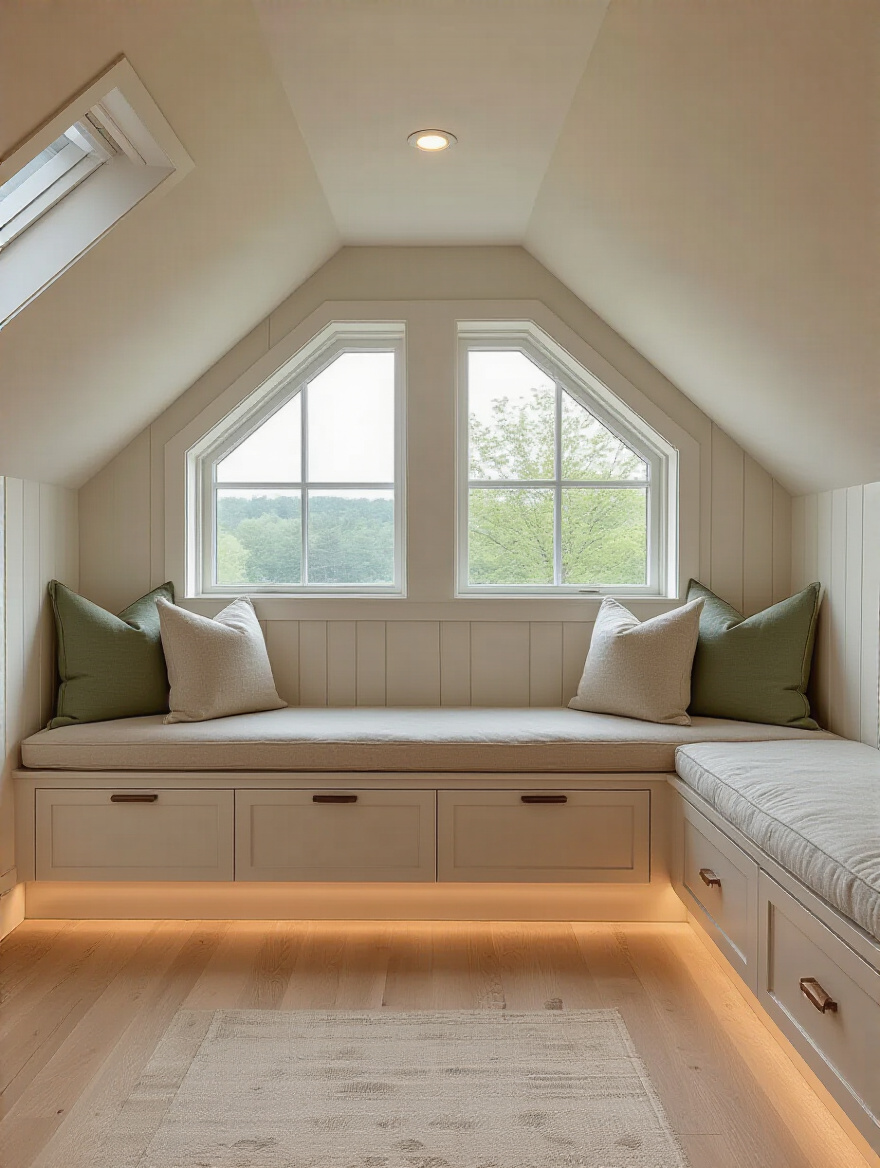
This is a shortcut to a clutter-free room. I once worked with a family who used this trick to create a wall of deep pull-out drawers for all their kids’ toys. The main floor of the room stayed completely clear for play. By integrating storage directly into the architecture, you maintain clean lines, maximize your floor plan, and create that “a place for everything” sense of order that is so crucial for a restful mind.
Next, we’ll use a simple but powerful trick to make the entire space feel bigger.
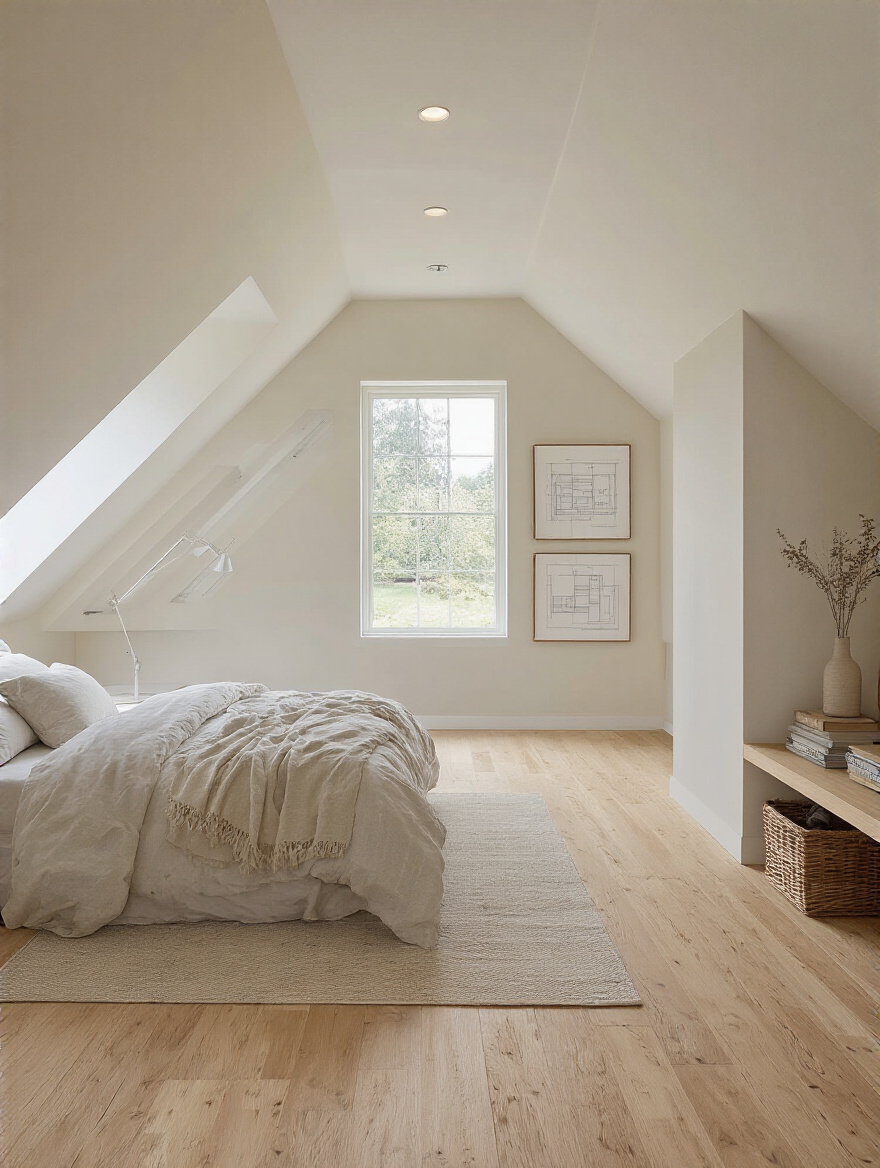
10. Employ Light Paint Colors to Visually Expand Room Dimensions
This sounds like basic advice, but in an attic, it’s mission-critical. Everyone says to paint small rooms white, but here’s the real pro move: paint the walls, the sloped ceilings, and the flat ceiling all the same light color. This blurs the lines where the walls end and the ceilings begin. The angles and corners soften, and your eye perceives the space as one continuous, expansive volume.
This simple trick can make a room feel 20-30% larger. You are essentially tricking the brain by removing the visual cues that define the room’s boundaries. A soft white, a pale grey, or a warm beige creates a serene, cloud-like atmosphere. It’s less about a specific color and more about creating a seamless, light-reflecting envelope that feels boundless and airy.
To amplify that effect, we’re going to bring in the ultimate tool for creating illusory space.
11. Strategically Place Mirrors to Amplify Light and Depth
A large mirror is like adding a new window for a fraction of the cost. The key is strategic placement. Don’t just hang one anywhere. Place a large, full-length mirror directly opposite your main window or skylight. It will capture all that natural light and bounce it deep into the room, effectively doubling your light source and illuminating dark corners.
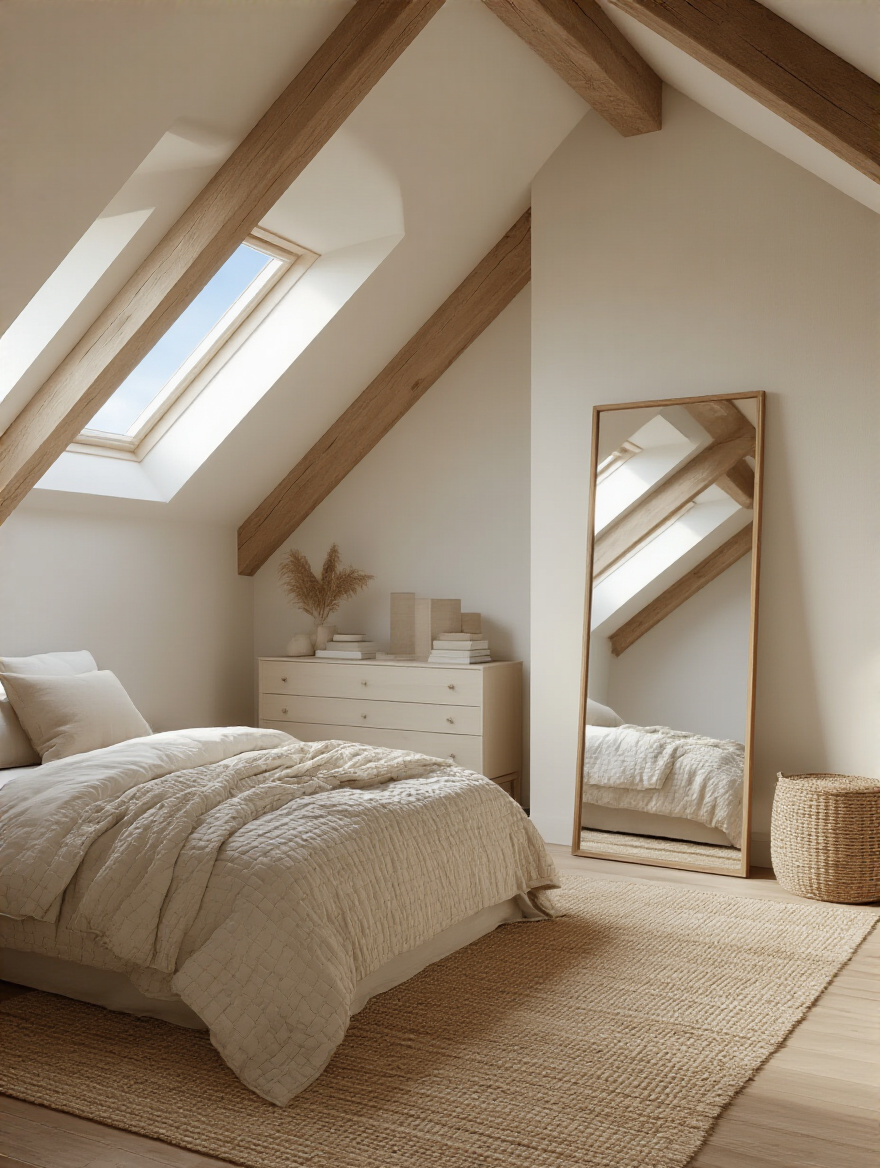
Mirrors also create a profound illusion of depth. Leaning a tall mirror against a wall or using mirrored closet doors can make a narrow room feel twice as wide. The reflection breaks up the solid plane of the wall and suggests a whole other space beyond. In an attic, which can sometimes feel enclosed, this is a powerful way to create a sense of openness and prevent any feeling of being boxed in.
Smart Design & Bespoke Storage Solutions
Attics demand cleverness. Because the space is unconventional, off-the-shelf solutions often don’t work. This is an invitation to get creative and design bespoke solutions that make the room hyper-functional and uniquely yours.
12. Integrate Custom Built-in Wardrobes Along Gable Walls
The gable wall—that flat, triangular wall at the end of the attic—is your prime real estate for a fantastic built-in wardrobe. A freestanding wardrobe will always look clunky and leave awkward, unusable gaps next to the sloped ceiling. A custom built-in, however, can be designed to fit the angle perfectly, using every single inch of space from floor to ceiling.
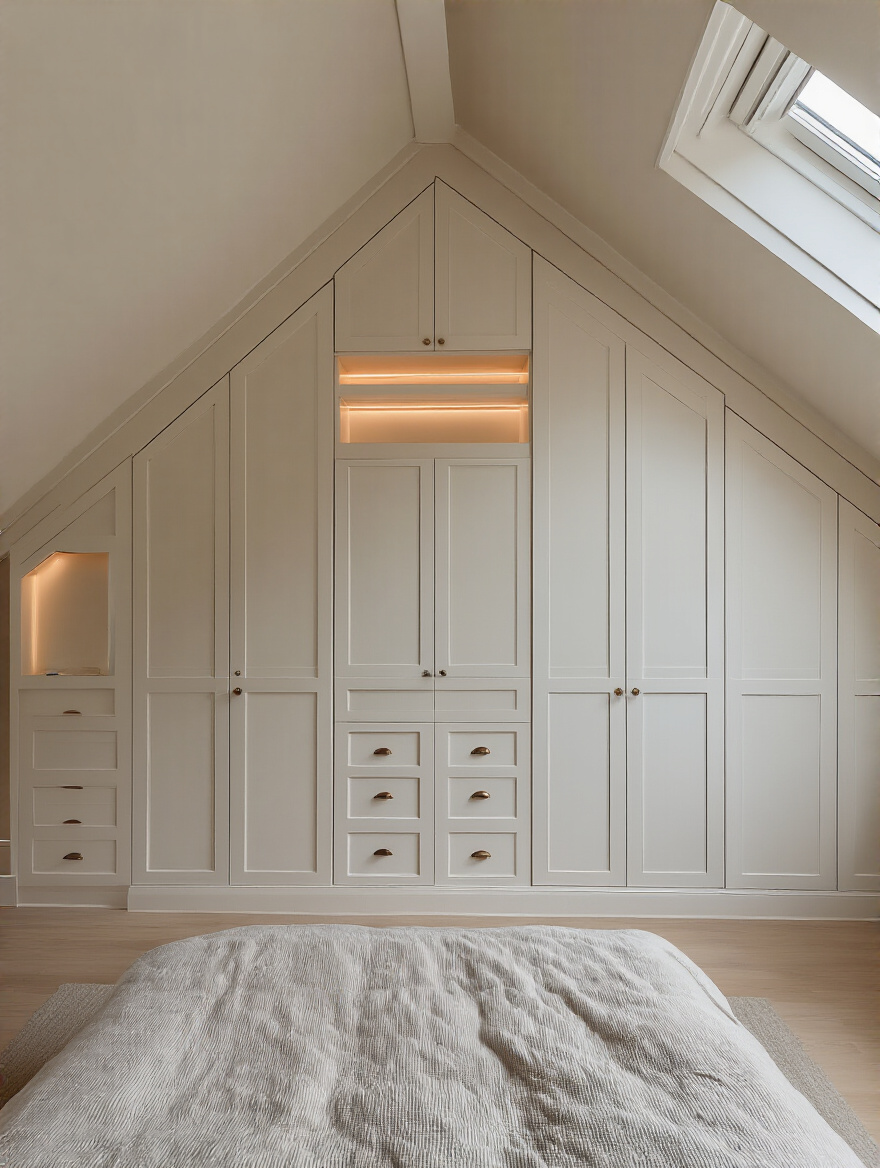
You can design the interior exactly for your needs—more hanging space, less shelving, dedicated shoe racks. The seamless, integrated look makes the entire room feel more high-end and intentional. It’s an investment, but the functional payoff of having a perfectly organized, non-cluttered wardrobe is immense for your daily routine and mental clarity.
Just as the gable wall is perfect for wardrobes, the smaller nooks and crannies are ideal for another type of built-in.
13. Design Bespoke Shelving Units to Fit Awkward Angles
You know that weird little corner where the roof meets the floor at a sharp angle? The one where nothing fits? That’s a perfect spot for a bespoke bookshelf or display niche. Instead of seeing it as a problem, see it as a design opportunity. A set of custom triangular shelves or a floating shelf that runs the length of a sloped wall can turn a “dead zone” into a stunning architectural feature.
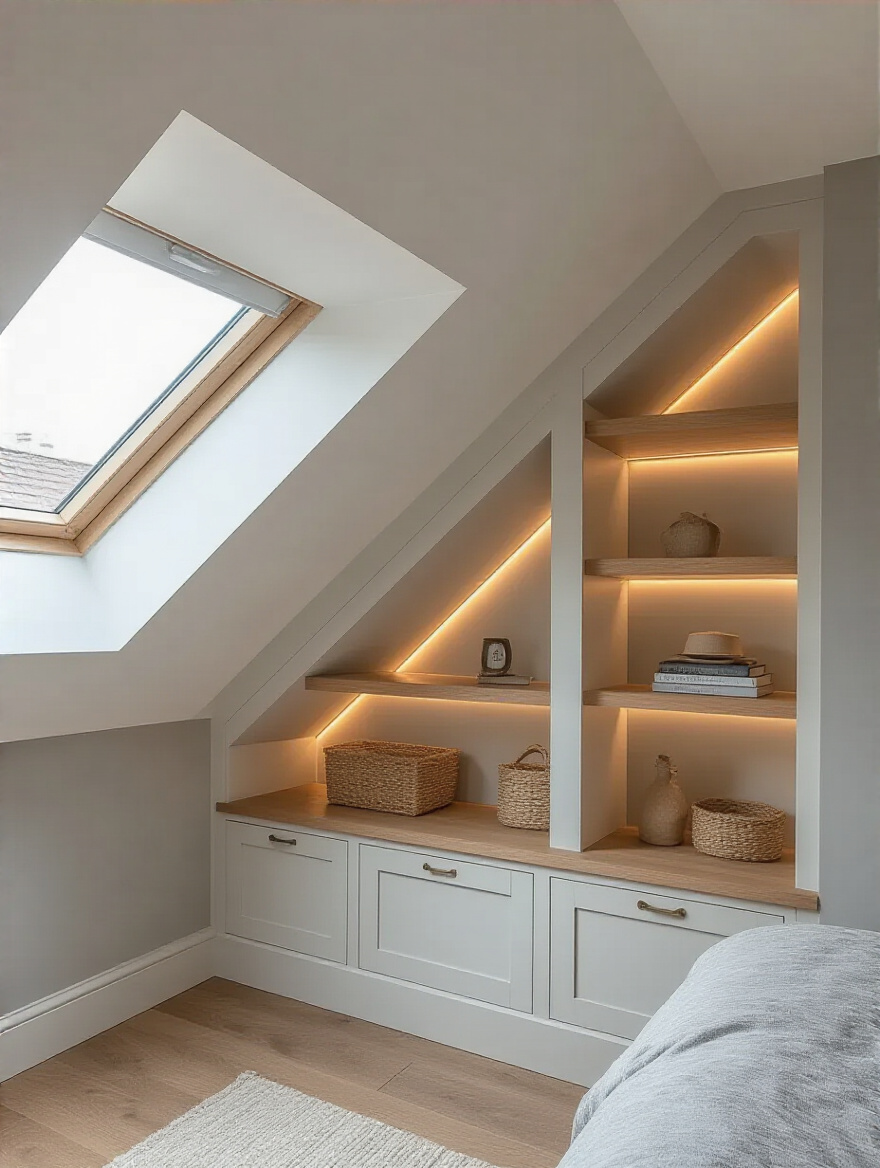
This is where you can display your most cherished objects—the books, photos, and art that make a space feel like yours. By building shelving into the quirks of the room, you celebrate its unique character. You’re not just storing things; you’re creating a built-in gallery of your life story.
As we furnish the room, we need to think about silhouette and how it impacts the feeling of space.
14. Choose Low-Profile Furniture to Maximize Headroom Space
Because attic ceilings are often low or sloped, high-profile furniture can make the room feel cramped and top-heavy. The solution is to keep your furniture low to the ground. Think platform beds, low-slung modular sofas, and short, wide credenzas instead of tall, narrow dressers.
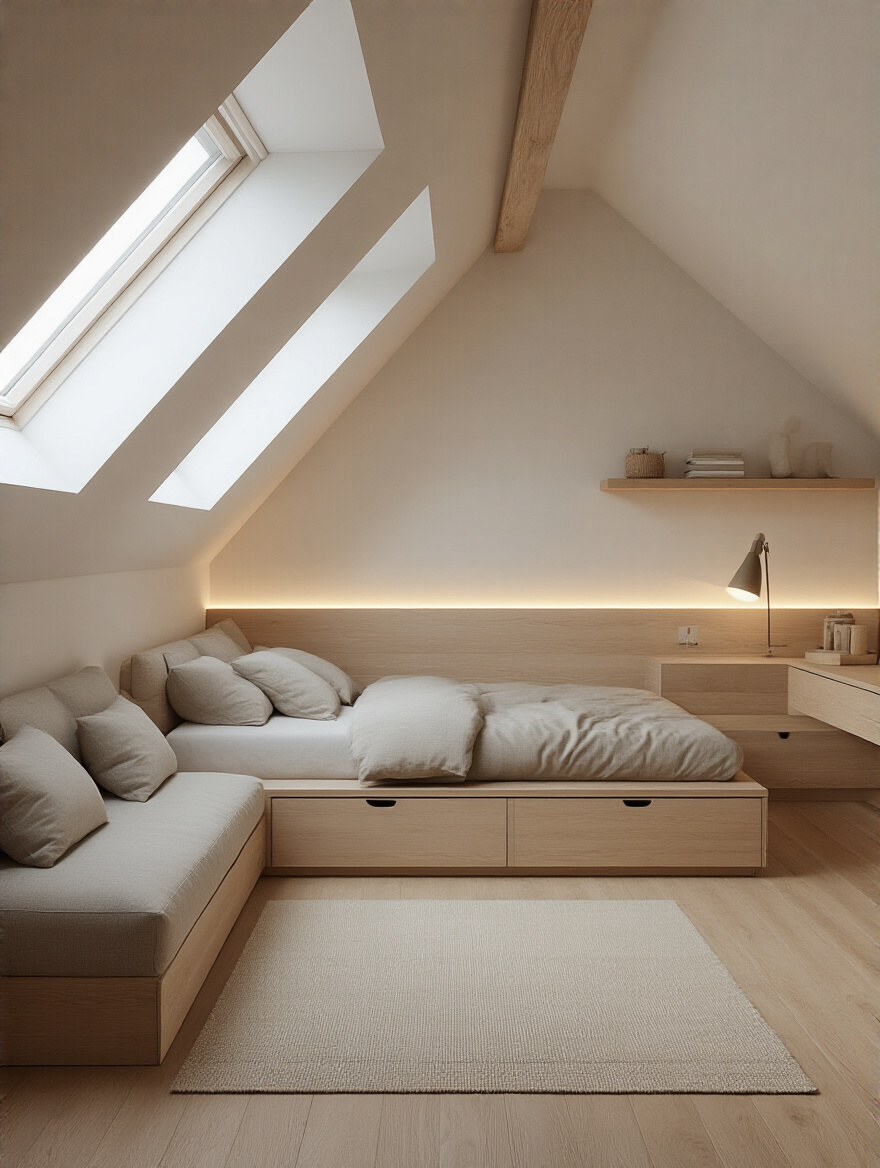
This simple choice has a huge psychological impact. When the furniture is low, the vertical space above it feels much taller and more expansive. Your eye has more room to roam, and the entire space feels airier and less constricted. This allows you to place furniture in areas you might have otherwise avoided, maximizing your floor plan and ensuring you never feel like you have to duck.
Next, we’ll take that smart furniture choice and make it even smarter.
15. Select Multifunctional Pieces Like Storage Ottomans or Daybeds
In a space where every square foot counts, every piece of furniture should be a workhorse. A storage ottoman is not just a place to put your feet up; it’s a hidden chest for extra blankets and pillows. A daybed isn’t just a sofa; it’s a guest bed and often has storage drawers underneath.
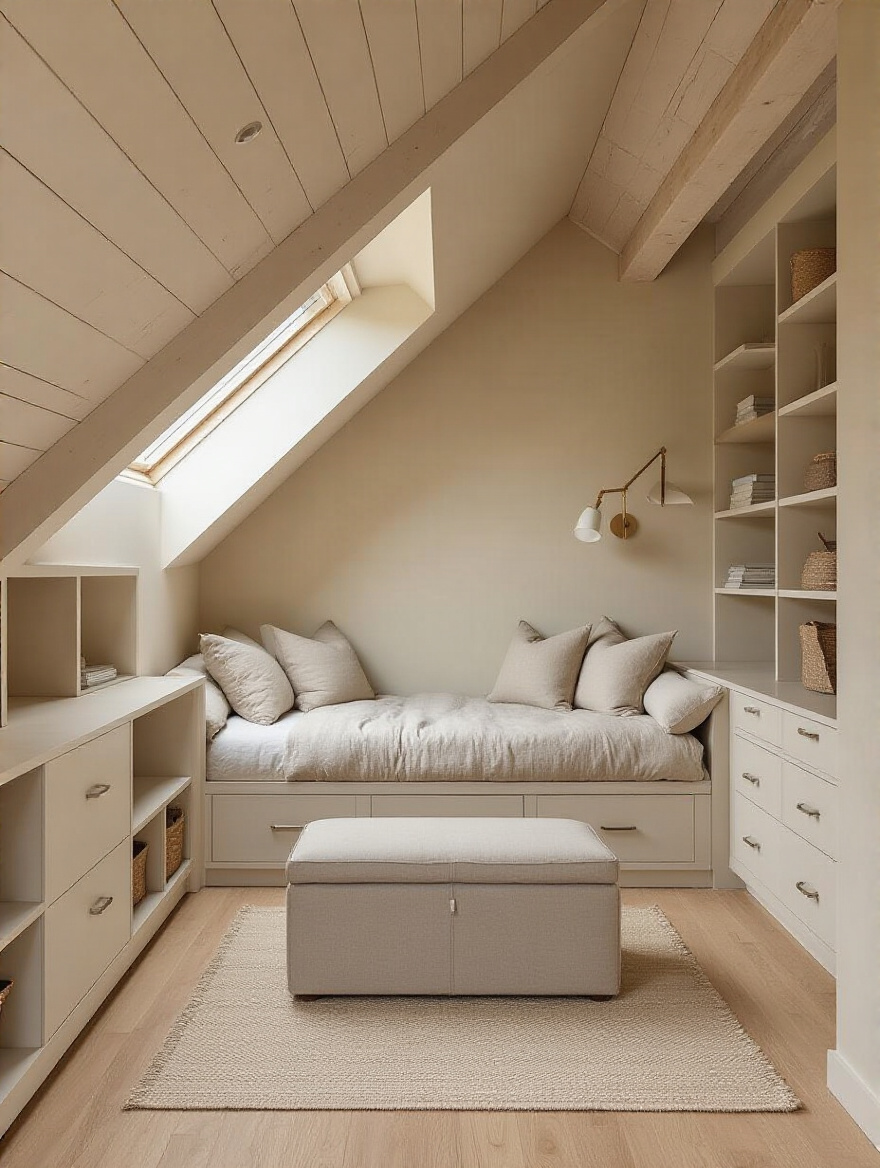
I once worked with a client creating a combined guest room and home office in her attic. We chose a beautiful daybed that served as a couch for daily use. We also found a stylish coffee table that could be raised to become a functional desk. With two smart pieces, we created three distinct functions—lounge, office, and guest room—without cluttering the space with single-use furniture.
This principle of multifunctionality naturally leads to creating clear zones within the room.
16. Create Defined Zones for Sleep, Work, or Relaxation
Even in an open-plan attic, you can create the feeling of separate rooms. This isn’t about building walls; it’s about using subtle design cues to define different zones for different activities. A large area rug can anchor a “living room” zone with a daybed and a chair. Placing a desk in a dormer nook with its own task light creates a clear “work” zone. Your bed, tucked under the eaves, is its own “sleep” zone.
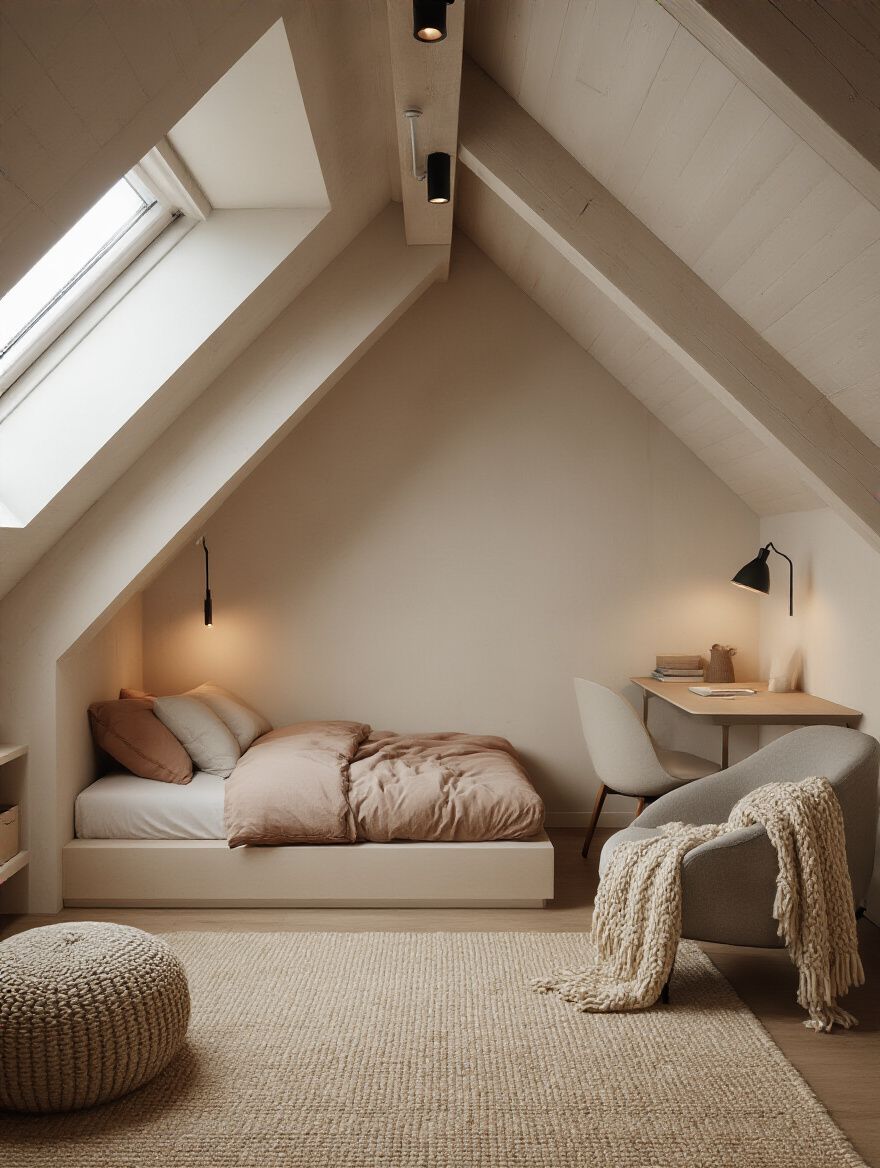
This is incredibly important for your mental well-being. When your brain learns that a specific area is for a specific activity, it can transition more easily. It’s easier to focus at your “work” desk and easier to switch off and relax in your “lounge” area. This psychological separation is key to making a single room support multiple aspects of your life without feeling chaotic.
Now let’s go back to one of the best tricks for maximizing storage in a way that feels invisible.
17. Incorporate Under-Eaves Storage for Seasonal or Seldom-Used Items
Beyond the built-in drawers in the knee walls, the deep space under the eaves is the perfect hiding spot for things you don’t need every day. Think holiday decorations, seasonal clothes, or bulky luggage. By installing simple access panels or custom-built rolling carts that slide deep into the eaves, you can utilize this vast, hidden space.
This is the ultimate decluttering strategy. It allows you to keep the main living area of your attic bedroom serene and minimalist because all the “stuff” is tucked away out of sight but still easily accessible. You gain an enormous amount of storage without sacrificing an inch of visible floor space.
Ensuring Year-Round Comfort & Aesthetic Appeal
We’ve made the space smart, functional, and bright. Now, let’s make it a truly comfortable haven—a place that feels as good as it looks, no matter the season.
18. Prioritize Superior Insulation for Temperature Regulation and Soundproofing
If there’s one thing everyone gets wrong about attics, it’s underestimating the need for superior insulation. An attic is on the front lines of your home’s battle with the elements. It gets the hottest in the summer and the coldest in the winter. Investing in high-quality insulation (like closed-cell spray foam) is the single most critical factor for year-round comfort.
But here’s the wellness secret: insulation is also for soundproofing. The right insulation will muffle the sound of rain on the roof, traffic from a nearby street, or planes overhead. It creates a quiet, peaceful cocoon. The combination of stable temperature and acoustic serenity is what elevates a room into a true sanctuary. This isn’t just about comfort; it’s about creating an environment that supports deep, restorative sleep.
Insulation is the passive system for comfort; now we need the active system.
19. Install Efficient HVAC or Mini-Split Systems for Climate Control
Your home’s central HVAC system was likely not designed to handle the extra load of a new, top-floor room. Extending ducts is often inefficient and can lead to poor performance. A ductless mini-split system is almost always the best solution for an attic bedroom. It’s incredibly energy-efficient and gives you precise, zoned control over the temperature in that one room.
This is about more than just staying warm or cool. Consistent temperature and humidity control are vital for healthy living. Modern mini-splits also have advanced filtration systems, which means you’re not just conditioning the air, you’re cleaning it. For anyone with allergies or sensitivities, this is a massive wellness upgrade, creating a space with excellent indoor air quality.
Now let’s illuminate our comfortable, quiet space in a way that supports our mood and biology.
20. Use Strategic Lighting Fixtures for Ambiance and Functionality
Never, ever rely on a single light fixture in the middle of the ceiling. It creates harsh, unflattering light and leaves the corners in shadow. A truly well-lit room has layers of light.
- Ambient: This is your general, overall light. Low-profile recessed lights or a beautiful flush-mount fixture can provide this.
- Task: This is focused light for activities. A reading lamp by your bed, a desk lamp, or lighting over a vanity mirror.
- Accent: This is the jewelry. Think of a light that highlights a piece of art or uplighting that washes a wall with a soft glow, making the room feel taller.
And here’s the crucial wellness component: put everything on a dimmer. This allows you to tailor the light to your needs and your body’s natural rhythm. You can have bright, energizing light in the morning and transition to a soft, warm, relaxing glow in the evening to prepare your body for sleep. It’s a simple tool with a profound impact on your well-being.
With the room lit beautifully, the final sensory layer is touch.
21. Select Textures and Fabrics to Enhance Warmth and Coziness
An attic, with its hard angles, can sometimes feel a bit stark. The fastest way to soften it and create a sense of cozy warmth is through texture. Think about how things feel. A deep-pile wool rug underfoot, a soft velvet throw on the bed, heavy linen curtains, and plush, nubby pillows.
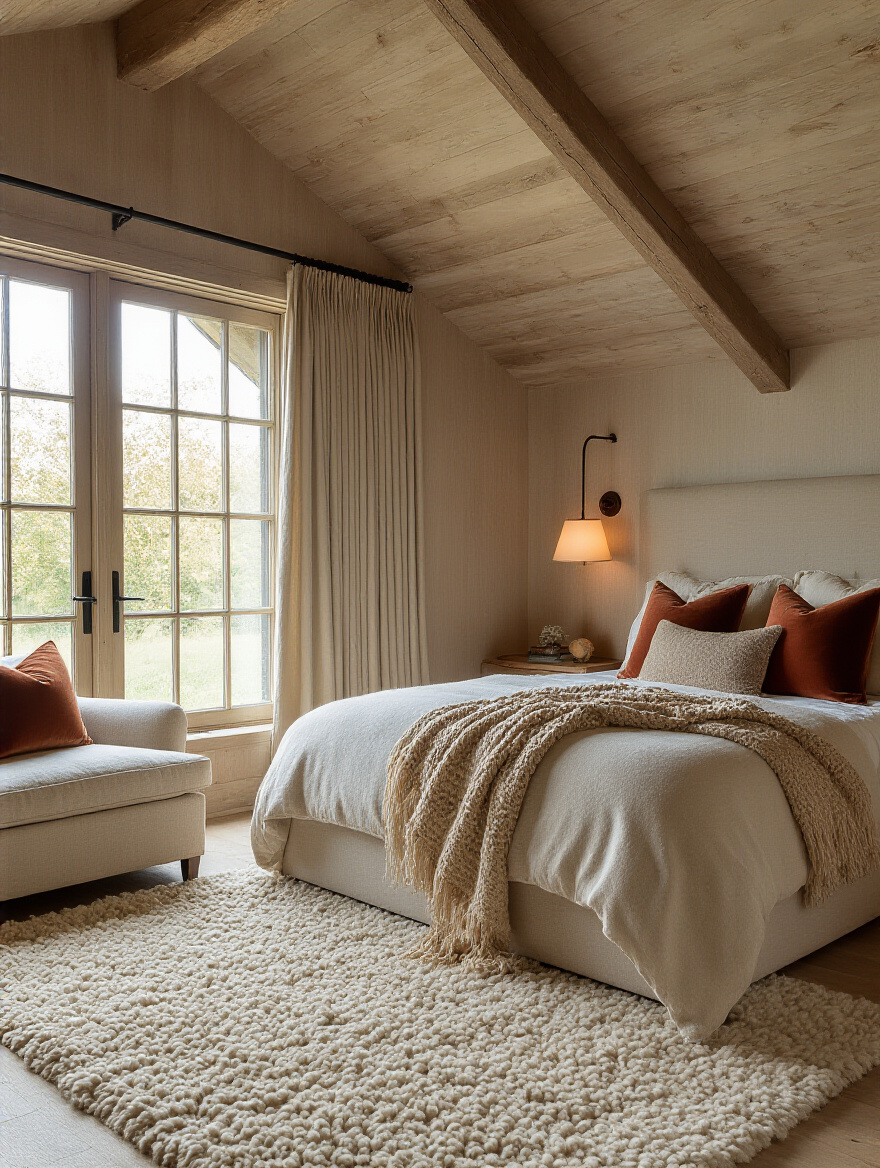
These textures do more than just feel good to the touch. They also absorb sound, further enhancing the acoustic peace of the room. Visually, they add depth and interest, making the space feel richer and more inviting. Layering different natural materials—wool, cotton, linen, wood—creates a tactile environment that feels grounded, comfortable, and deeply human.
And finally, the step that makes this sanctuary truly yours.
22. Incorporate Personal Touches and Decor Elements for Unique Style
This is the soul of the room. A space can be perfectly designed, but it doesn’t become a sanctuary until it reflects you. This isn’t about following trends; it’s about surrounding yourself with things that have meaning. Frame that photo from a trip you loved. Display the weird ceramic vase you found at a flea market. Hang your grandfather’s old hat on the wall.
These personal artifacts are what make a house a home. They tell your story. In a retreat space like an attic bedroom, they serve as gentle, daily reminders of who you are, what you love, and where you’ve been. Don’t rush this part. Let the room evolve with you. It’s this final, deeply personal layer that completes the transformation from an attic into your own private haven.
Conclusion
Transforming an attic is more than a renovation; it’s an act of claiming space for yourself. It’s about carving out a piece of your home that is dedicated purely to rest, restoration, and well-being. By focusing first on the foundational elements that create peace of mind—structure, safety, and comfort—and then layering in the light, functionality, and personal touches that bring joy, you can create a room that truly supports your health and happiness.
Forget the idea of a perfect, magazine-ready room. Instead, focus on creating a space that feels like a deep exhale. A space that is a true reflection of you and a sanctuary from the demands of the outside world. This attic bedroom isn’t just adding square footage to your house; it’s adding a restorative dimension to your life.