You know what drives me absolutely nuts? It’s the same problem I see in landscape design as I do inside the home. People treat the symptoms, not the cause. They’ll buy a new pot to hide a struggling plant instead of fixing the soil, or in the kitchen, they’ll buy a cute basket to cram more chaos into a cabinet that’s fundamentally broken. It’s just shuffling clutter around.
Your kitchen isn’t just a room; it’s the command center for your entire living space, especially the parts that flow outdoors. It’s the place you grab plates for the deck, mix drinks for the patio, and prep burgers for the grill. When it’s chaotic, that chaos bleeds into every other part of your life. A cluttered kitchen is a bottleneck that stifles the natural, easy flow between inside and out. But we can fix that. It’s not about buying more stuff—it’s about creating a system that works with you, a kind of natural ecosystem where everything has its place and purpose.
Strategic Planning for Cabinet Harmony (Part 1)
Before you buy a single bin or divider, we need to do the groundwork. You wouldn’t build a deck without surveying the land, and you can’t organize a kitchen without a clear plan. This is the part everyone wants to skip, and it’s the only part that actually guarantees success. This is where we create the foundation for a system that lasts.
1. Assess Cabinet Contents Thoroughly: Uncover Hidden Potential
Think of this as weeding a garden bed. You can’t just move the weeds around and hope for the best; you have to pull everything out to see what’s good, what’s choking out the good stuff, and what’s just plain dead. So, empty one cabinet at a time. Put everything out on the counter where you can see it. It’s the only way to get an honest look at the three duplicate whisks and the jar of saffron from 2012 you’re hoarding.
Once it’s all out, be ruthless. Sort into four piles: Keep, Donate, Trash, and Relocate (that stray screwdriver doesn’t belong next to the soy sauce). The real work is with the “Keep” pile. Pick up each item and ask yourself, “When was the last time I used this?” If it’s been over a year, it’s probably a weed. Don’t just rearrange clutter; remove it. That’s the only way to reclaim the space you already have.
Getting rid of the excess is the first step toward clarity. But now that you’re left with only what you truly need and use, the next logical move is to stop seeing it as a pile of stuff and start seeing it as a collection of families.
2. Group Like Items Logically: Streamline Retrieval Efficiency
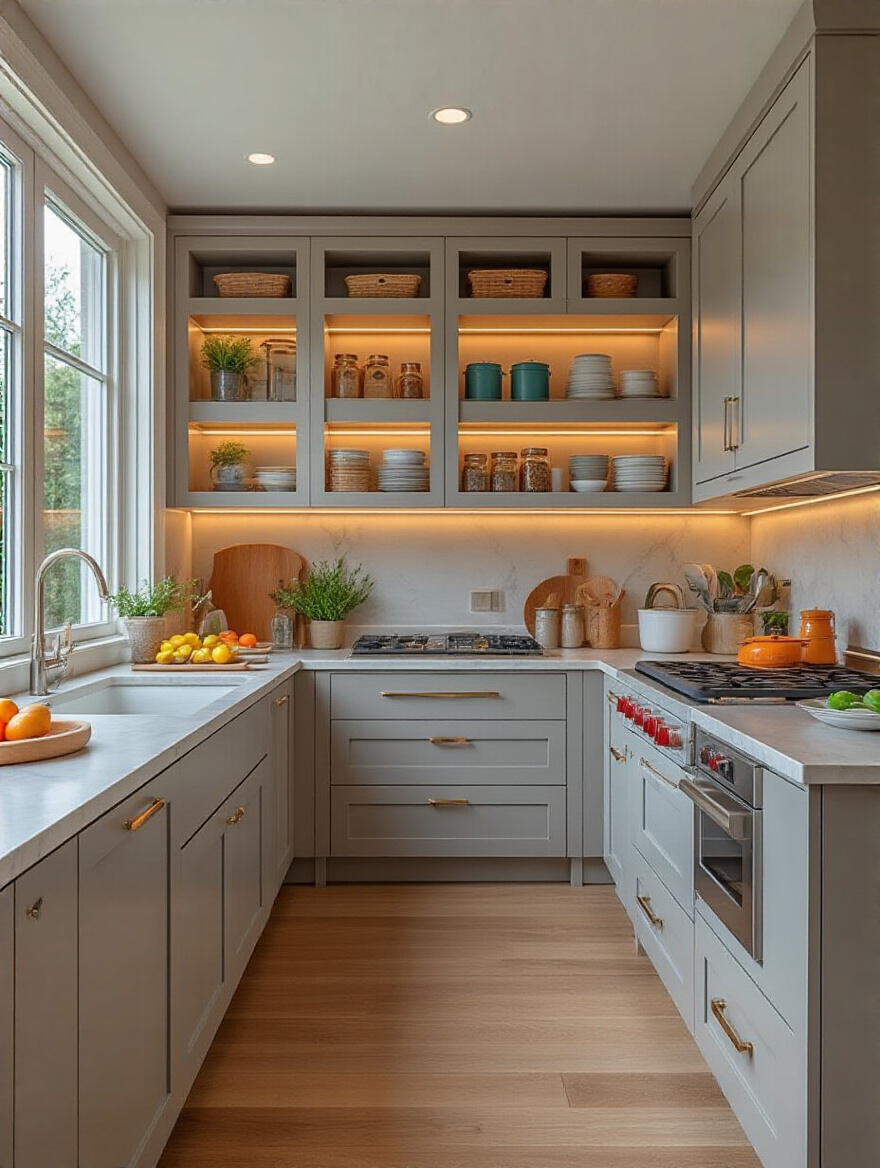
Now you’re working with your essentials. The goal here is to create logical “plant families.” You wouldn’t scatter your herbs all over the garden; you’d put them together. Same goes for your kitchen. All the baking supplies—flour, sugar, vanilla, baking soda—belong together in a dedicated baking zone. All the oils, vinegars, and spices you use for cooking belong near the stove. Coffee and tea supplies get their own station.
This isn’t just about being tidy; it’s about creating an intuitive workflow. When you’re in the middle of cooking, you don’t want to go on a scavenger hunt. You want to be able to reach, almost without thinking, and grab what you need. Think in zones: the Prep Zone (knives, cutting boards), the Cooking Zone (pots, pans, utensils), and the Serving Zone (plates, glassware). This turns your kitchen from a storage closet into a functional workshop.
You’ve got your zones mapped out, which is fantastic. But before you start shopping for the perfect spice rack, there’s a critical, non-negotiable step that separates a successful project from a pile of plastic returns.
3. Precisely Measure Interior Spaces: Ensure Organizer Compatibility
I once watched a client try to install a gorgeous, pre-fabricated outdoor kitchen island, only to realize it was two inches too wide to fit the stone patio they’d just laid. It was a costly, soul-crushing mistake born from assumption. Don’t let that happen to your cabinets. Never, ever buy an organizer without measuring first. And I don’t mean a quick glance. I mean getting a real tape measure and getting exact numbers.
Measure the width, the depth, and the height of the interior space. But here’s the part everyone forgets: you have to account for obstacles. That means measuring the clearance around the door hinges, any pipes under the sink, and the lip of the cabinet frame itself. That half-inch lip can be the difference between a sliding drawer that glides beautifully and one that won’t even fit through the opening. Write these numbers down, take them with you, and treat them as gospel.
With precise measurements in hand, you’re ready to think about placement. But where you put things is just as important as how you store them. It’s all about creating a landscape that works for you every single day.
4. Prioritize Usage Frequency: Place Essentials Within Reach
In landscape design, we have a concept called “desire paths”—the worn-down shortcuts people create in the grass because the paved path is inconvenient. Your kitchen works the same way. You’ll naturally create patterns based on what’s easiest. So, let’s design for that from the start. Your most-used items are your prime real estate. They should live at eye level or waist level, right where you can grab them without thinking.
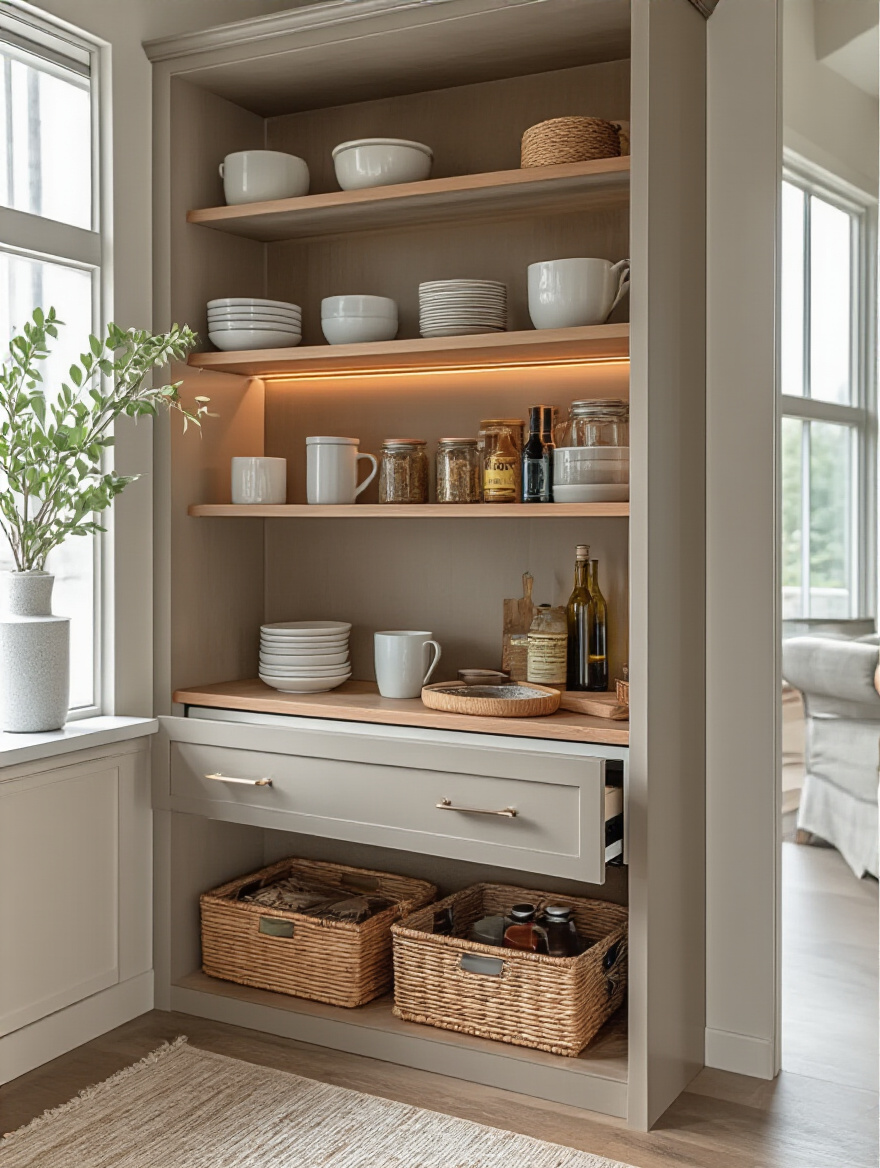
Your daily coffee mugs, the olive oil you cook with every night, your favorite chef’s knife—these are the things that belong in the most accessible spots. The turkey platter you use once a year? That can go on the highest shelf. The waffle maker for lazy Sunday mornings? Back of a deep cabinet. Stop giving your holiday-only gear the best spot in the house. Arrange your kitchen based on the rhythm of your actual life, not the one you imagine you have. This single change will reduce daily friction more than anything else.
Strategic Planning for Cabinet Harmony (Part 2)
Okay, you’ve done the hardest part—the mental work of sorting, measuring, and planning your zones. Now we can get into the practical side of things. This is where we ensure the project not only succeeds but does so in a way that respects your resources and genuinely solves the problems that have been bugging you for years.
5. Define an Organizer Budget: Make Smart, Value-Driven Choices
It’s easy to get mesmerized by those perfect pantries on social media, filled with hundreds of dollars worth of matching acrylic containers. But a functional space doesn’t have to be a flashy one. Before you buy anything, set a realistic budget. Being constrained by a budget forces you to be more creative and to focus on what truly matters.
Start by allocating funds to solve your biggest pain points first. If the pots and pans cabinet is a daily nightmare, invest in a heavy-duty pull-out organizer there. If the spices are manageable for now, maybe a simple tiered riser is good enough. Don’t blow your whole budget on making one corner of your pantry look like a magazine spread while the rest of your kitchen remains a disaster. A smart budget isn’t about spending less; it’s about spending smart and getting the highest functional return on your investment.
Having a budget helps you prioritize. And the best way to prioritize is to know exactly what problem you’re trying to solve. Without that, you’re just shopping.
6. Identify Problem Areas: Solve Storage Pain Points First
Every single kitchen has that one cabinet. You know the one. The one you dread opening. Maybe it’s the corner cabinet where things go to die, or the Tupperware drawer where a lid avalanche is a constant threat. This is your “Zone Zero.” This is where you start.
Don’t try to tackle everything at once. That’s a recipe for overwhelm and an unfinished project. Instead, identify the single biggest source of daily frustration in your kitchen. Is it finding a matching lid for your food container? Is it the cacophony of falling baking sheets every time you reach for one? Whatever it is, focus your energy and your budget on solving that one problem completely. The momentum and satisfaction you get from fixing your worst pain point will fuel you to tackle the rest. It’s like clearing out the most invasive weeds first; it makes the rest of the garden so much easier to manage.
Maximizing Accessibility with Smart Organizers (Part 1)
Now for the fun part. We’ve got a plan, a budget, and a target. It’s time to choose our tools. The right organizers are less about containment and more about accessibility. The goal is to make every item in your cabinet as easy to see and reach as if it were sitting on an open countertop. We want to eliminate “back of the cabinet” syndrome for good.
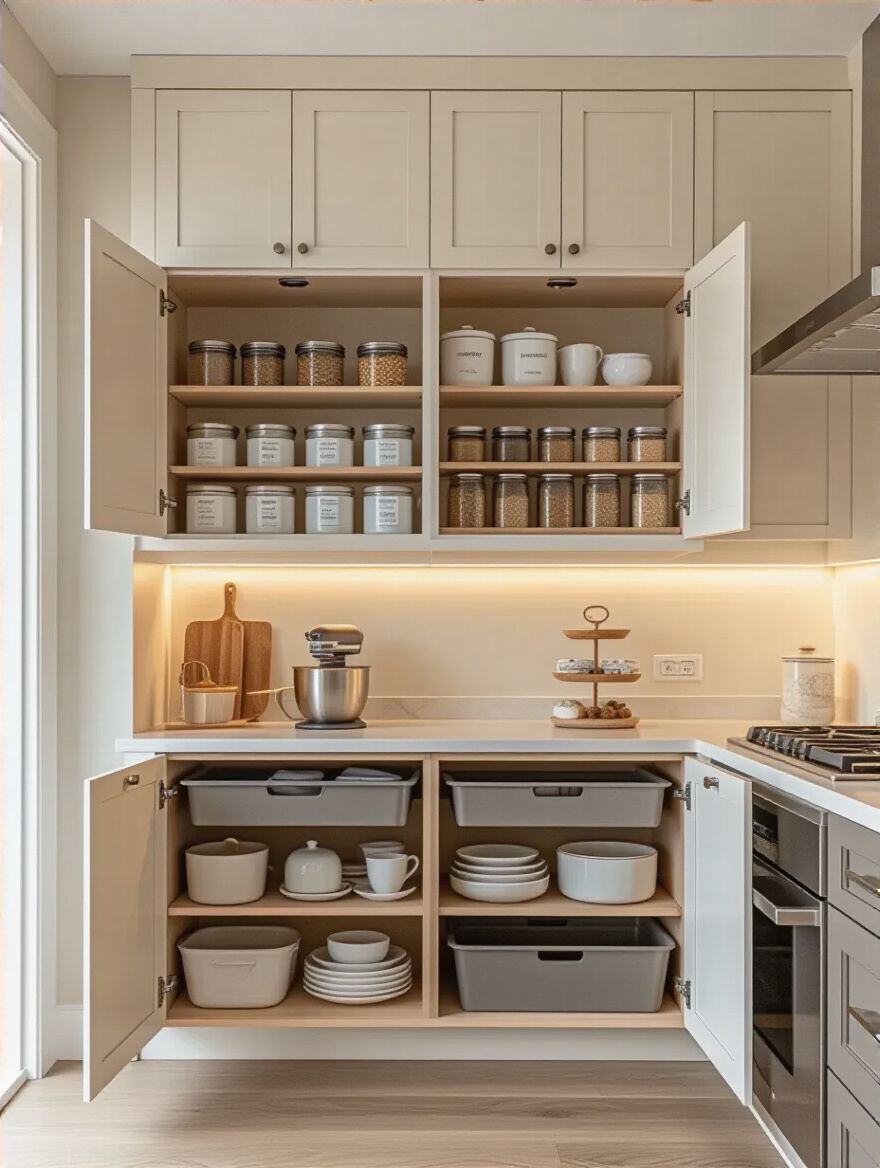
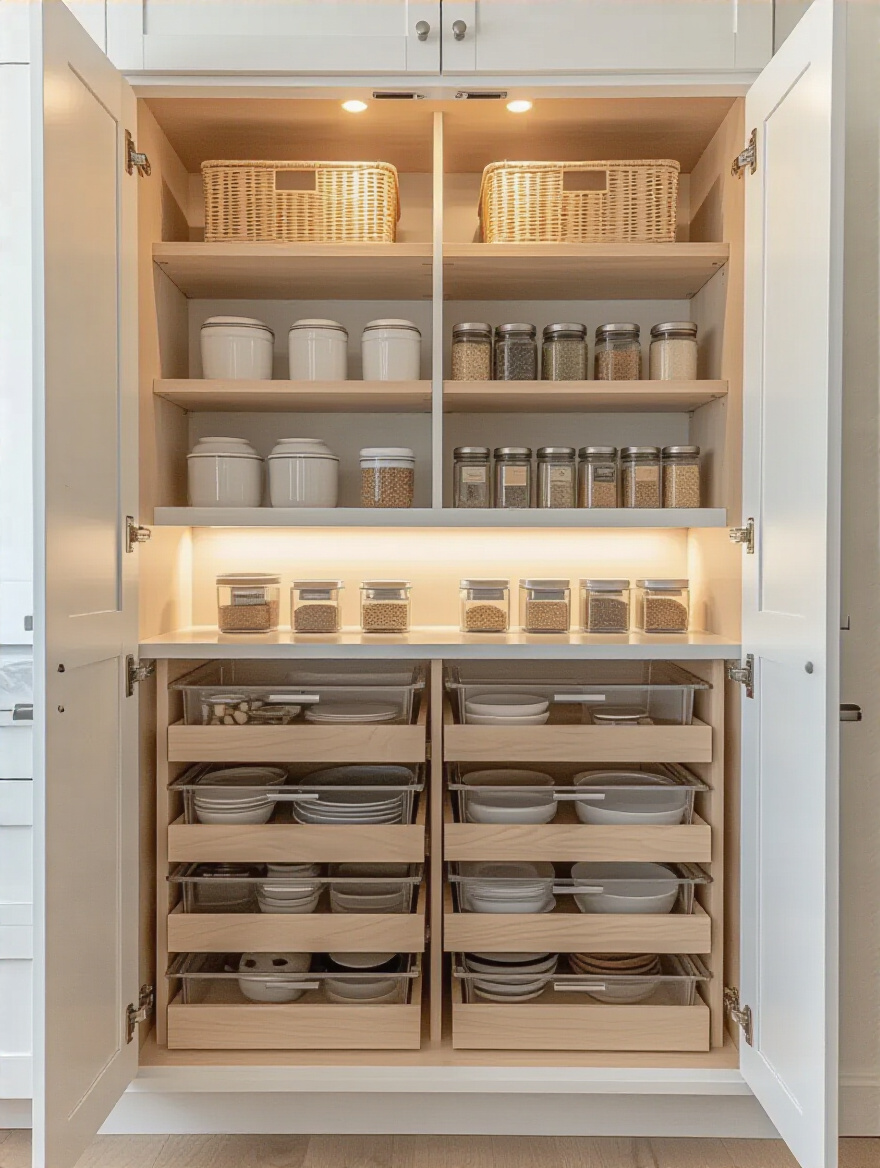
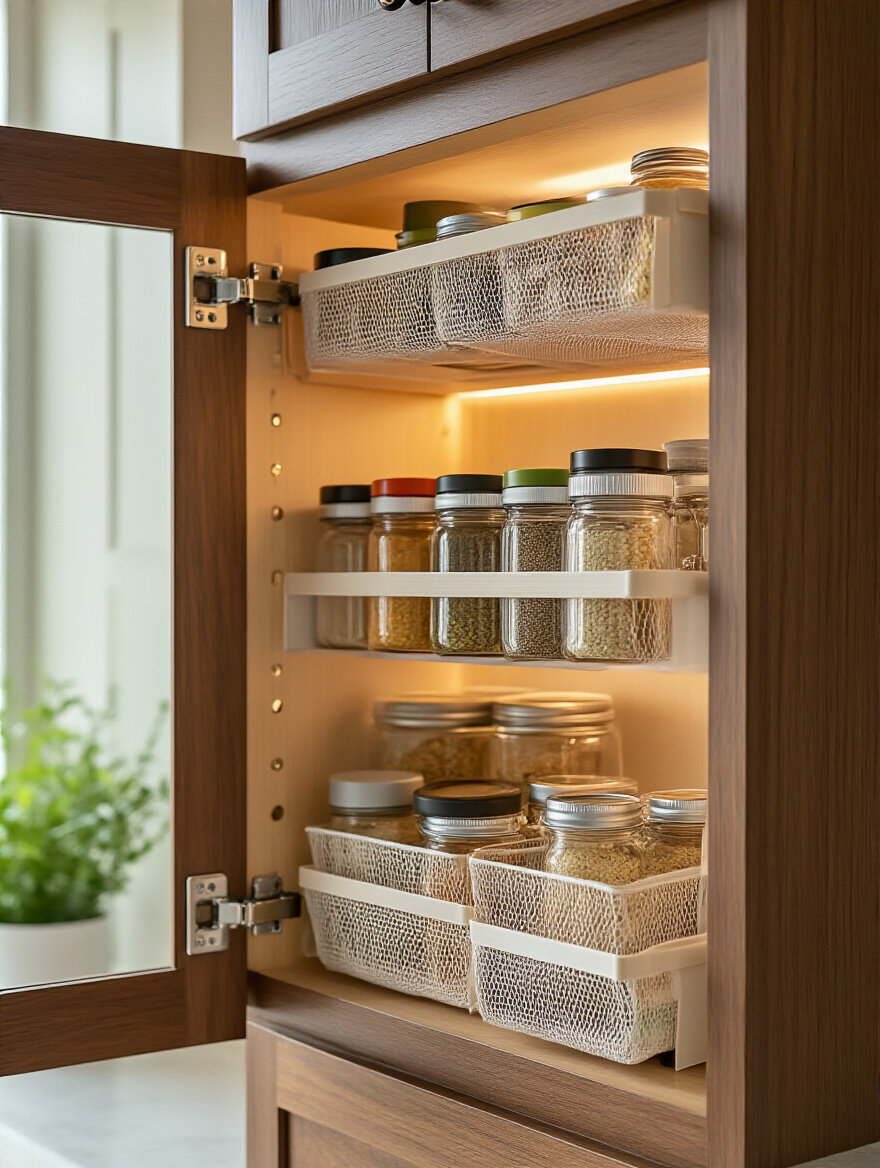
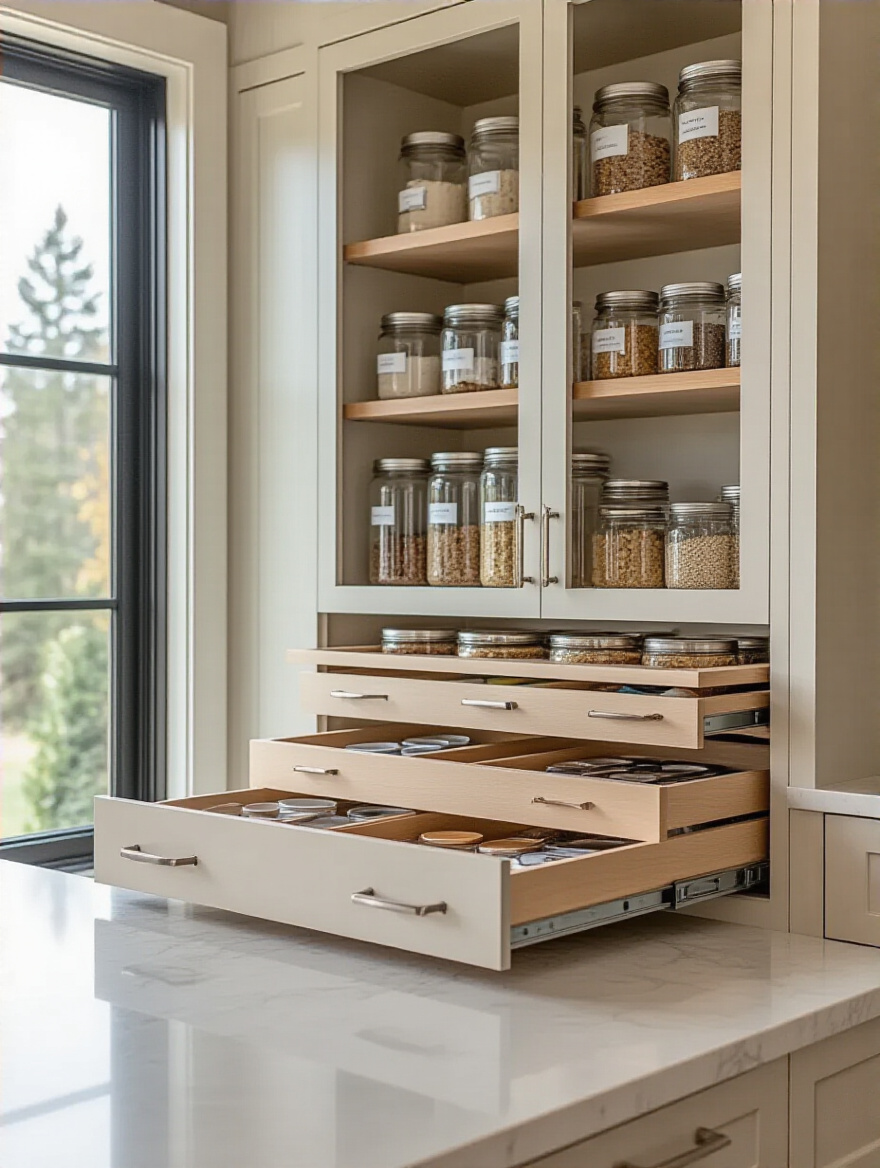
7. Integrate Pull-Out Drawers and Shelves: Eliminate Deep Cabinet Foraging
Base cabinets, especially the deep ones, are fundamentally flawed. They’re dark caverns where you have to get on your hands and knees with a flashlight just to find what you’re looking for. The absolute best way to fix this is with pull-out drawers and shelves. This isn’t just an organizer; it’s a total transformation of the space.
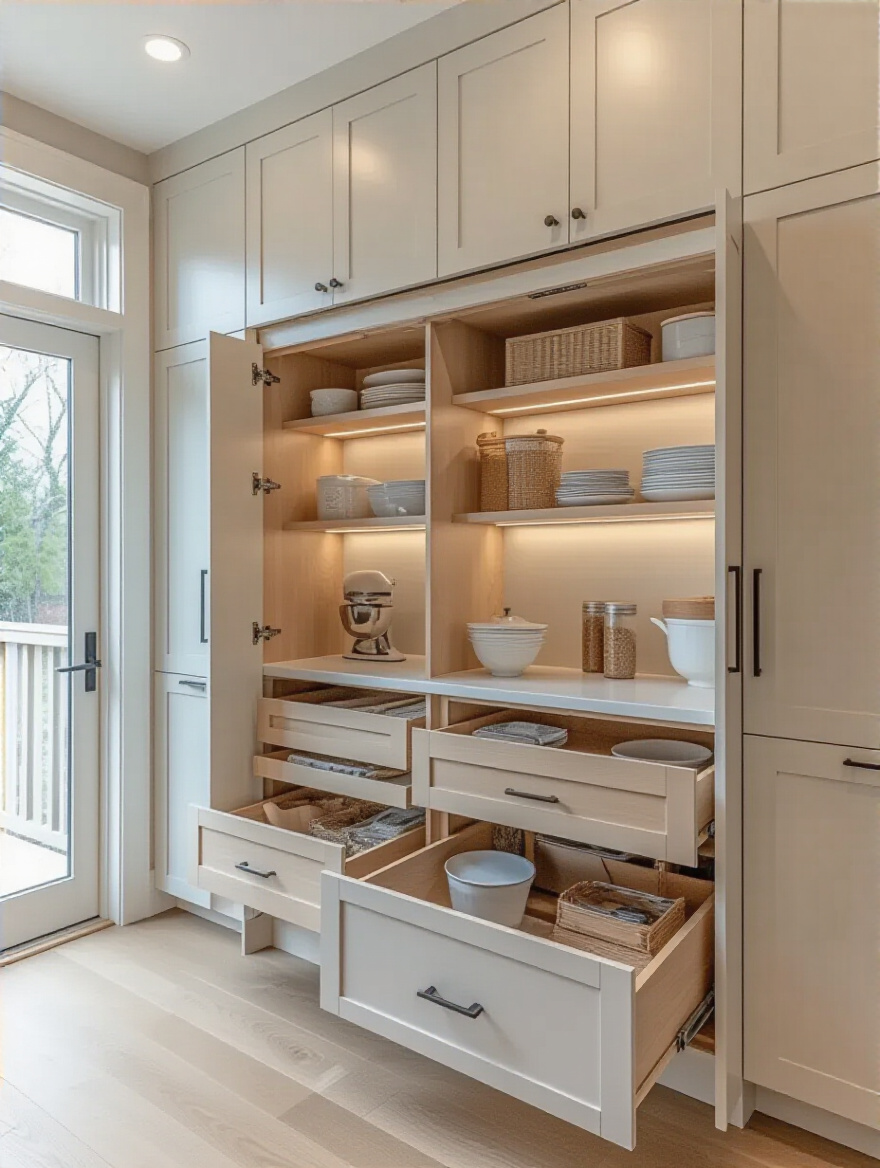
Instead of you reaching into the darkness, the shelf glides out and brings the contents to you, into the light. It instantly makes every single item—from the pot in the very back to the blender you thought you’d lost—100% accessible. For heavy items like pots, pans, and small appliances, this is a non-negotiable, ergonomic game-changer. It’s probably the single most impactful investment you can make in your kitchen’s daily function.
Bringing everything out into the light is a powerful first step. But within that newly accessible space, we can do even better by thinking vertically.
8. Optimize Vertical Space with Adjustable Dividers: Stack Smarter, Not Taller
Most cabinets come with one or two shelves, leaving huge, awkward gaps of unused vertical space. You end up with these precarious, wobbly stacks of bowls or mugs that you have to unstack just to get to the one you want. The solution is to create more levels with adjustable shelf dividers or risers.
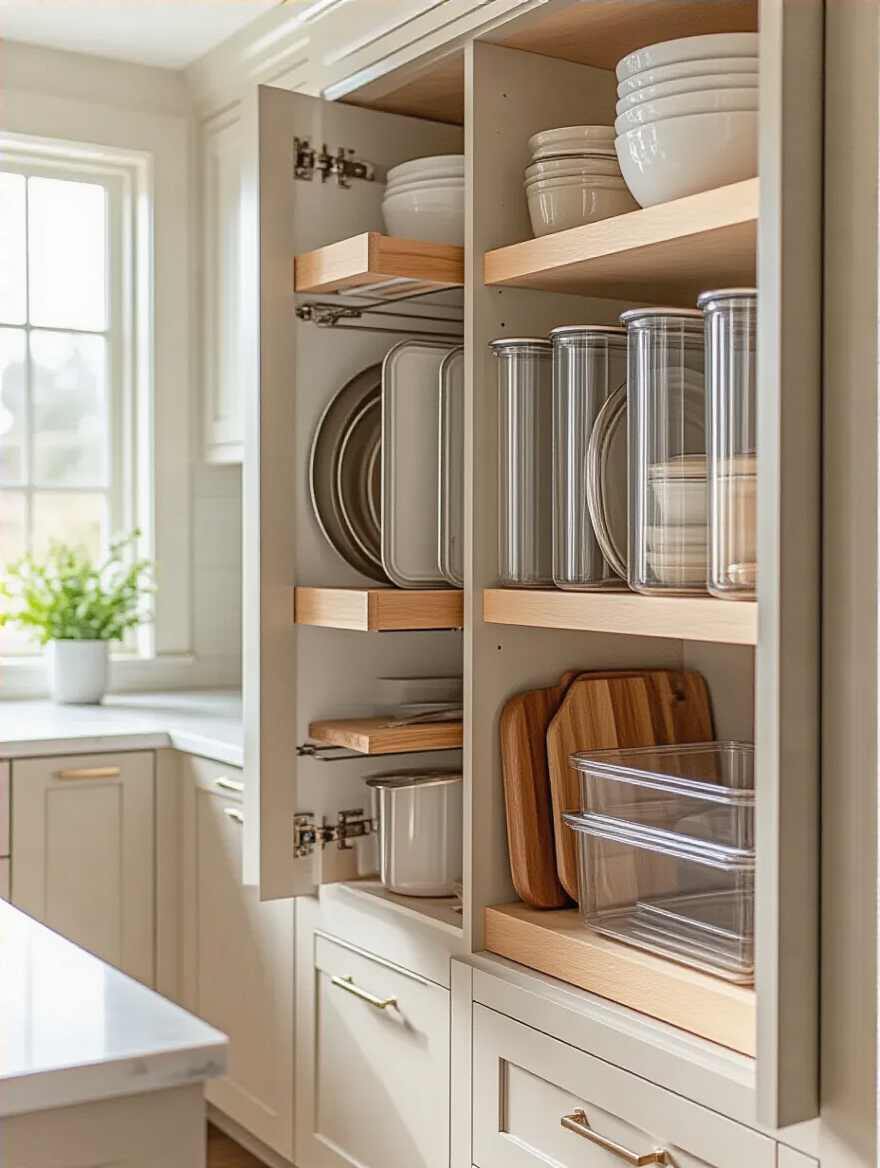
These simple tools essentially double your usable surface area. A good wire shelf riser can instantly create a second story for your mugs or canned goods, letting you use that empty air for storage. Adjustable dividers do the same for things like food storage containers, allowing you to create custom-sized compartments so they stack neatly without toppling over. It’s about creating order within the larger space, breaking it down into manageable micro-zones.
Creating those micro-zones is key, and it’s especially effective for those notoriously clumsy, flat items that never seem to stack right.
9. Utilize Vertical Slot Dividers: Neatly Store Bakeware & Trays
Can we all agree that the horizontal stack of baking sheets, cutting boards, and muffin tins is a terrible system? To get the one on the bottom, you have to lift the entire heavy, noisy pile, risking a crash and making a racket. This problem is solved instantly and elegantly with vertical slot dividers.
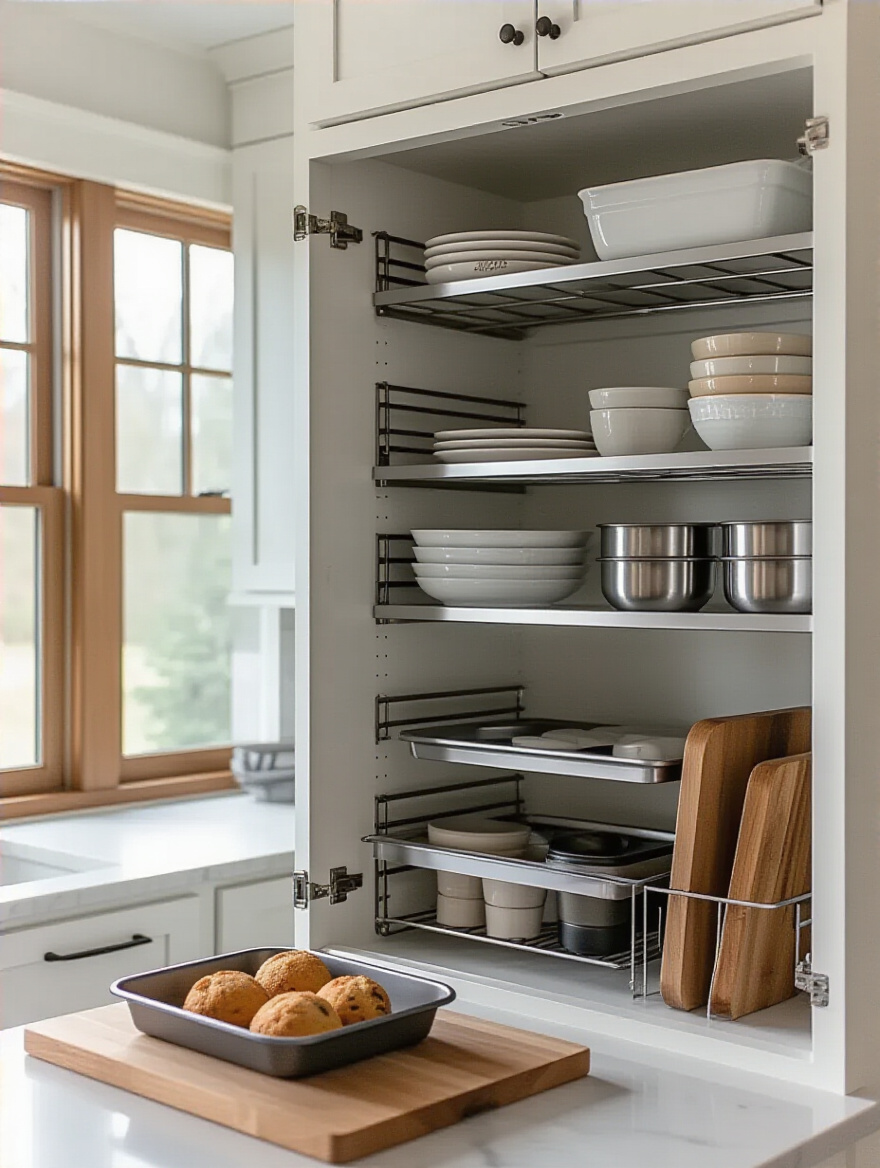
These simple wire or wood racks allow you to store all those flat items on their sides, like files in a filing cabinet. You can see every single item at a glance and slide just the one you need out effortlessly and silently. This is one of the cheapest and most effective organizing tricks in the book. It reclaims a chaotic cabinet and transforms it into a library of bakeware, where everything is visible and easily checked out.
We’ve filed away our bakeware, but there’s still one beast left to tame: the dreaded corner cabinet. Don’t worry, even that awkward space has a natural, elegant solution.
10. Conquer Corner Cabinets: Install Rotating Lazy Susans for Full Access
Corner cabinets are the Bermuda Triangle of the kitchen. But they don’t have to be. The classic Lazy Susan is still one of the most brilliant solutions for these awkward, deep spaces. By installing a rotating turntable, you make it possible to bring the items from the deepest, darkest corner to the front with a simple spin.
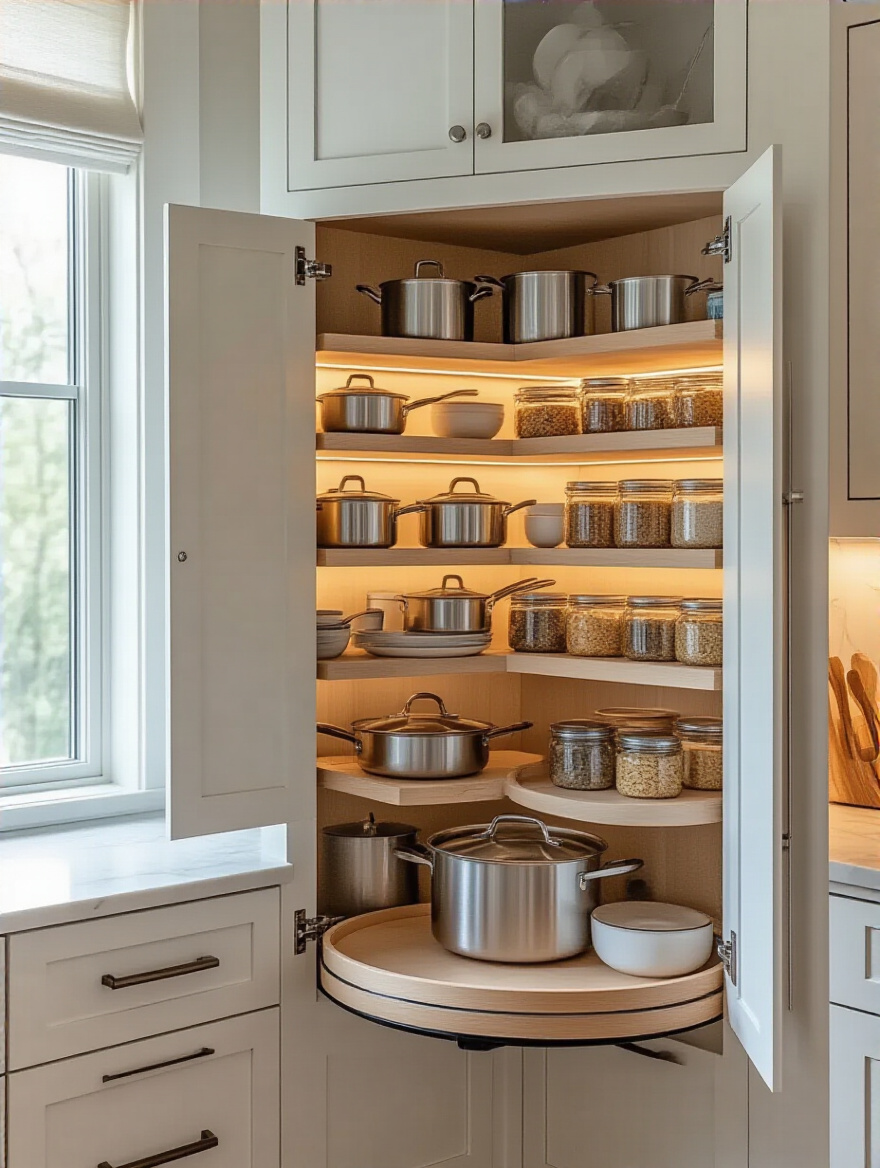
This is especially effective for things like canned goods, oils, jars, or even smaller pots and pans. Nothing can ever get lost in the back because there is no back. For L-shaped blind corners, you can get even fancier with half-moon or kidney-shaped pull-outs that both rotate and slide out of the cabinet. Whatever style you choose, the principle is the same: introduce movement to a static space to make it fully accessible.
Maximizing Accessibility with Smart Organizers (Part 2)
We’ve tackled the big structural issues of deep cabinets and corners. Now let’s refine our system with organizers that improve visibility and make use of every last hidden sliver of space. These next tools are about bringing clarity and efficiency to your day-to-day essentials.
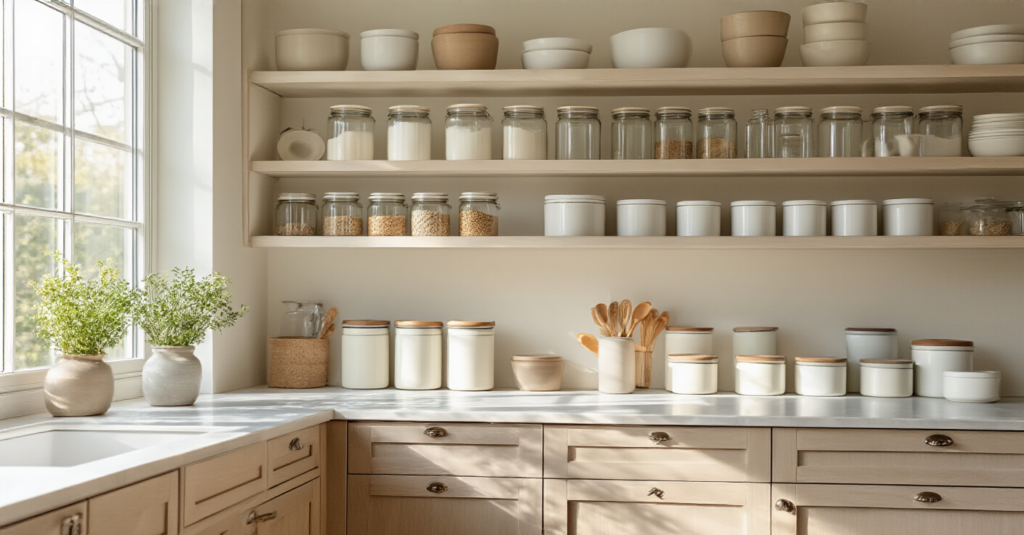
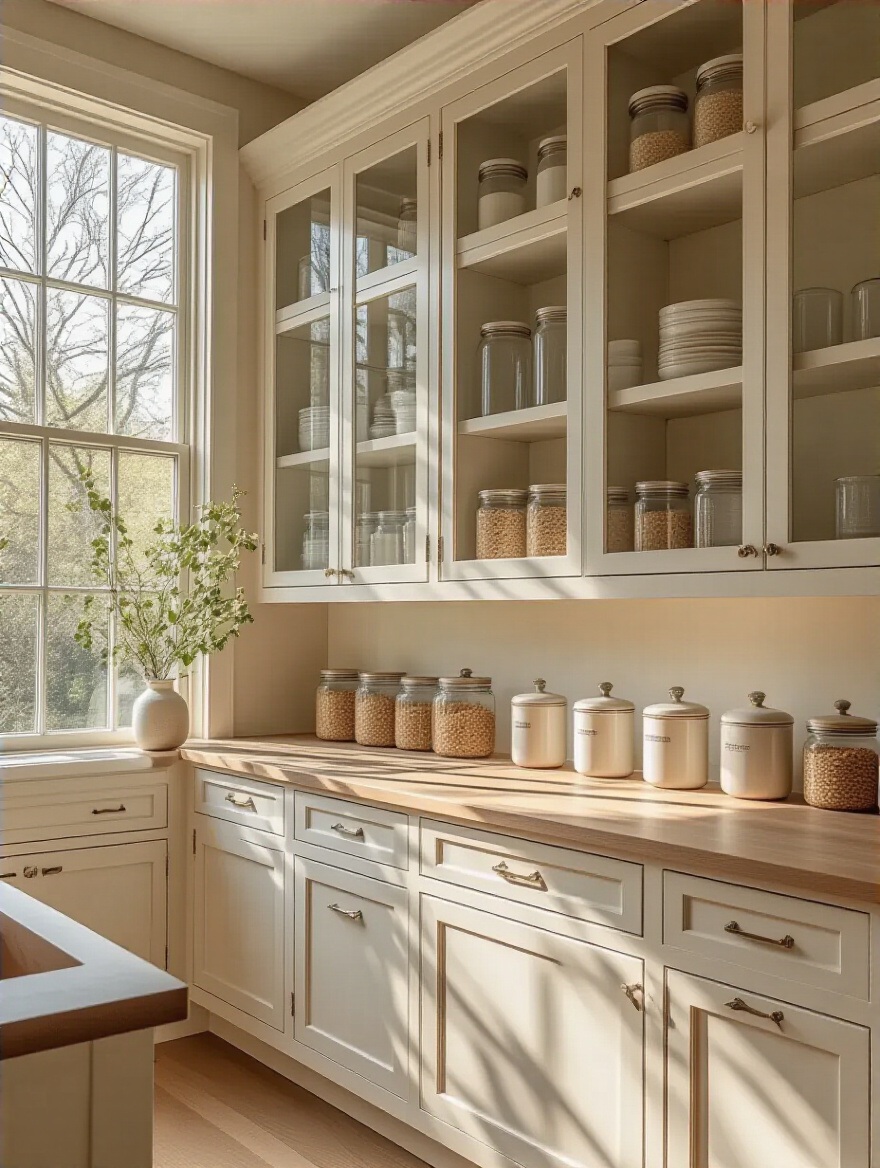
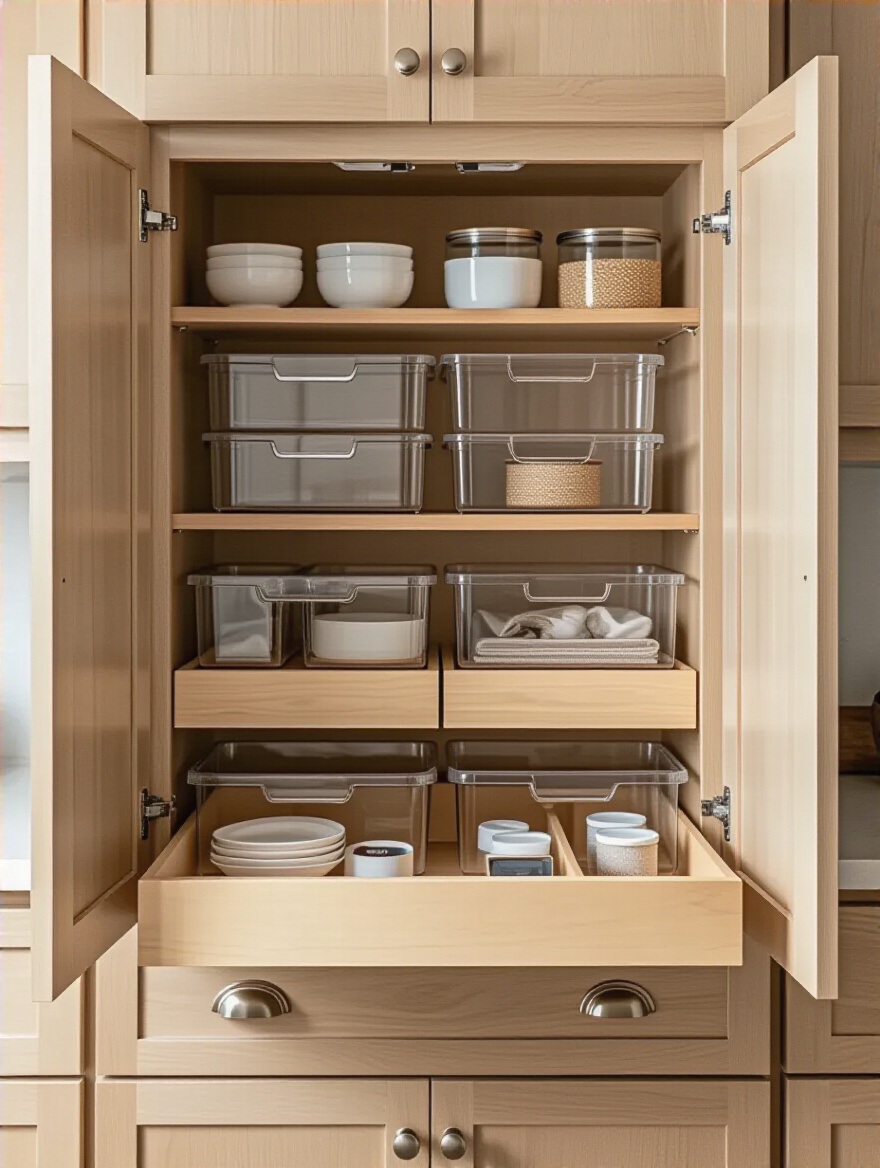
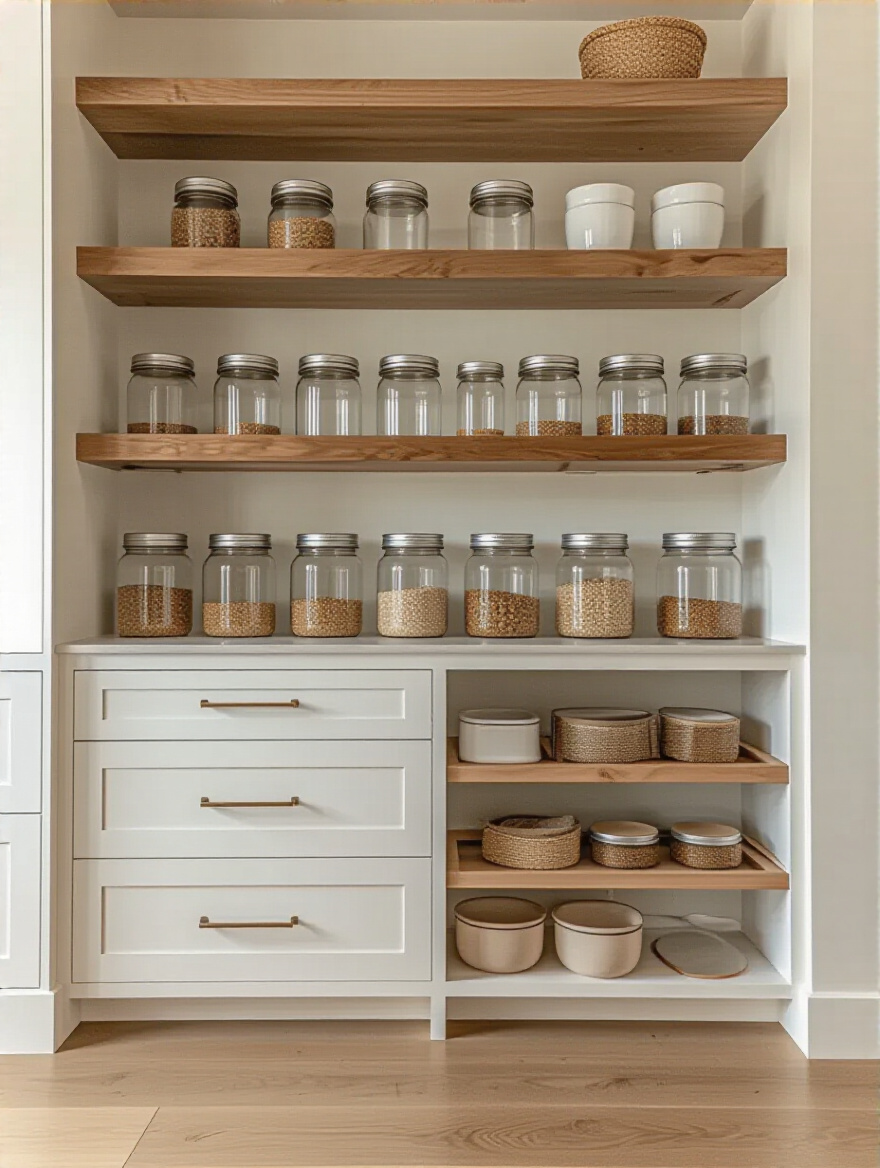
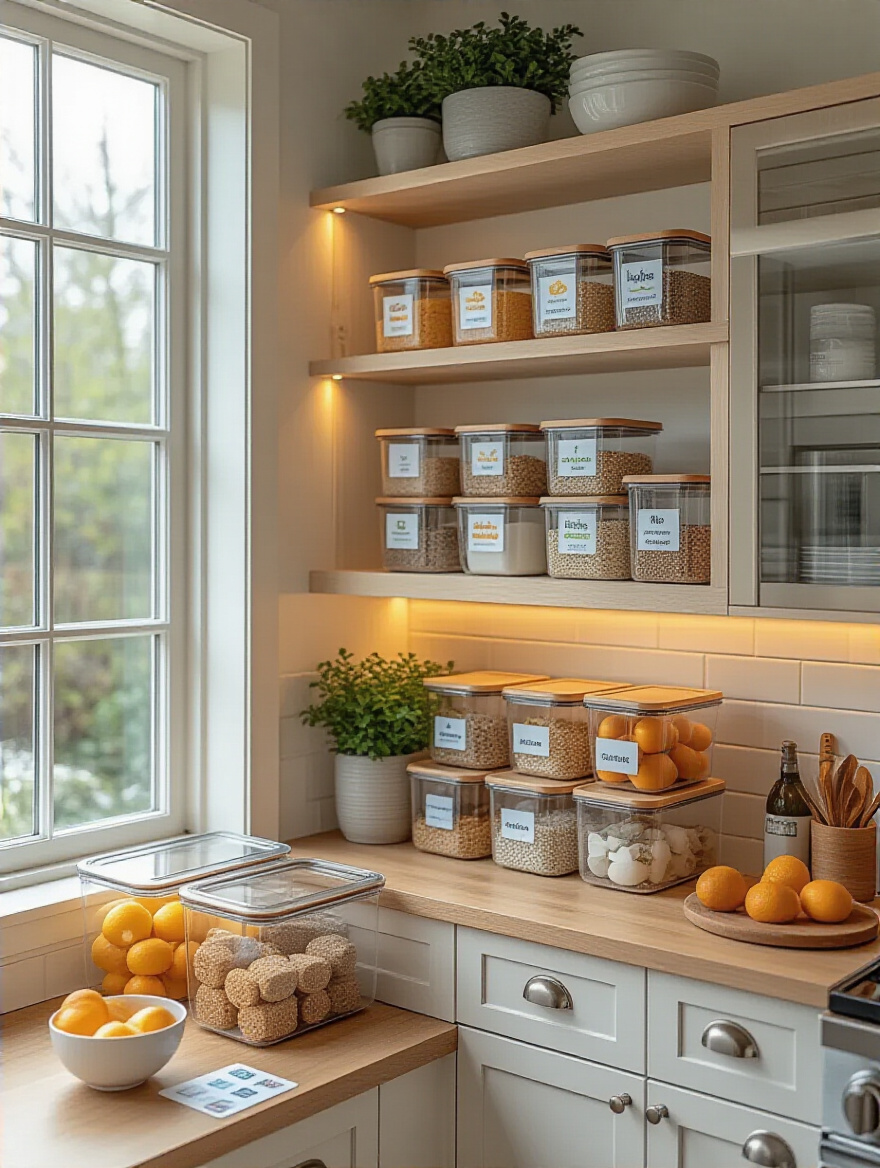
11. Select Stackable Clear Bins: Easily View & Access Dry Goods
The mishmash of half-empty bags of flour, crinkly pasta packages, and open boxes of cereal doesn’t just look messy—it’s also bad for your food and your wallet. Decanting dry goods into clear, stackable, airtight containers is a triple win. First, the airtight seal keeps food fresher for much longer, preventing pests and staleness. Second, the uniform shapes let you stack them neatly, maximizing vertical space far better than flimsy packaging.
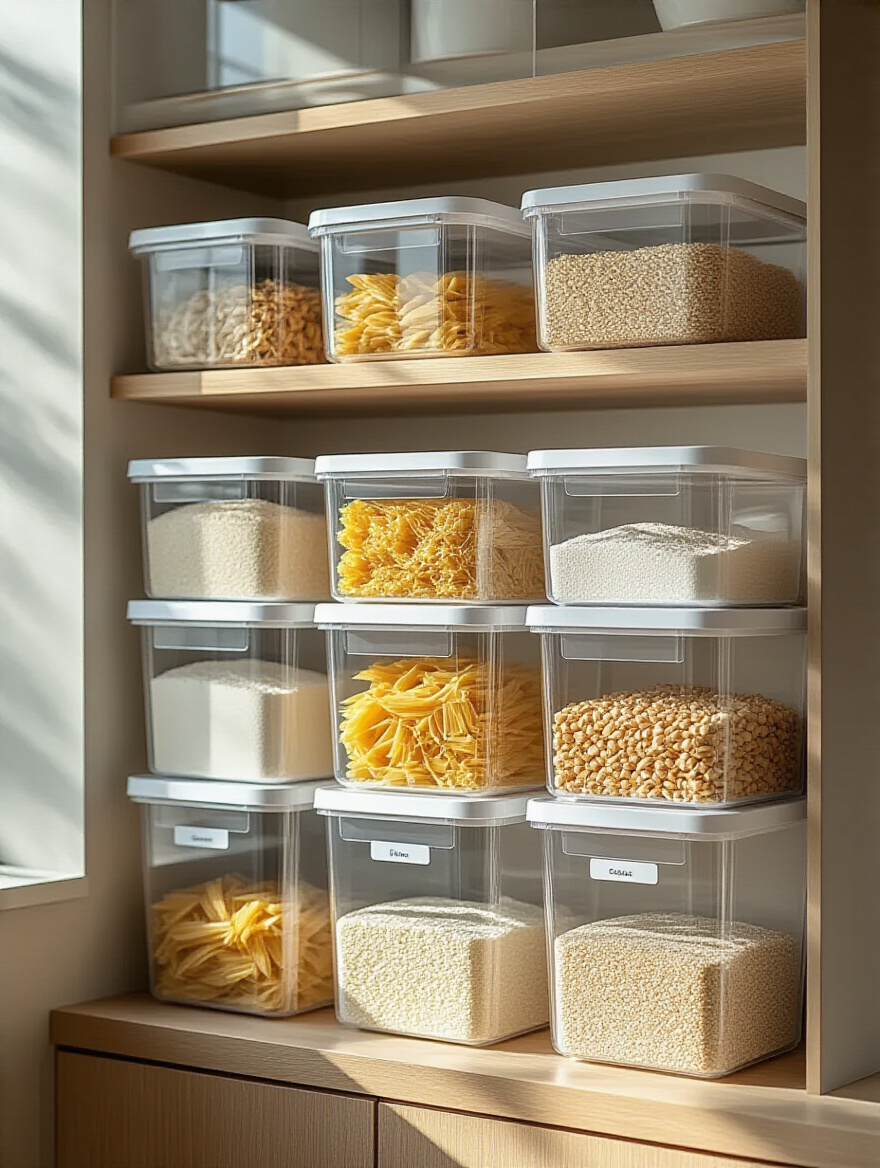
But the biggest benefit is visibility. You can see at a glance exactly how much rice you have left. There’s no more buying a new bag of quinoa only to find you already had two. It turns your pantry into a visual inventory system, which reduces food waste and prevents duplicate purchases. This is the definition of creating an ordered, self-sustaining system.
Clear containers give us a bird’s-eye view, but there are still hidden pockets of space just begging to be used, if you know where to look.
12. Create Extra Levels with Under-Shelf Baskets: Leverage Unused Space
Look inside any cabinet. See that empty space between the top of your plates and the shelf above them? That’s wasted real estate. Under-shelf baskets are a genius way to claim it. These simple wire baskets slide right onto your existing shelves, instantly creating a new, shallow drawer for small or flat items.

This is the perfect spot for things like rolls of foil and parchment paper, dish towels, or even boxes of tea. It gets these smaller items out of the way, freeing up the main shelf for bigger things. It’s a classic design principle: look for the voids and make them functional. It’s a small change that can have a surprisingly large impact on your total storage capacity.
We’ve claimed the space under the shelf, but there’s another vertical surface that’s almost always ignored, and it’s prime real estate for your most-used essentials.
13. Mount Door Organizers: Free Up Shelf Space for Smaller Essentials
Just like we use a trellis to make a bare wall productive in a garden, we can use the back of a cabinet door to create valuable storage. Cabinet door organizers are one of the most under-utilized tools for reclaiming space. They are perfect for small, lightweight items that tend to get lost on shelves.
A spice rack mounted on the pantry door keeps all your spices visible and frees up an entire shelf inside. A simple wire rack on the under-sink cabinet door is the ideal home for sponges and dish soap. By moving these small but essential items to the door, you free up the core cabinet space for larger, bulkier things. It’s all about putting every square inch to work for you.
Elevated Organization & Efficiency Tactics
With the right physical tools in place, we can now elevate the system with some smarter habits and strategies. This is about fine-tuning your kitchen’s workflow and creating a system that not only looks organized but feels effortless to use and maintain.
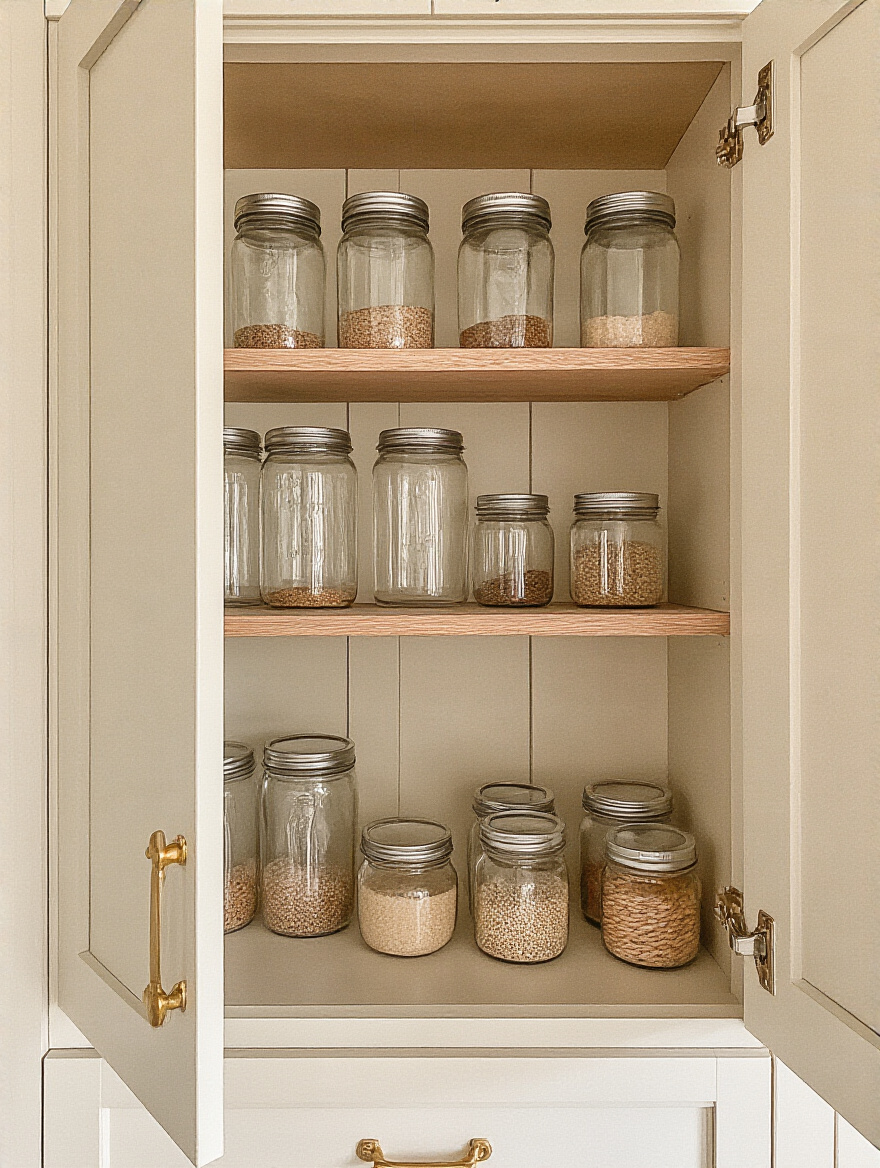
14. Decant Pantry Staples: Enhance Freshness and Visual Appeal
We talked about using clear containers, and decanting is the official term for that process. It might seem fussy, but transferring items from their ugly, inefficient packaging into uniform containers is a functional powerhouse. Airtight seals drastically extend the life of your food, which is a big deal. Think about how often you throw away stale crackers or clumpy brown sugar. That’s just money in the trash.
Beyond freshness, it brings a sense of calm and order. Your eye isn’t darting between loud, mismatched logos and labels. It sees clean lines and clear contents. This reduces the mental load of searching for things and makes cooking a more serene experience. When your environment is orderly, your mind feels more orderly. It’s that simple.
A calm environment is wonderful, but it has to be functional, too. That calm comes from knowing exactly where to find what you need, when you need it.
15. Implement Cabinet Zones: Streamline Workflow for Cooking & Prep
This is my favorite principle because it comes directly from landscape architecture. When designing a large property, you create zones for different activities: a dining area, a lounge area, a play area. Your kitchen needs the same treatment. We touched on this earlier, but it’s worth driving home: store items where you use them.
Knives, cutting boards, mixing bowls, and peelers all belong in the “Prep Zone” next to your biggest stretch of counter space. Pots, pans, cooking utensils, oils, and spices belong in the “Cooking Zone” right by the stove. By zoning your kitchen this way, you create an ergonomic triangle of efficiency, minimizing the steps you take and the time you waste hunting for things. You’ll be amazed at how much smoother your cooking process becomes when everything you need for a task is within arm’s reach.
Zoning tells you where things should live, but within those zones, we can still make items much, much easier to see.
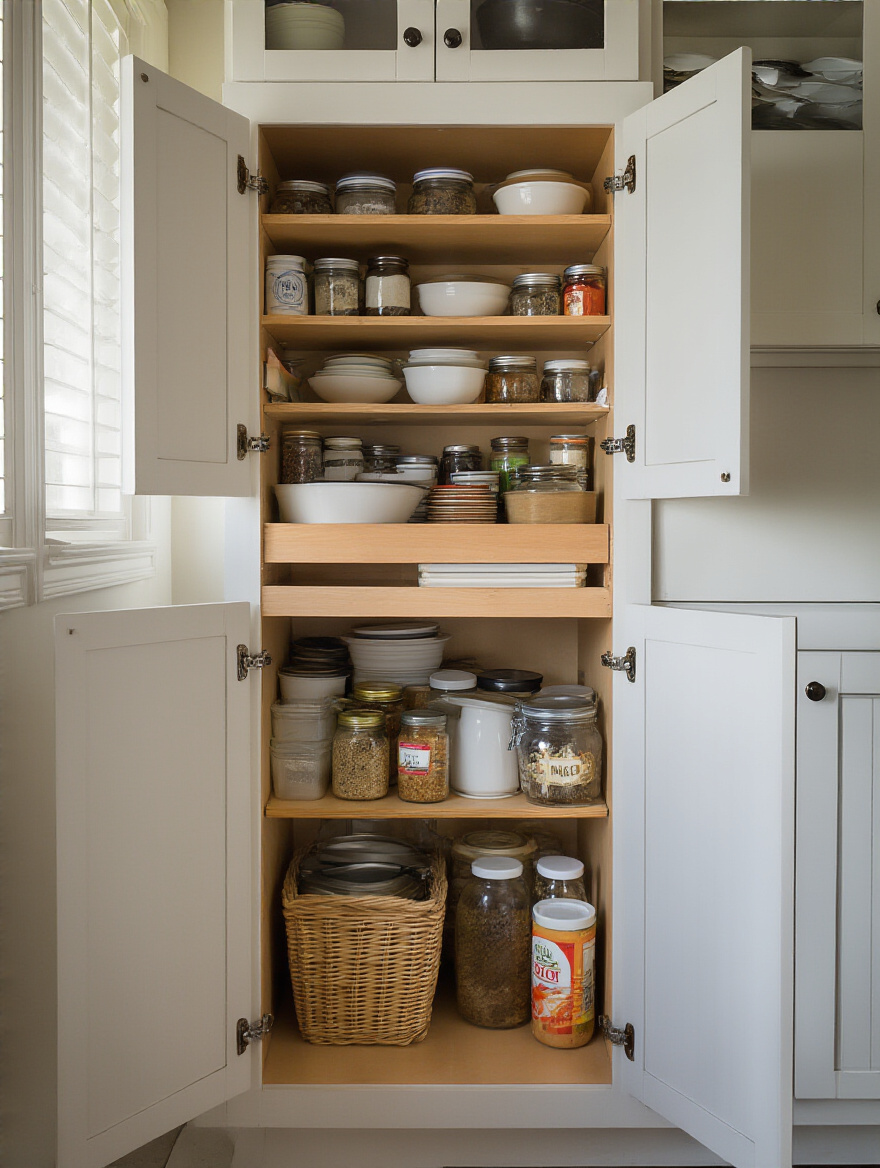
16. Employ Tiered Risers for Spices & Canned Goods: Find Items Instantly
A deep cabinet with a bunch of spice jars or cans all on one level is basically useless. You can only see the first row. Everything behind it might as well not exist. Tiered risers, or stadium shelves, are the simple, brilliant solution. They elevate the items in the back so you can see every single label at a glance.
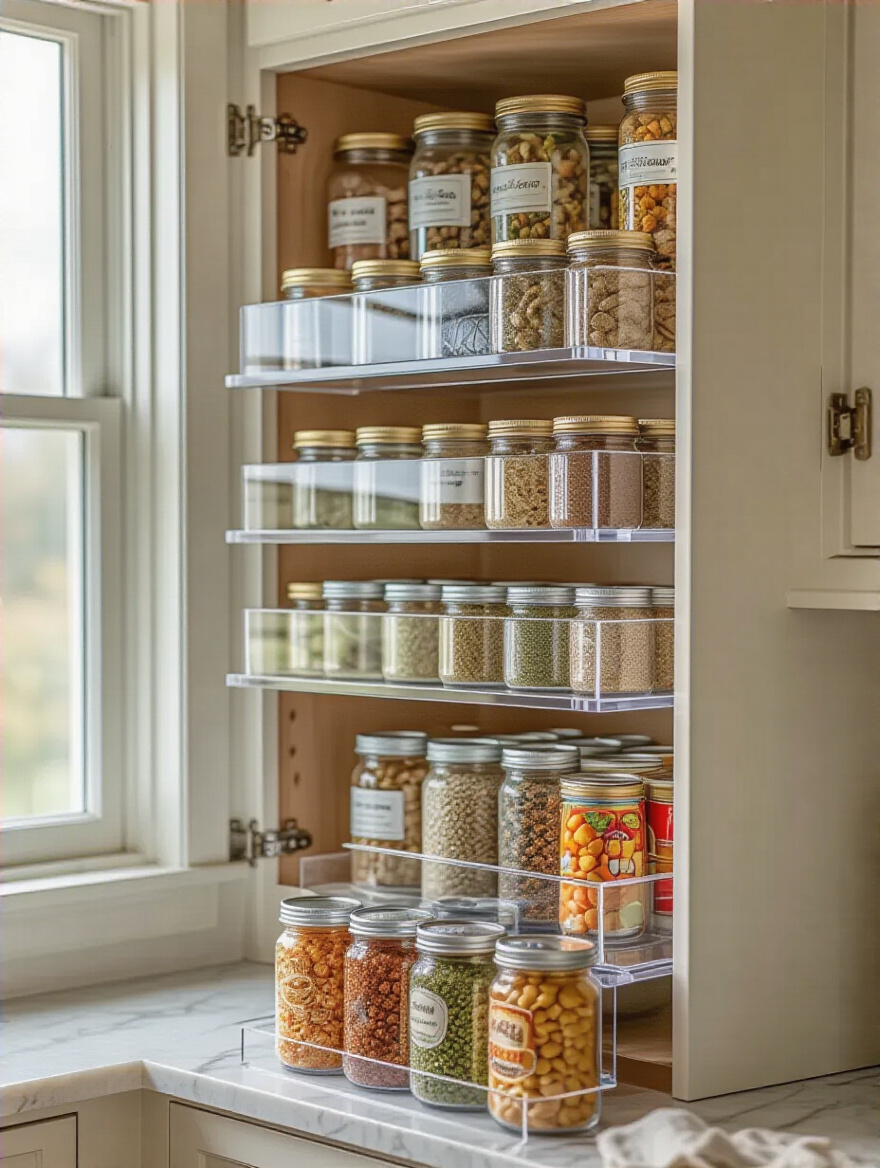
This is a must-have for spices and canned goods. It instantly transforms a chaotic mess into an organized, at-a-glance inventory. You’ll stop buying duplicate cans of beans, and you’ll actually use that paprika in the back because you can see it. It’s a cheap, easy fix that makes a world of difference in your day-to-day cooking.
We’ve organized our cabinets, but let’s not forget about the drawers, which are often the worst offenders when it comes to clutter.
17. Use Drawer Organizers and Inserts: Tame Utensil Clutter Effectively
A drawer without dividers is just a box of chaos. Utensils get tangled, gadgets get jammed, and you can never find the one thing you’re looking for. Simple drawer organizers and inserts are absolutely essential for bringing order to the chaos. They create designated homes for every single item.
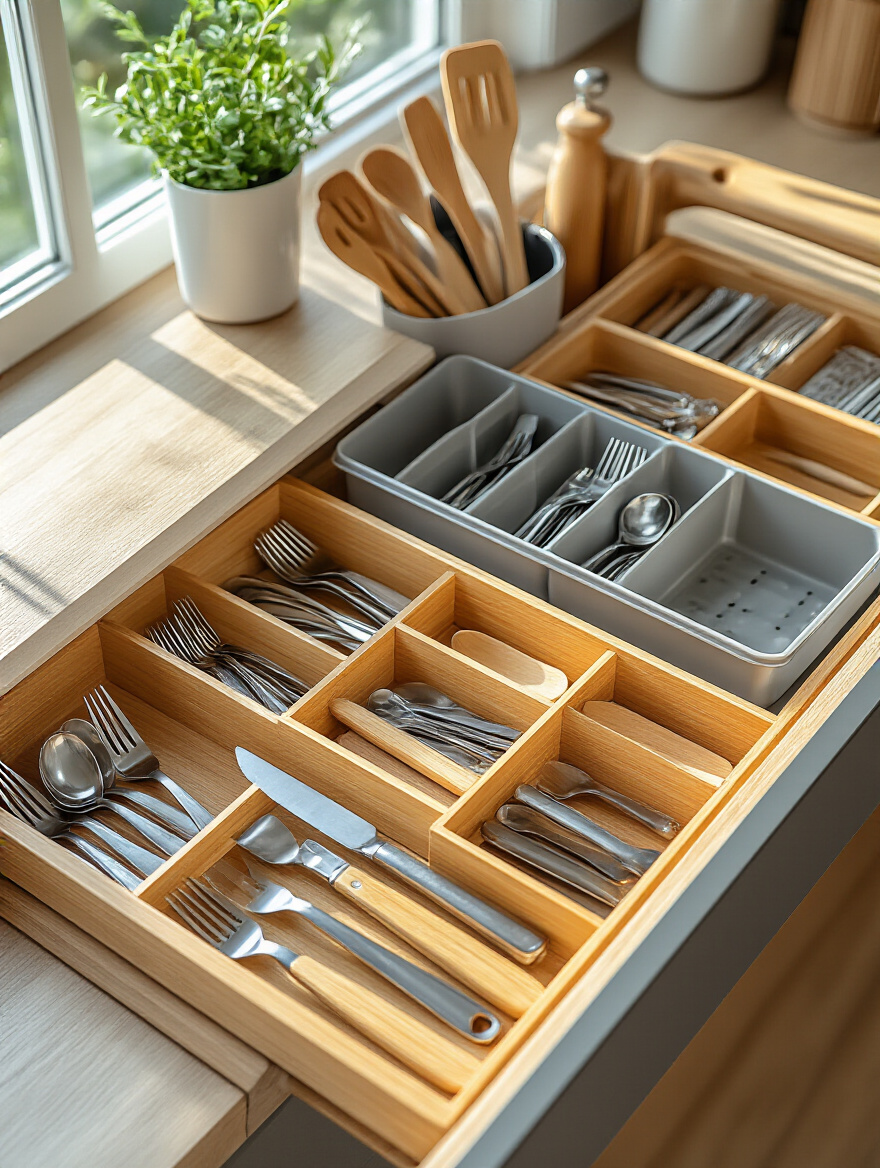
Go beyond the standard cutlery tray. Use adjustable bamboo dividers to create custom-sized compartments for your cooking utensils, from spatulas to whisks. Deep drawer dividers are perfect for corralling food storage containers and their lids. This isn’t just about tidiness; it’s about protection. When your knives and tools aren’t crashing into each other, they stay sharper and last longer.
Sustaining Order and Advanced Solutions
You’ve done it. You’ve created a beautiful, functional system. The hard work is over, right? Almost. The final, and perhaps most important, step is creating the simple habits that will maintain this new order for the long haul. A garden doesn’t stay beautiful without a little upkeep, and neither will your kitchen.
18. Label All Containers Clearly: Maintain Easy Identification
If you’ve gone to the trouble of decanting everything into beautiful clear containers, don’t skip the final step: labeling. What looks like all-purpose flour could be bread flour, or even worse, powdered sugar. Clear labels eliminate the guesswork and save you from culinary disasters.
Be specific. Label the contents and, if you can, the expiration date. A simple label maker or even a piece of masking tape and a marker will do the trick. This is crucial for maintaining your system, especially when other people in your household are putting things away. Labels create a clear, unambiguous language of organization that everyone can understand and follow.
Labels help you know what’s what, but how do you prevent the sheer volume of stuff from creeping back up and overwhelming your perfect system?
19. Adopt a ‘One In, One Out’ Policy: Prevent Overstuffing
This is the golden rule for preventing clutter creep. The policy is simple: for every new kitchen item you bring into the house, a similar old one has to leave. Buy a new, better spatula? The old, melted one goes in the trash. Get a new set of coffee mugs for your birthday? A few of the old, chipped ones get donated.
This simple discipline forces you to be a mindful consumer instead of a passive accumulator. It stops your cabinets from becoming overstuffed and ensures that the organizational system you worked so hard to create isn’t undone by sheer volume. It’s the gatekeeper that protects your kitchen from returning to a state of chaos.
This gatekeeper policy is a daily habit. But you also need a plan for periodic, big-picture maintenance to keep everything running smoothly.
20. Schedule Routine Cabinet Reviews: Ensure Long-Term Functionality
An organized kitchen, like a well-tended garden, requires seasonal maintenance. You don’t have to do a massive overhaul every month, but scheduling a quick cabinet review every quarter or so is a smart move. This is your chance to catch clutter before it takes root.
Take 15 minutes to pull things out of your pantry, wipe down the shelf, and check for expired dates. Re-fold the dish towels that have gotten messy. Put the utensils that migrated to the wrong spot back in their home. These little check-ins are quick, painless, and they prevent small messes from turning into overwhelming projects. It’s the simple act of pruning and weeding that keeps the whole ecosystem healthy and thriving.
Conclusion
So there you have it. This isn’t just about tidying up. It’s about fundamentally redesigning the engine of your home so that it supports the life you want to live. A kitchen that flows is one that encourages you to cook more, to entertain with less stress, and to seamlessly connect your indoor and outdoor living spaces. You’ve transformed your cabinets from cluttered black holes into an efficient, ordered system that feels as natural and intuitive as a well-planned garden.
Don’t let this be just another article you read. Pick one thing—your biggest pain point—and fix it this weekend. Install that pull-out shelf, get the vertical dividers for your baking sheets, or just take 30 minutes to weed out one cluttered cabinet. Small, decisive actions create momentum. You’ve unlocked the potential of your space on paper; now it’s time to bring that natural, functional, and beautiful order into your home. You’ll feel the difference immediately.