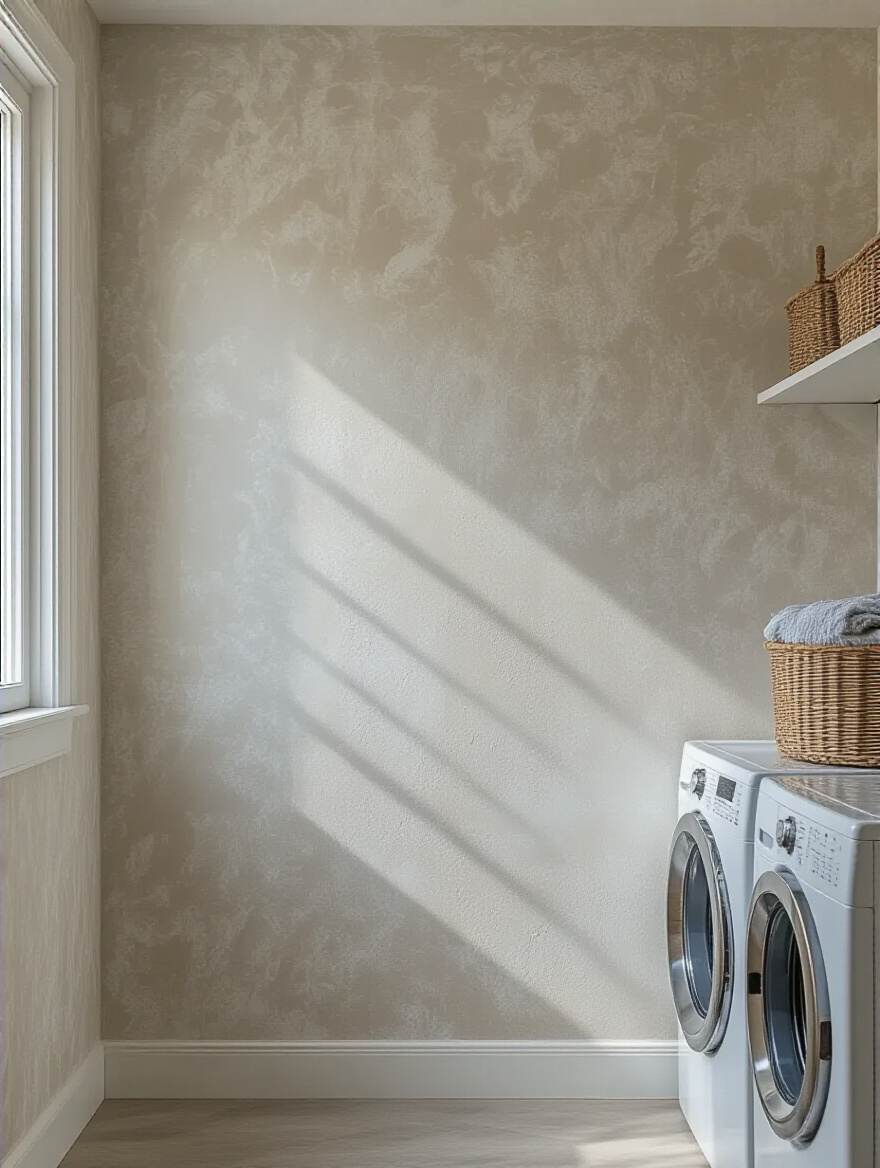
You know what people always ask me? It’s not about the living room or the grand entryway. It’s, “Carley, what can I do about my laundry room? It’s just… a sad, beige box where my socks go to die.” And I get it! It’s the one room we all use constantly but give zero love. We treat it like a chore cave, but I see it as a hidden opportunity—a small space just begging for a huge dose of personality.
And the fastest, most impactful way to do that is with wallpaper. Forget thinking of it as a huge, expensive, permanent commitment. Think of it as dressing up the hardest-working room in your house. It’s about making a space you have to be in a space you want to be in. So, let’s talk about how to do it right, without the headaches.
Foundational Planning & Design Essentials
Okay, before we get to the fun patterns, we have to talk about the boring-but-critical stuff. I know, I know. You just want to start shopping. But trust me, spending an hour on this part will save you from the nightmare of watching your beautiful new wallpaper literally peel off the wall. This is the stuff that makes your project look professional and last for years, not months.
1. Assess Humidity Levels for Optimal Wallpaper Longevity
First, let’s talk about the enemy: steam. Laundry rooms are basically little tropical rainforests. All that heat and moisture from the washer and dryer is a recipe for wallpaper disaster if you don’t plan for it. I’m talking peeling, bubbling, and—worst of all—mold. Ignoring the humidity is the number one reason these projects fail.

So, here’s the deal: run your machines and see what happens. Does the air feel soupy? Do mirrors fog up? If so, your ventilation is not cutting it. Before you even think about wallpaper, fix that. Clean your dryer vent, consider upgrading your exhaust fan, or just plan to run a dehumidifier. You need to get that moisture under control before you stick anything to those walls. Seriously. It’s the difference between a project you love and one you have to rip out in six months.
A little planning here makes sure your laundry room refresh doesn’t turn into a soggy, peeling mess down the line.
2. Select Washable Wallpaper Types for Easy Maintenance
Here’s my pet peeve: people buying gorgeous, delicate, paper-based wallpaper for a room that sees detergent splashes and lint explosions. That’s like wearing silk to a mud run. For a laundry room, your wallpaper needs to be tough. The magic words you’re looking for are “washable,” “scrubbable,” or my personal favorite, “vinyl.”
These aren’t your grandma’s shiny, plastic-looking wallpapers anymore. You can find incredible vinyl options with gorgeous textures and matte finishes that look super high-end. They’re designed to be wiped down. A little detergent splash? No problem. A smudge of grime? Gone with a damp sponge. Don’t even look at anything labeled just “wipeable” or “spongeable”—that’s for-your-life delicate. You want the workhorse.
This isn’t about sacrificing style; it’s about being smart. You’re choosing a finish that can handle real life in a real-life work zone.
3. Measure Your Laundry Room Walls Accurately to Minimize Waste
I used to think “measure twice, cut once” was just a cliché. Then I helped a friend who eyeballed her measurements and ended up one roll short… of a pattern that was being discontinued. Ouch. Don’t be that friend. Measuring accurately saves you money and a world of frustration.
Start by measuring the height and width of each wall you want to cover. Then—and this is the part everyone forgets—you have to add about 15% extra to your total. This isn’t just for mistakes. It’s for matching up the pattern repeat! That beautiful floral or cool geometric needs to line up perfectly from one strip to the next, and that takes extra paper. Under-ordering is a rookie mistake that can bring your entire project to a screeching halt.
It feels like you’re buying too much, but having that extra on hand for the inevitable oops-cut or for future repairs is a total lifesaver.
4. Choose Wallpaper Scale and Pattern for Your Room’s Size
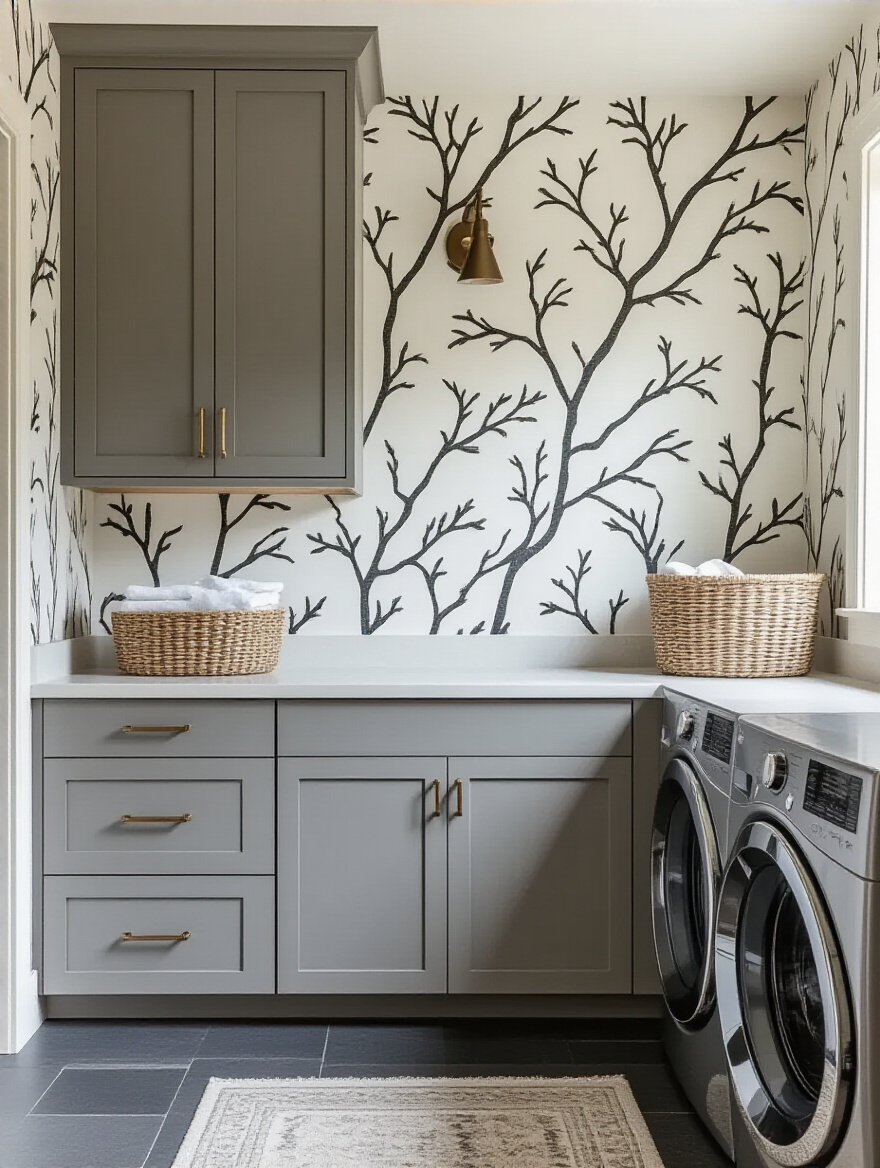
Everyone says that for a small room, you have to use a tiny pattern. I’m here to call BS on that. Sometimes, a big, bold, dramatic pattern is exactly what a tiny laundry room needs. It’s a design trick! A large-scale pattern can actually fool the eye, making the space feel more intentional and artfully designed, drawing your attention to the beautiful design instead of the small size of the walls.

The real key is balance. If you have a teeny-tiny laundry closet, maybe a huge, dense damask is a bit much. But a large-scale botanical with lots of negative space? Absolutely stunning. On the flip side, if you have a larger laundry room, a tiny, itsy-bitsy print can get lost and just look busy. The rule is simple: get samples. Tape them to the wall and live with them for a day or two. See how they look in the morning light and under the glow of that single lightbulb at night. The right scale is the one that makes you smile when you see it.
The right pattern can be a total game-changer, turning a cramped utility closet into a jewel box.
5. Coordinate Wallpaper with Existing Laundry Room Finishes
Your wallpaper doesn’t live in a vacuum. It has to play nice with your floors, your cabinets, and those big, white (or gray, or black) appliances. The goal isn’t to match everything perfectly—that can look dated and boring. The goal is harmony.
Look at the undertones in your space. Is your floor a warm-toned wood or a cool-toned tile? Are your cabinets a stark white or a creamy off-white? Pick a wallpaper that shares that same underlying temperature. For example, if you have cool gray cabinets, a wallpaper with blues, greens, or even a crisp black and white will feel right. A warm beige or cream-based pattern would just clash. A client once fell in love with a wallpaper but ignored that her floors were a cool slate tile. The paper she chose had a warm, creamy background, and the whole room just felt… off. Unsettled. We swapped it for a paper with a crisp white background, and boom—instant cohesion.
It’s about creating a conversation between the elements in the room, not making them all wear the same uniform.
Smart Material & Pattern Selection Strategies
Now we’re in my favorite territory! This is where the magic happens. Choosing the right material and pattern is more than just picking something pretty—it’s a strategy. It’s about choosing a design that not only looks amazing but also works for you, hiding flaws and standing up to the daily grind.
6. Prioritize Vinyl or Peel-and-Stick Options for Moisture Resistance
Let’s get real: peel-and-stick wallpaper has had a major glow-up. It’s not the flimsy contact paper you remember. High-quality peel-and-stick is now mostly vinyl-based, which makes it your best friend in a humid laundry room. It’s water-resistant, durable, and incredibly forgiving to install. For a space that’s all about function, why not make your life easier?
I am a huge fan of peel-and-stick for laundry rooms, especially for accent walls. It gives you the freedom to go bold without the commitment and mess of traditional wallpaper paste. If you get tired of it in a few years, you can just peel it off. That said, the number one mistake people make is thinking they can just slap it on the wall. You still have to clean and prime your walls! A clean, primed surface gives the adhesive something to really grab onto, ensuring it won’t curl at the edges after a few steamy laundry cycles.
Think of it as the ultimate low-risk, high-reward design choice for a room that deserves a little fun.
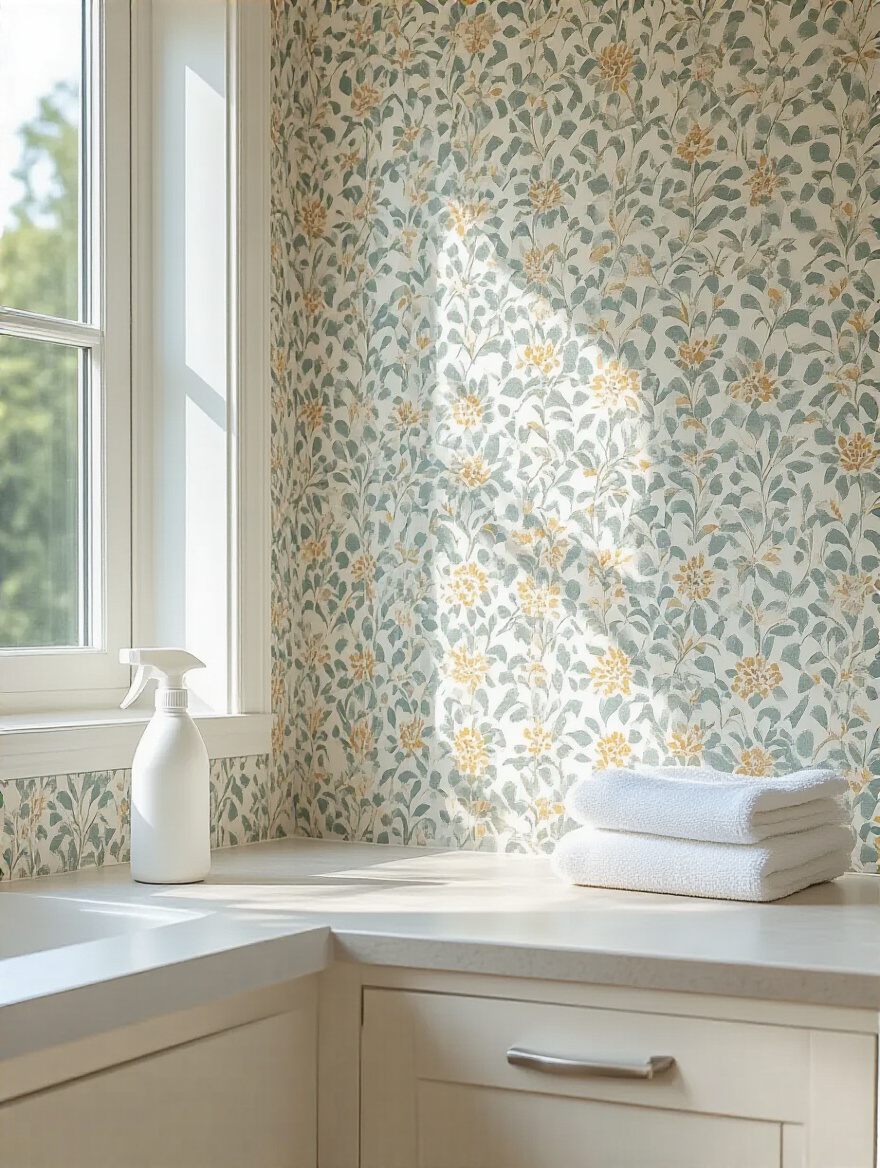
7. Opt for Small, Busy Patterns to Conceal Minor Scuffs
Here’s a shortcut to a laundry room that always looks clean, even when it isn’t: choose a busy pattern. I’m talking about tiny florals, fun geometrics, or a speckled terrazzo print. This is camouflage for real life. The laundry room is a high-traffic area. Baskets get bumped, detergent drips, and scuffs just… happen. On a plain painted wall, every single tiny flaw screams for attention.
But on a wall with a ditsy floral or a cool, abstract print? That little scuff mark just blends in, becoming part of the visual texture. It’s an optical illusion that hides a multitude of sins. I once specified a beautiful, serene, solid-colored grasscloth for a client’s mudroom—big mistake. The first time a muddy boot scuffed it, it looked like a giant scar on the wall. We re-did it with a small-scale patterned vinyl, and it still looks perfect years later, despite two kids and a dog.
It’s one of my favorite “work smarter, not harder” design secrets. Your walls will look pristine with way less effort.
8. Integrate Geometric Prints for a Modern, Organized Aesthetic
If your laundry room feels a little chaotic, a geometric print can be your secret weapon for creating a sense of calm and order. There’s something about the clean lines and repeating shapes—whether it’s a simple grid, a bold chevron, or a classic hexagon—that just makes a space feel more put-together and intentional.

This works especially well in small spaces. A pattern with strong vertical lines can make a low ceiling feel taller, while a crisp grid can make a narrow room feel wider. It’s like instant architecture. You’re giving the eye a structured path to follow, which tricks the brain into seeing order instead of clutter. A friend of mine has a tiny laundry closet, and she put a simple black-and-white striped wallpaper on the back wall. It’s a total “wow” moment when you open the doors and instantly makes the tiny space feel polished and sophisticated.
It’s an easy way to add a modern, graphic punch and bring a sense of structure to a room that can easily feel jumbled.
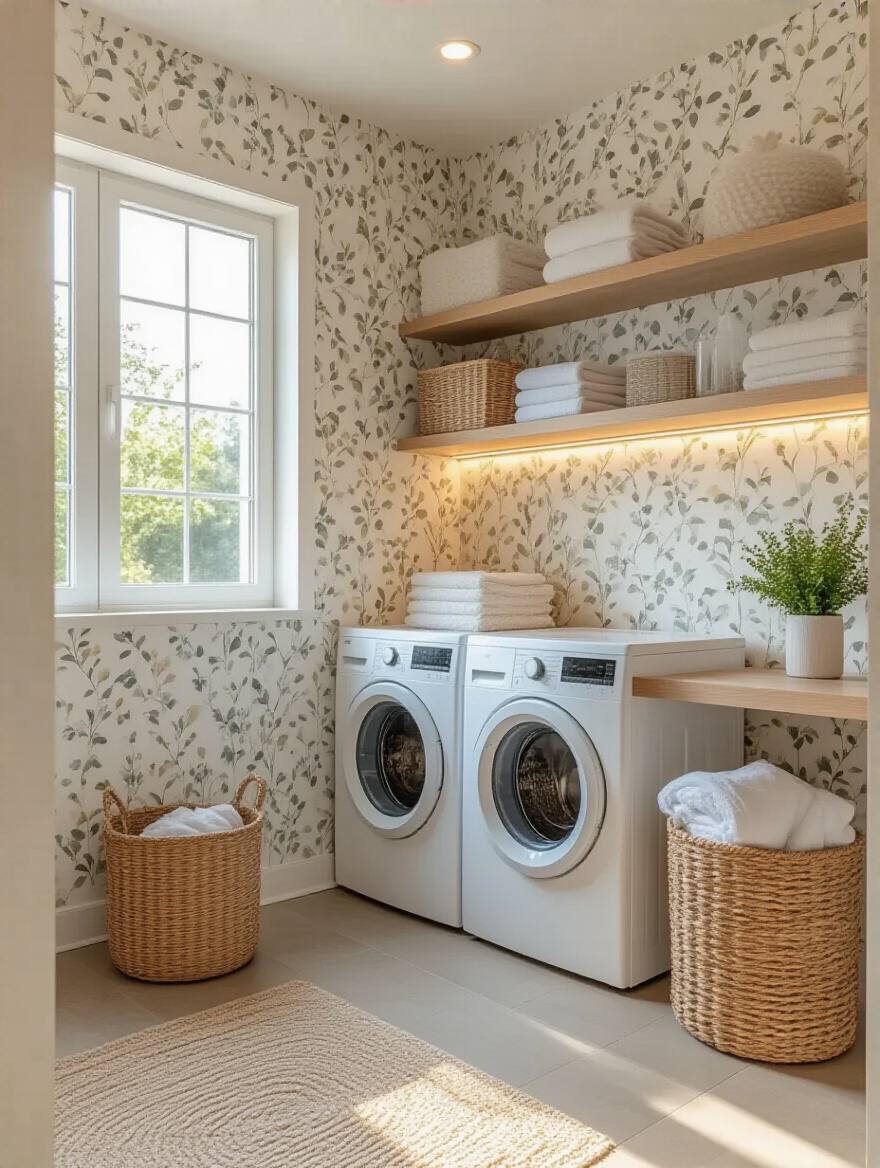
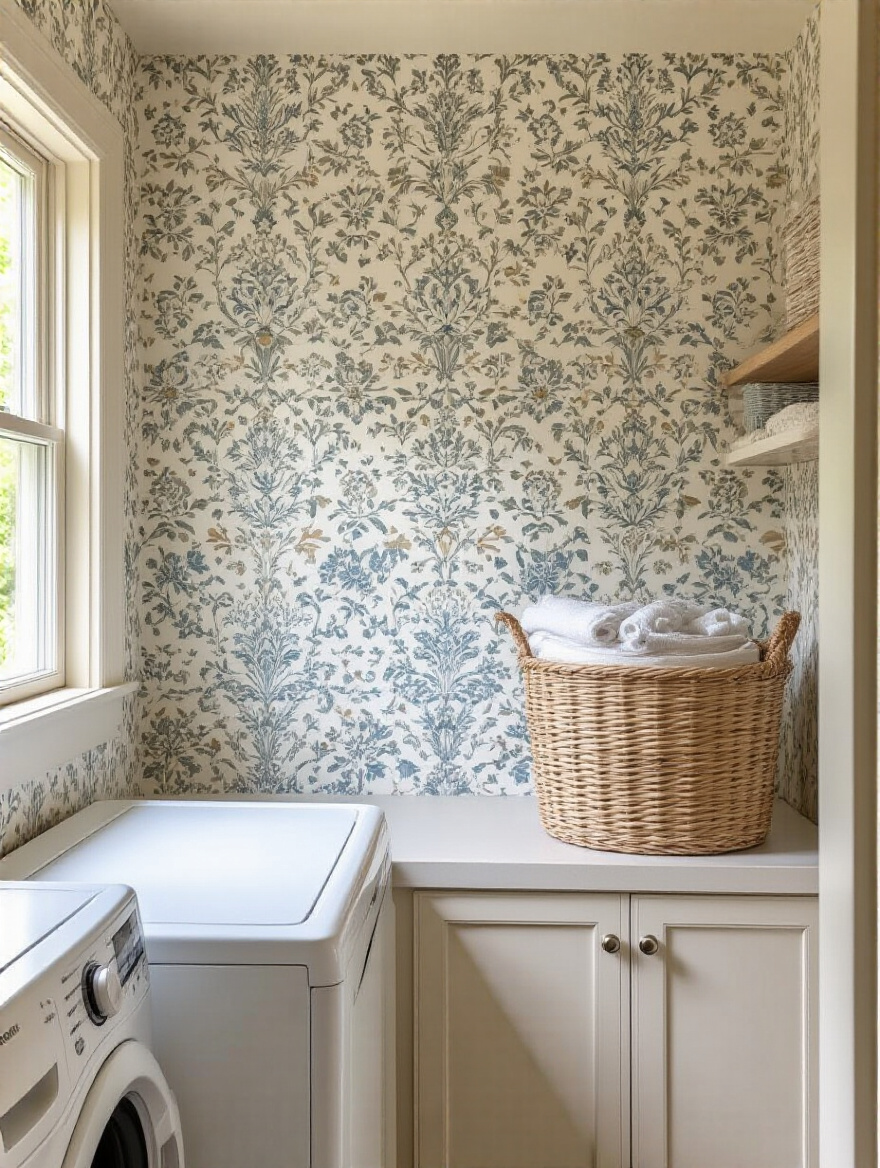
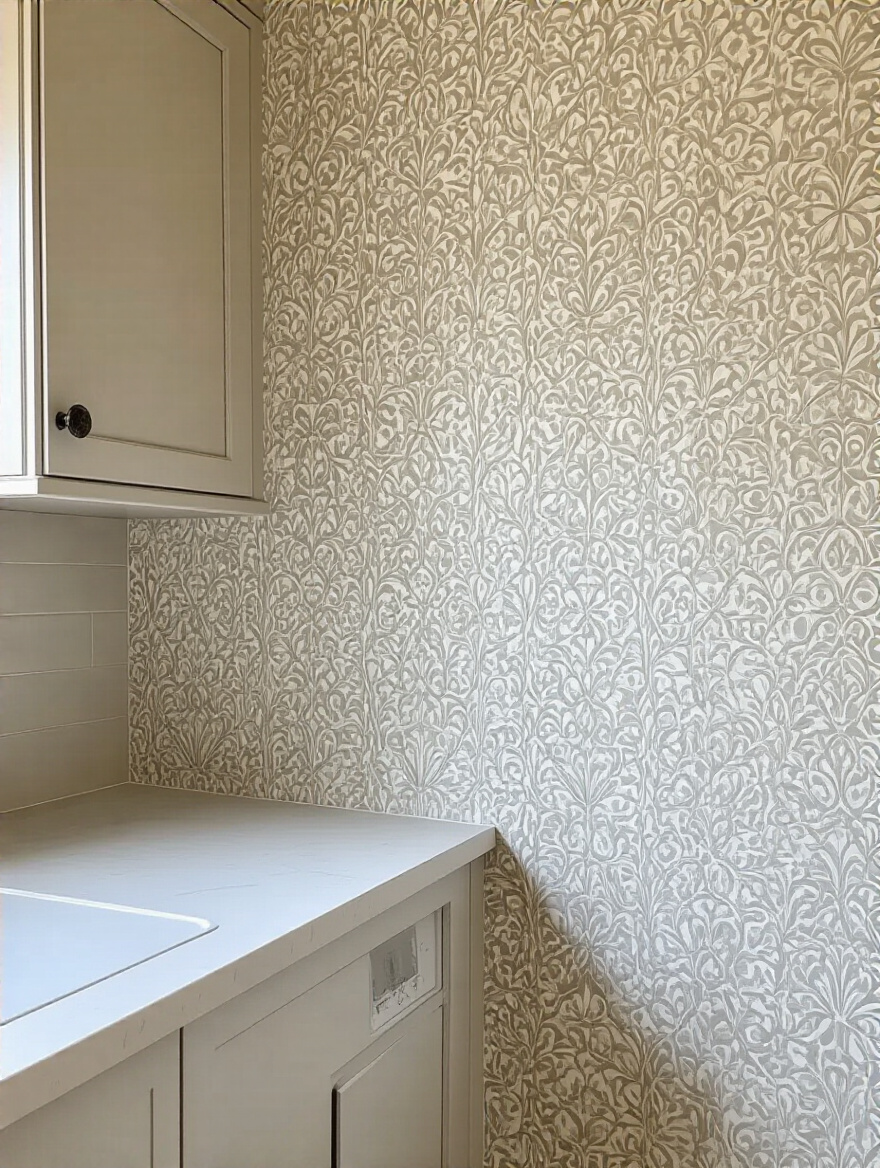
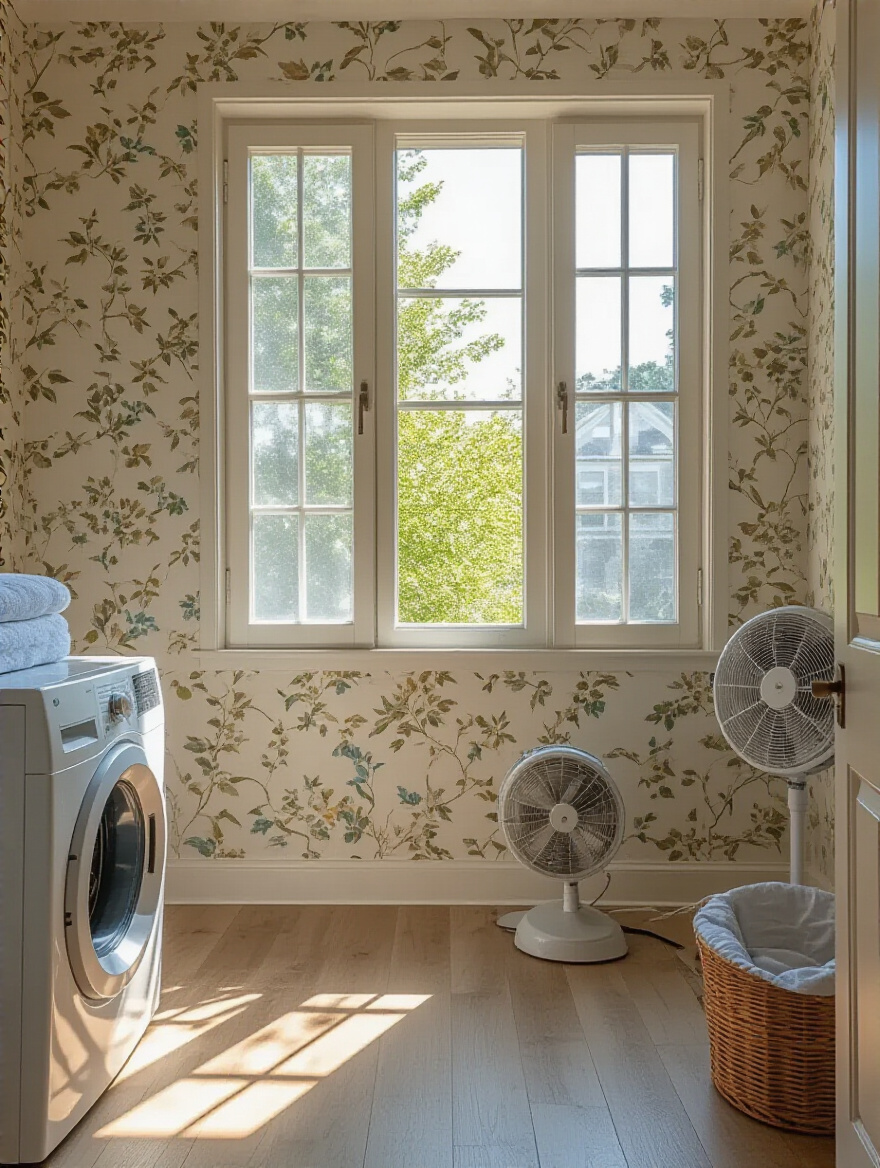
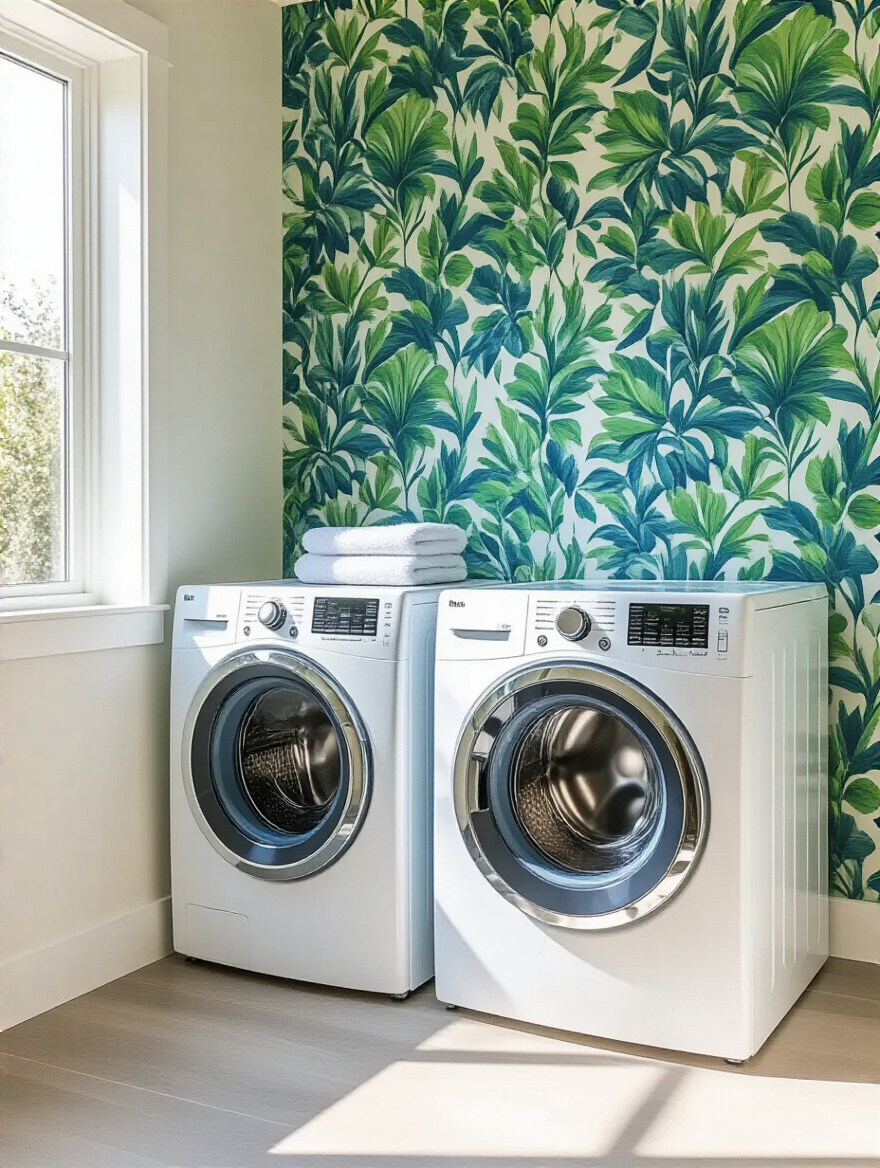
9. Embrace Botanical Motifs to Bring Outdoor Serenity Indoors
Is there anything more calming than a touch of nature? Bringing a botanical or floral pattern into your laundry room can completely change the vibe of the space. It stops feeling like a sterile utility room and starts feeling like a little sanctuary. Doing laundry might still be a chore, but it’s a lot more pleasant when you’re surrounded by beautiful leaves and flowers.

This is a great place to play with scale. A large-scale, minimalist palm leaf print can feel airy and modern, creating a gorgeous focal point behind the washer and dryer. A more traditional, smaller-scale floral can feel charming and sweet, perfect for a modern farmhouse look. I love pairing botanical wallpapers with natural textures like woven baskets for laundry, a small wooden shelf for supplies, or a jute rug on the floor. It amplifies that indoor-outdoor connection and makes the whole space feel so much more inviting.
You’re not just covering a wall; you’re introducing a sense of life and serenity, which is something every laundry room could use.
10. Sample Multiple Wallpaper Swatches Before Final Purchase
I cannot stress this enough: NEVER, ever, buy wallpaper without getting a sample first. I don’t care how perfect it looks online. The color on your screen is not the color it will be in your home, under your lighting. What looks like a soft, warm gray online can turn into a cold, gloomy purple under the fluorescent light of a windowless laundry room. I’ve seen it happen, and it’s a heartbreaking—and expensive—mistake.
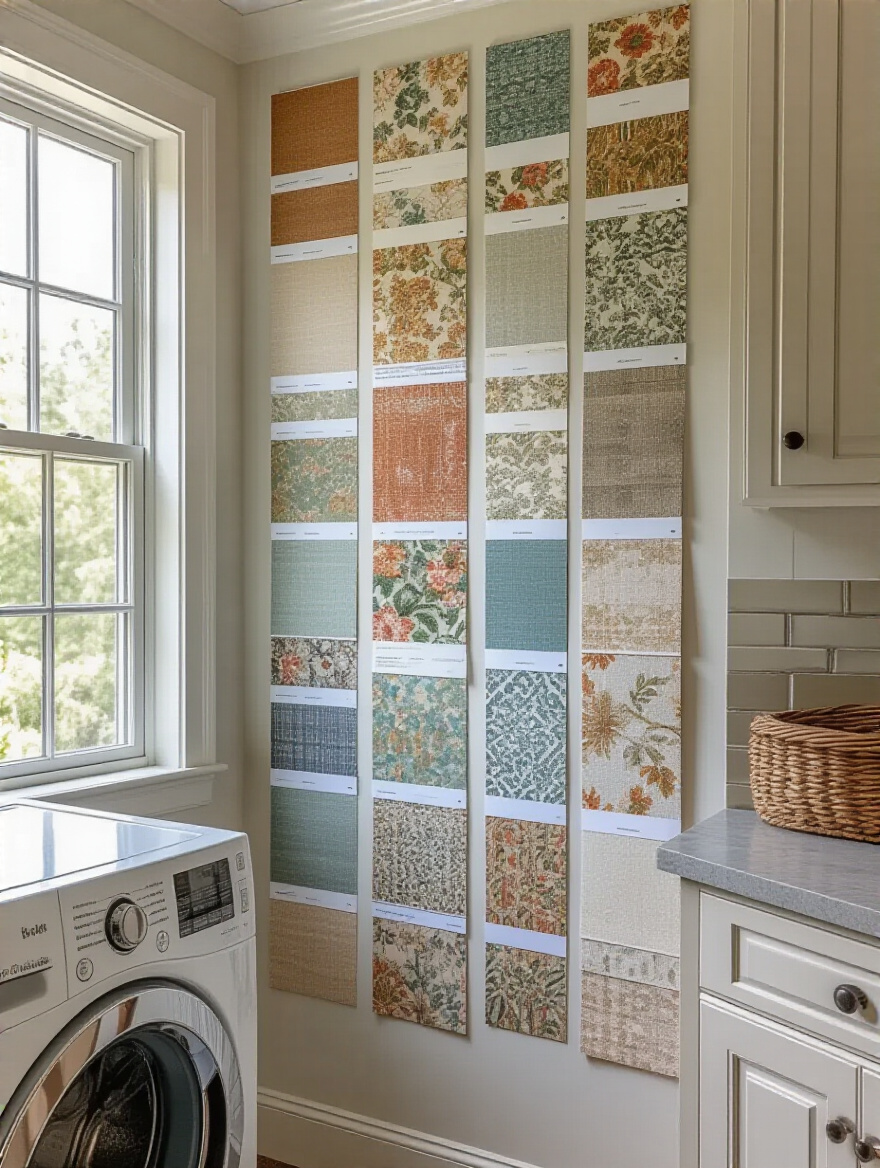
Order at least three to five samples of your top choices. Don’t just hold them up. Use painter’s tape to stick them to the wall. Live with them for a few days. See how the color shifts from morning to night. Look at them next to your cabinets, your floor, your washing machine. A sample that costs a few dollars can save you hundreds in wallpaper you can’t return because you already cut it.
It’s the single most important step in the entire selection process. It’s your insurance policy against disappointment.
Seamless Installation & Professional Finishing Techniques
Alright, you’ve planned, you’ve chosen, and now it’s go-time. The difference between a “wow, you did that yourself?” project and a “hmm, you did that yourself…” project is all in the installation details. These are the steps that ensure your beautiful paper goes up smooth, straight, and stays there.
11. Prepare Walls Thoroughly for Maximum Wallpaper Adhesion
Can we talk about why everyone gets this wrong? They think they can just wallpaper over whatever is on their walls. NO! Wall prep is 90% of the battle. If your walls are dirty, greasy, or have a glossy finish, your wallpaper will fail. The adhesive has nothing to grip onto, and it will eventually just give up.
Here’s the non-negotiable checklist: First, clean the walls. Use a degreaser, especially in a laundry room where lint and fabric softener residue can build up. Second, spackle any holes or dents and sand them perfectly smooth. Your wallpaper will highlight every lump and bump, so make it flat. Third, and this is the most important part: PRIME. Use a primer specifically made for wallpaper. It creates a uniform, sealed surface that the adhesive can bond to like a champ. It also makes it a million times easier to remove the wallpaper someday without destroying your drywall.
Skipping this step is like building a house on a foundation of sand. It’s just setting yourself up for a mess later.
12. Learn Proper Wallpaper Hanging Techniques for Crisp Seams
Nothing screams “amateur DIY” like crooked, overlapping, or peeling seams. The secret to a professional look is getting those strips to meet perfectly edge-to-edge in what’s called a “butt joint.” You never, ever overlap the edges unless the manufacturer specifically tells you to (which is rare). Overlapping creates a noticeable ridge that will catch light and cast a shadow.
Here’s the shortcut you need to know: As you hang each strip, gently push it up against the edge of the previous one until they kiss. Then, use a special tool called a seam roller—it’s like a tiny, hard rolling pin—and gently press along the seam. This ensures the edges are firmly adhered to the wall and pushes out any tiny air bubbles. And always wipe away any excess paste that squishes out with a clean, damp sponge immediately. If you let it dry, it will leave a shiny spot on your beautiful new wallpaper.
Perfect seams are the hallmark of a job well done. It’s a detail that makes a massive difference.
13. Utilize a Laser Level for Perfectly Straight Wallpaper Strips
I used to think laser levels were just for serious contractors. Then I tried one for wallpapering, and it was a complete game-changer. Here’s why: your walls, ceilings, and corners are almost never perfectly straight or plumb, especially in older homes. If you use a corner as your guide for your first strip, the entire wall will end up crooked.
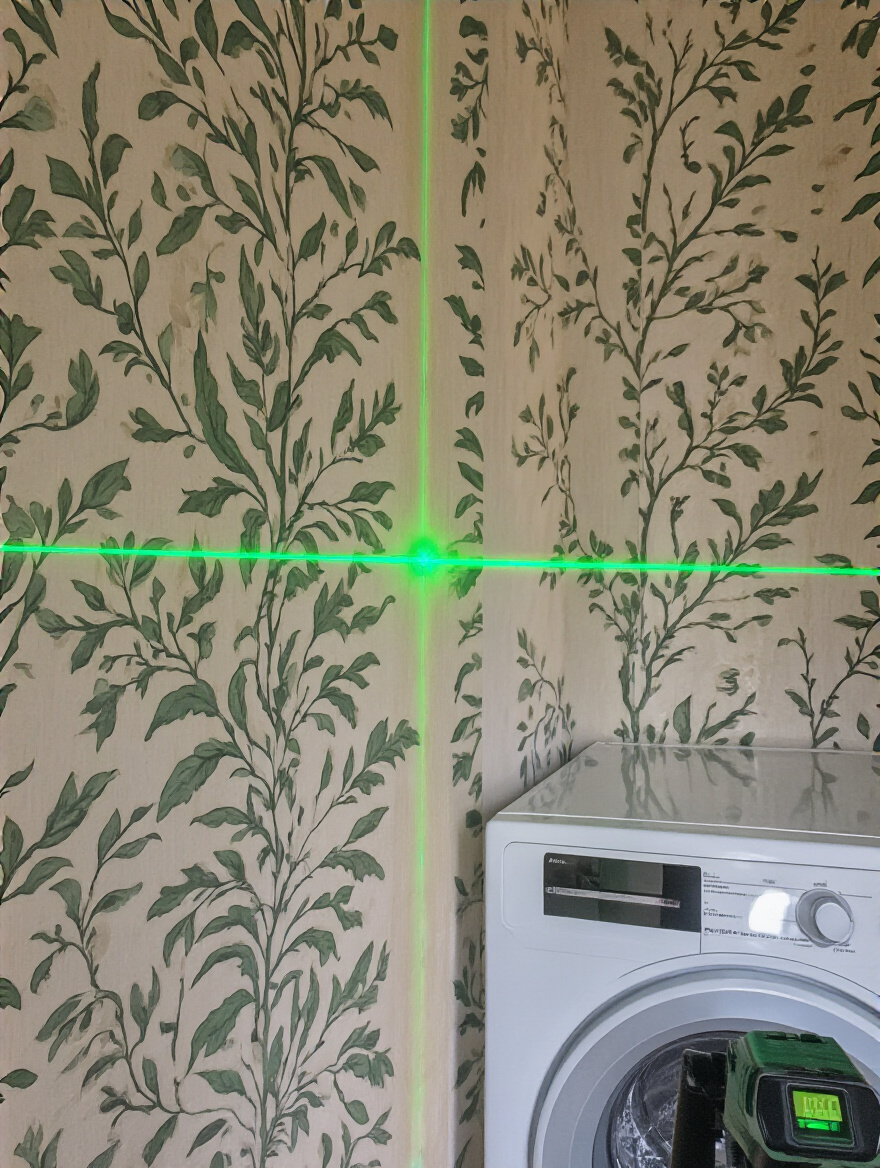
A laser level projects a perfectly straight, perfectly vertical line onto your wall. You just line up the edge of your first strip of wallpaper with that red or green laser line, and you are guaranteed to be starting straight. It takes all the guesswork and constant measuring with a traditional level out of the equation. Your patterns will line up flawlessly, and your whole project will look ten times more professional. It is the single best tool investment you can make for a wallpaper project.
It feels a little extra, but trust me, it saves so much time and frustration, you’ll wonder how you ever hung anything without one.
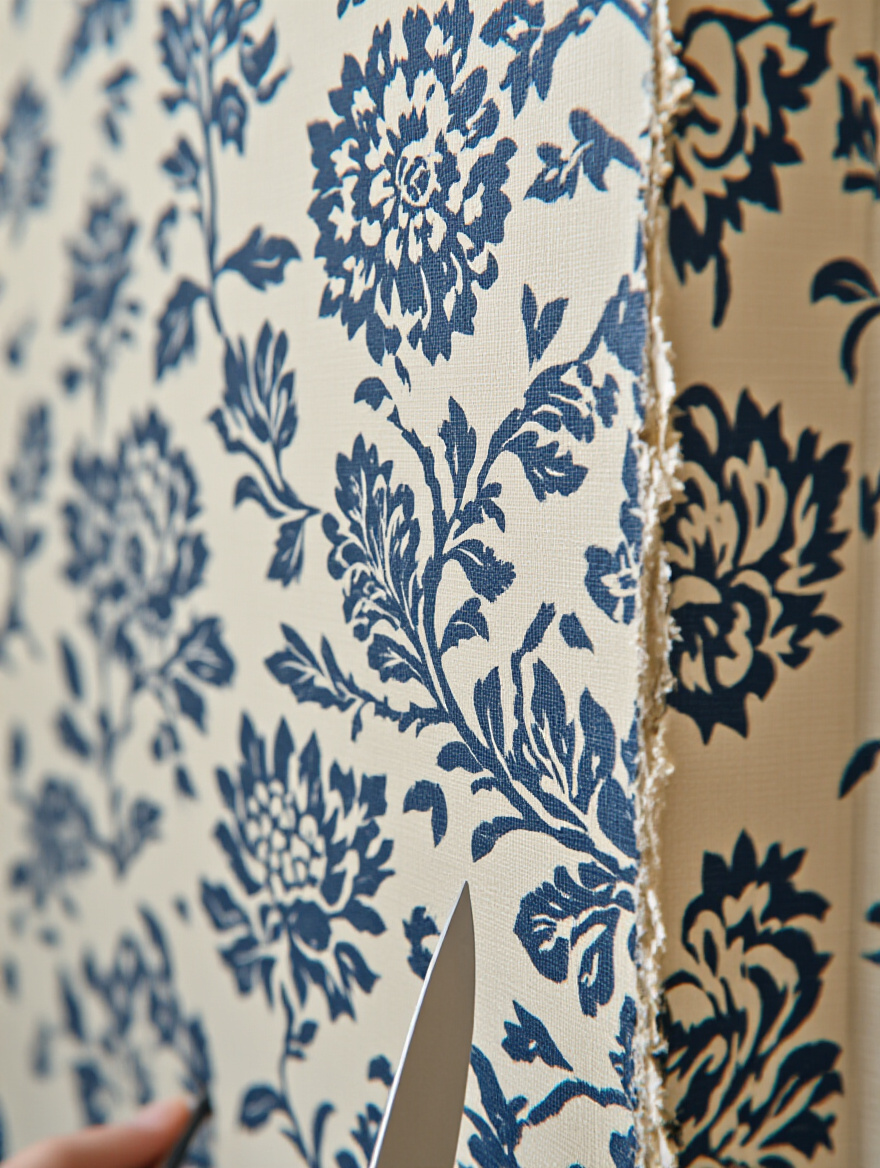
14. Trim Excess Wallpaper Precisely with a Sharp Utility Knife
My biggest pet peeve during installation? People trying to trim wallpaper with a dull knife. It doesn’t cut the paper; it rips and tears it, leaving a fuzzy, jagged edge that looks terrible. For those final, finishing cuts along the ceiling and baseboards, a ridiculously sharp blade is non-negotiable.
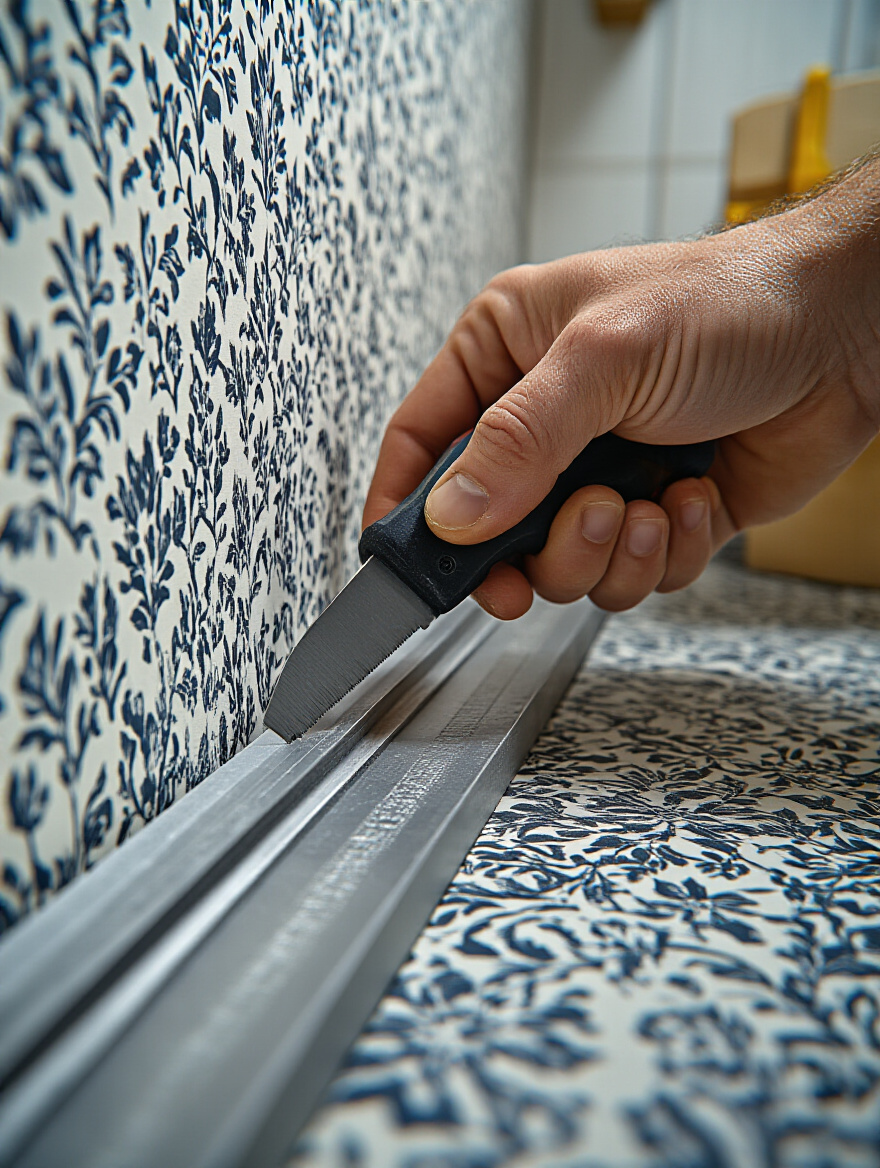
Here’s the trick: use a snap-off utility knife, and snap off a segment for a fresh blade way more often than you think you need to. I’m talking every few feet of cutting. Press a wide putty knife or a metal straightedge firmly into the corner and run your super-sharp blade along it. This gives you a guide to cut against and results in a perfectly crisp, clean line. It’s the difference between an edge that looks tailored and one that looks chewed.
This one tiny detail—a sharp blade—has a massive impact on the finished look. Don’t get lazy on the last step!
15. Ensure Proper Ventilation During and After Wallpaper Application
Okay, this might sound like a weird tip, but it’s so important, especially in a humid room. You need air moving both during and after you hang the wallpaper. For one, the fumes from wallpaper paste can be intense, and you want to air those out. But more importantly, you need the wallpaper to dry slowly and evenly.
If a room is sealed up tight and humid, the paste can take forever to cure, which can lead to mold growing behind your brand-new wallpaper. Yikes. On the other hand, if you blast it with a fan pointed directly at the wall, it can dry too quickly, causing the paper to shrink and the seams to pull apart. The solution is gentle, consistent air circulation. Open a window, run the exhaust fan, or place a fan in the doorway pointing out of the room.
You need to keep this up for a good 48-72 hours to ensure the paste is fully cured and bonded. It’s a little bit of patience that pays off big time.
Maintaining Vibrancy & Troubleshooting Common Issues
You did it! The wallpaper is up, and it looks incredible. Now, let’s talk about how to keep it looking that way. A little bit of care and knowing how to handle the inevitable “oops” moments will ensure your beautiful laundry room stays beautiful for years to come.
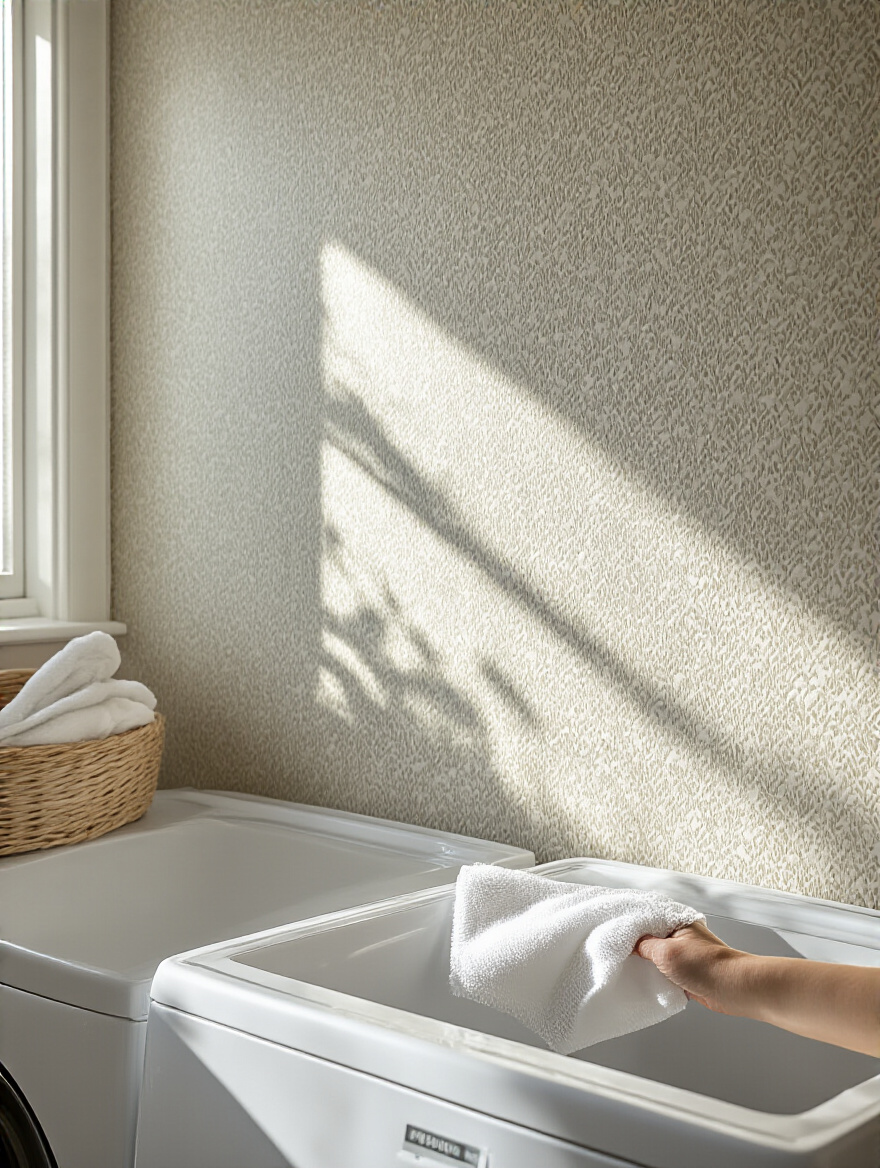
16. Clean Vinyl Wallpaper Safely Using Mild Soap Solutions
Life is messy. Especially in the laundry room. But please, please do not grab an abrasive cleaner or a magic eraser to scrub your beautiful new wallpaper. You’ll strip the color right off. The beauty of choosing a durable vinyl paper is that it’s incredibly easy to clean—if you do it right.
Here’s the secret recipe: a few drops of a mild dish soap (like Dawn) in a bucket of warm water. That’s it. Use a soft sponge or microfiber cloth, wring it out so it’s just damp (not sopping wet!), and gently wipe down the walls. Then, go back over it with a second cloth dampened with just plain water to “rinse” it, and finally, a quick wipe with a dry cloth. This gentle method will remove dust, lint, and most minor smudges without harming the finish.
It’s a simple five-minute job that will keep your wallpaper looking fresh and vibrant for its entire lifespan.
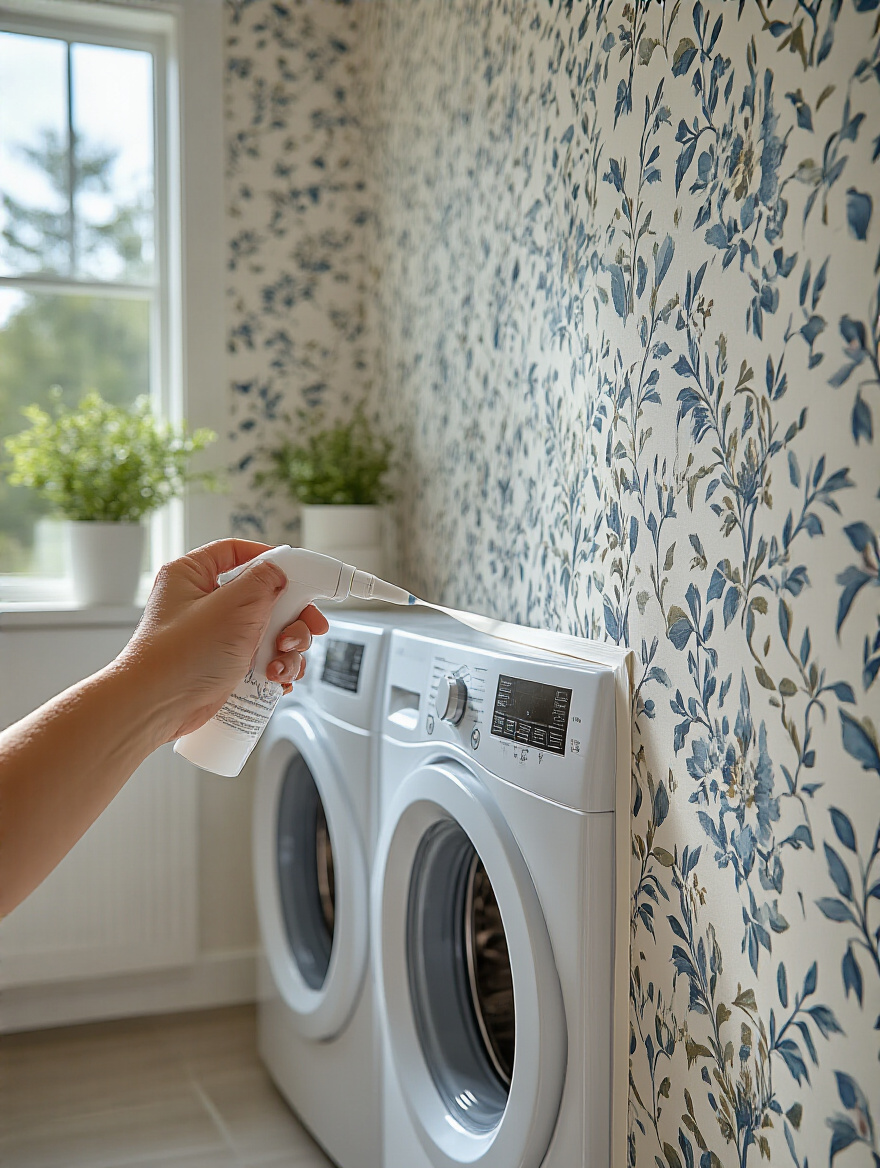
17. Spot Treat Minor Stains Promptly to Prevent Permanent Damage
Picture this: a glop of blue laundry detergent slides down your brand new, light-colored wallpaper. Your first instinct might be to panic and scrub wildly. Don’t! The key to stain removal is to act fast, but act gently. The longer a stain sits, the more it wants to become a permanent resident.
First, blot—don’t rub!—any excess with a clean cloth or paper towel. For most stains on washable wallpaper, that same mild soap and water solution is your best friend. Dampen a clean white cloth (so no color transfers) and gently dab at the stain from the outside in. This prevents you from spreading the stain and making it bigger. For greasy or oily stains, try dabbing a little cornstarch on it first to absorb the oil, then gently brush it off and clean the remaining spot.
Having a little “stain kit” with a clean cloth and a small spray bottle of soapy water ready to go in the laundry room is a total pro move.
18. Prevent Edge Peeling by Sealing High-Traffic Wallpaper Areas
Here’s a trick I learned from professional installers. In a high-humidity, high-traffic area like a laundry room, the seams and edges are the most vulnerable spots. They’re the first place moisture will try to sneak in and the first place to get bumped or brushed against, causing them to lift. You can stop this before it even starts.
Once your wallpaper is fully dry (after a few days), get a tiny bottle of specialized wallpaper seam sealer. It’s a clear adhesive that you can apply with a tiny brush right over the seam line. It creates an invisible, waterproof barrier that locks those edges down and protects them from moisture and physical wear and tear. It’s especially brilliant for the seams near a sink or right behind the washer and dryer.
This one extra, five-minute step can add years to the life of your wallpaper installation. It’s cheap insurance for your beautiful walls.
19. Address Mold or Mildew Immediately with Approved Cleaners
Okay, let’s talk about the scary M-word: mold. If you see little black or gray spots starting to form, do not ignore them. In a humid laundry room, a tiny spot can turn into a big problem fast. But the good news is, if you catch it early, it’s usually an easy fix. The key is to address the moisture source first—is there a tiny leak? Is your ventilation poor? Fix that problem permanently.
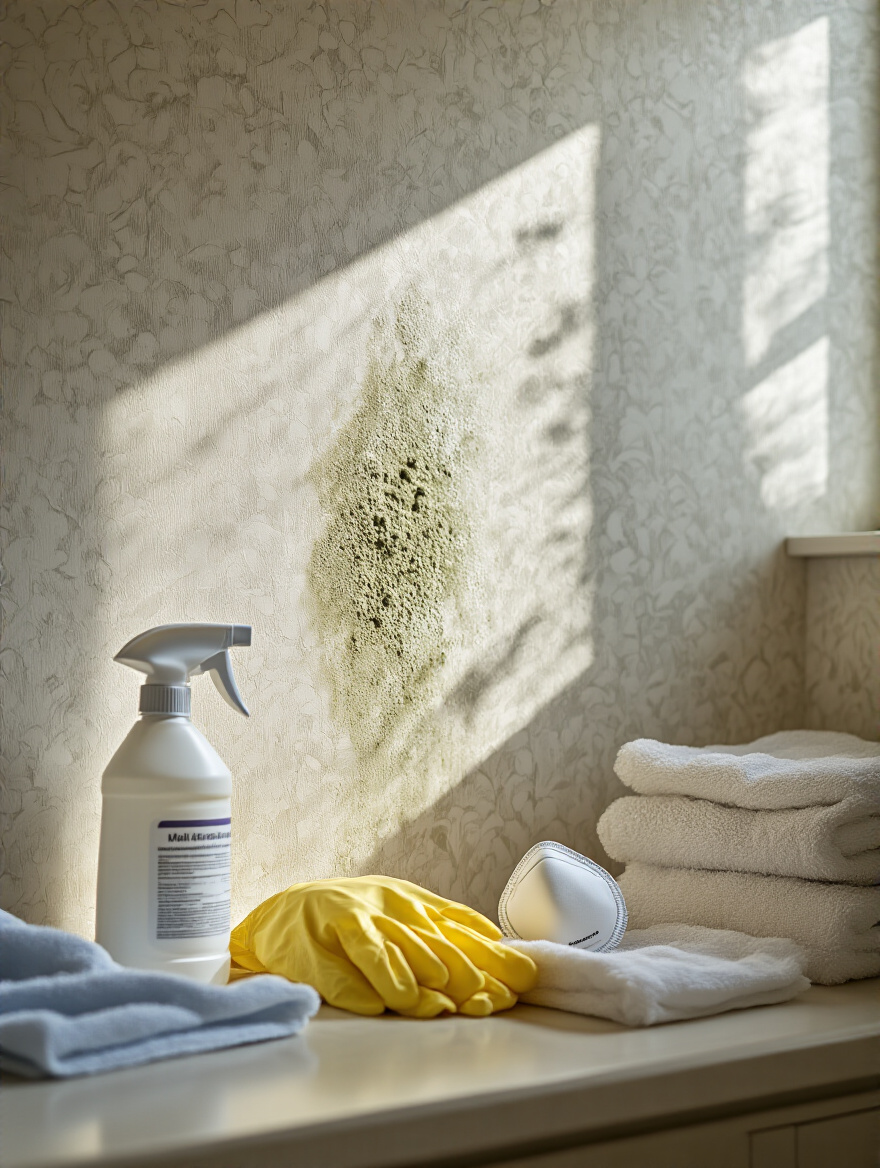
To clean the spots on washable wallpaper, you don’t need harsh bleach right away. Start with a simple solution of equal parts white vinegar and water in a spray bottle. Spray it on the spot, let it sit for a few minutes, and then gently wipe it away with a soft cloth. Vinegar is a natural fungicide and is much gentler on your wallpaper’s finish. For anything more serious, you might need a commercial mold remover, but always test it in a hidden spot first!
Don’t panic, just act fast. A quick response protects both your wallpaper and your family’s health.
20. Repair Small Rips with Matching Wallpaper Scraps for Invisibility
This is why you always buy that extra 15% of wallpaper! Inevitably, a sharp corner of a laundry basket or a misplaced tool will cause a small tear. Don’t despair. You can make it virtually disappear with a technique called “double cutting.”
Take a leftover scrap of your wallpaper that’s a bit larger than the tear and place it over the damaged area, carefully lining up the pattern perfectly. Hold it in place with painter’s tape. Then, using a fresh, sharp blade and a straightedge, cut a square or rectangle shape through both the patch and the damaged wallpaper on the wall. Remove the patch and the taped-on scrap, then carefully peel away the little cut-out section of damaged paper from the wall. Apply a tiny bit of wallpaper paste to your new patch, fit it into the hole like a puzzle piece, and smooth it down. The seam will be right on your cut line and, if the pattern is aligned, practically invisible.
It’s a design magic trick that will make you feel like a total home repair hero.
Creative Accents & Advanced Design Strategies
Now that you’ve mastered the basics, let’s have some real fun. Wallpaper isn’t just for walls! With a little creativity, you can use it to add bespoke, high-end details that will make your laundry room feel truly custom and special. This is where you get to play.
21. Create an Accent Wall Behind Washer and Dryer
If wallpapering an entire room feels too intimidating or expensive, an accent wall is your best friend. The wall behind your washer and dryer is the perfect candidate. It’s a brilliant way to make a huge statement with minimal cost and effort. It instantly creates a focal point and gives those boring appliances a beautiful, stylish backdrop.
This is your chance to go bold. Pick the dramatic, large-scale floral or the funky, colorful geometric you were maybe too nervous to use everywhere else. In a small dose, it’s not overwhelming—it’s exciting! It draws the eye and makes the whole space feel more intentional and designed. I did this in my own tiny laundry closet with a vibrant lemon-print peel-and-stick paper, and it makes me smile every single time I open the doors. It turned a purely functional space into a joyful little moment.
It’s the most bang-for-your-buck design move you can make in a laundry room, period.
22. Use Wallpaper Scraps to Line Cabinet Shelves
This is one of my favorite “use every last scrap” secrets. After you’re done wallpapering, don’t throw away the remnants! Use them to line the inside of your laundry room cabinets or the back of your open shelving. It’s a delicious little secret that adds a completely unexpected pop of pattern and color.
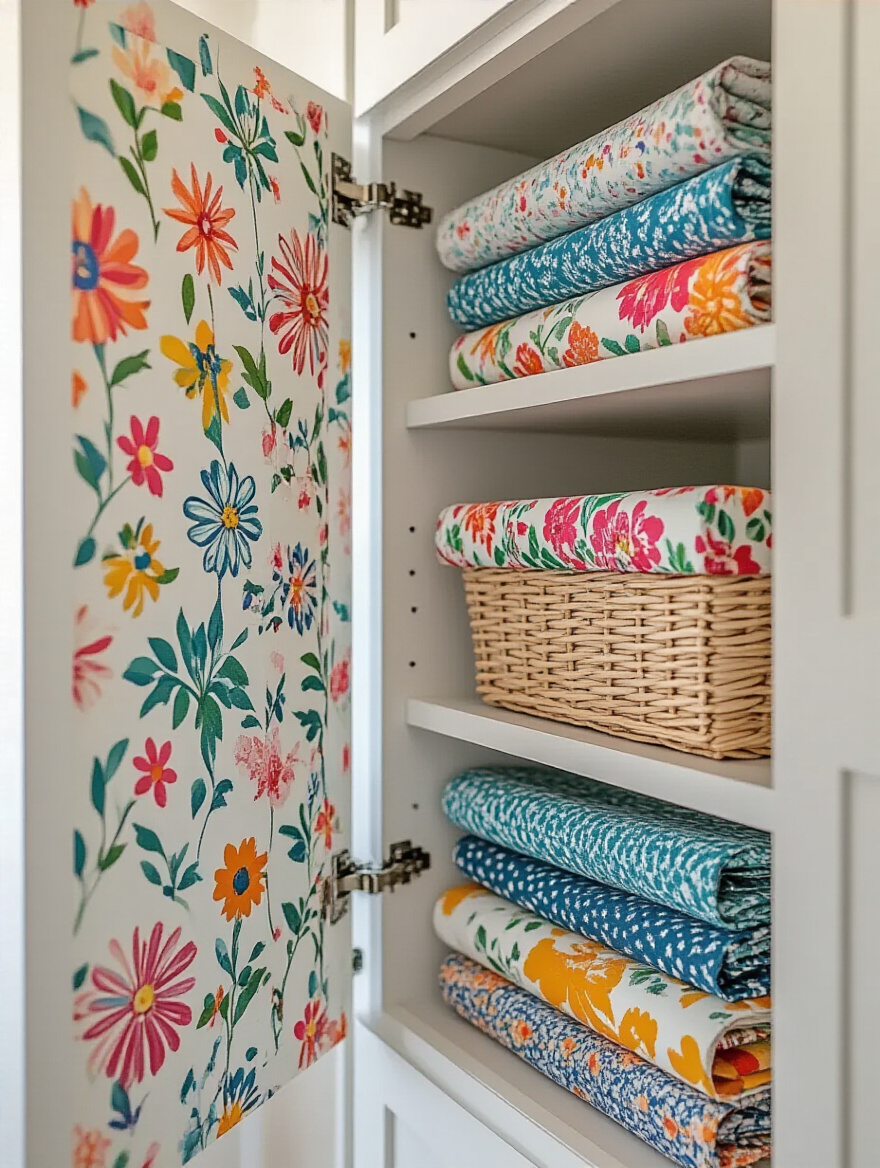
It’s such a small detail, but it feels so custom and thoughtful. When you open a cabinet to grab the detergent and are greeted with that beautiful pattern, it just elevates the entire experience. It’s a way to tie the whole room together and show that every single detail was considered. Plus, if you use a vinyl wallpaper, it provides a durable, wipeable surface that helps protect your shelves from spills and scratches.
It costs you nothing but a few minutes of your time and makes your laundry room feel like a boutique space.
23. Frame Wallpaper Panels for Instant Laundry Room Art
Have a stunning wallpaper pattern that you love, but you’re a renter or just not ready to commit to a full wall? Frame it! This is such a chic and budget-friendly way to create large-scale custom art for your laundry room. Just a few coordinating framed pieces can make the room feel incredibly polished.
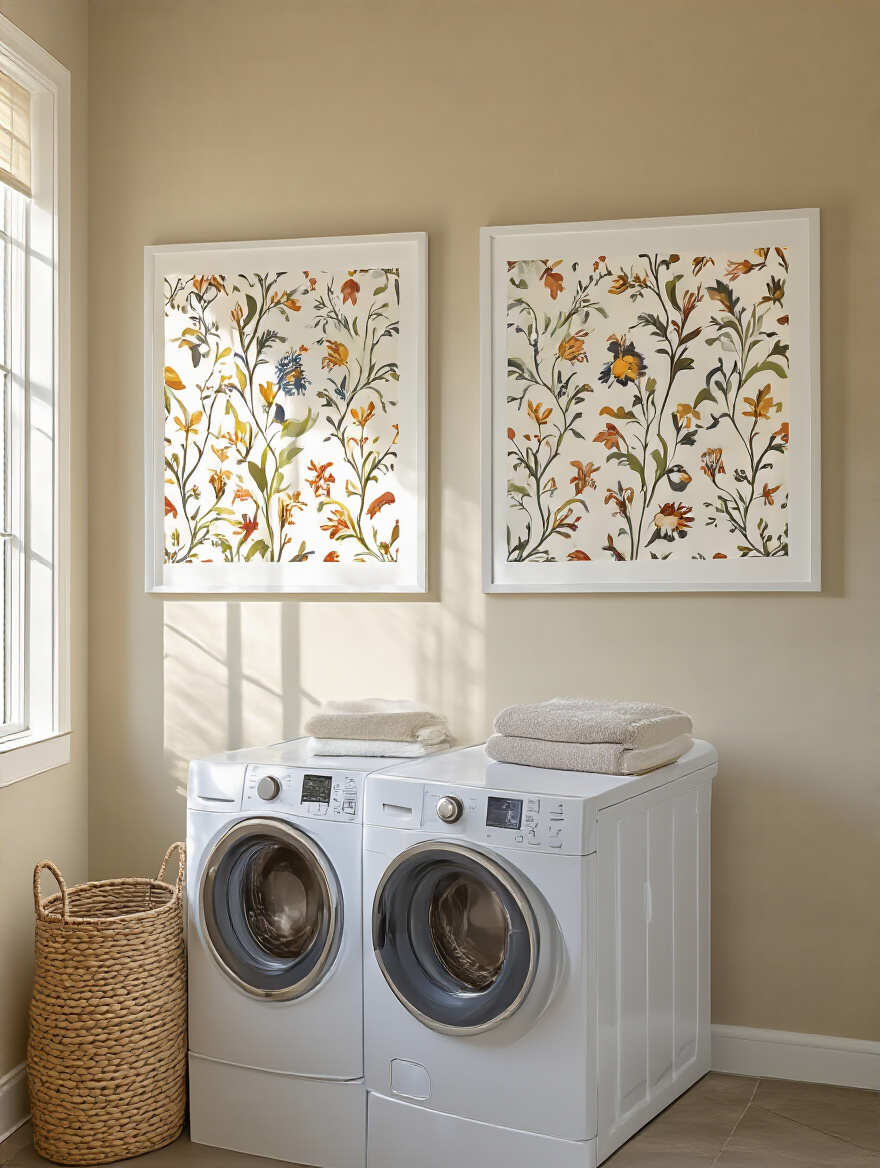
Buy a few simple, inexpensive frames (IKEA is great for this) and cut panels of your favorite wallpaper to fit inside. You can do a single large frame or a series of three smaller ones. A bold graphic print, a serene botanical, or even a beautiful texture like grasscloth looks incredible when treated like a piece of art. It’s a perfect solution for adding personality without a long-term commitment. You can even swap out the paper with the seasons for a quick and easy refresh!
This is how you get that high-end designer look for a fraction of the cost of buying actual art.
24. Mix Different Wallpaper Patterns for Eclectic Laundry Charm
Okay, for my fellow design daredevils out there, this is the boss move. Mixing patterns is not for the faint of heart, but when you get it right, it is absolutely spectacular. It’s how you create a space that is bubbling with personality and charm, a room that feels collected and uniquely you.
The key to successfully mixing patterns is to have a common thread that ties them together. The easiest way is through color. Pick two or three patterns that all share a primary color—say, different prints that all have a touch of navy blue. Then, be sure to vary the scale: pair a large-scale floral with a small-scale geometric, or a bold stripe with a subtle texture. The contrast in scale is what makes it feel intentional and not just chaotic. Start by taping up samples next to each other to see how they talk to one another.
It’s a fearless choice, but it can transform a boring utility room into the most interesting and vibrant space in your whole house.
Conclusion
So there you have it. Your laundry room doesn’t have to be the forgotten corner of your home. With the right wallpaper and a little bit of know-how, you can transform it into a space that’s not just functional, but genuinely beautiful—a place that adds a little bit of joy to your daily routine. It’s about seeing the potential in every square foot of your home and making it work for you, both in style and in spirit.
Don’t be intimidated! Start small with an accent wall or by framing a few panels. Order those samples and see what sparks joy. By focusing on smart preparation, choosing durable materials, and adding those creative finishing touches, you can create a laundry room you’ll actually want to show off. So go ahead, give that hardworking room the makeover it deserves. You’ll be amazed at how a little pattern can completely change the way you feel about doing laundry.