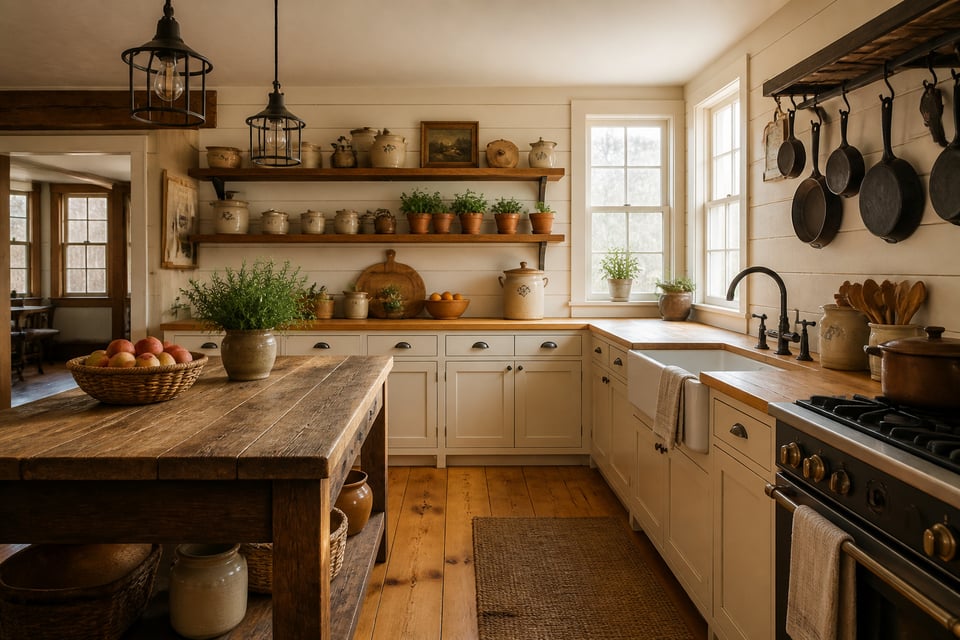
There’s a specific quality in a genuine farmhouse kitchen that you recognize immediately but can’t always name. It’s not the shiplap or the apron sink — plenty of kitchens have those. It’s something quieter: the sense that the room has been living with the same family for decades. The things in it got there because they were needed, not because they were chosen from a catalog.
I’ve spent fourteen years renovating historic homes. Farmhouse kitchen decoration is where I spend most of my time talking clients out of trends and back toward honest choices. The farmhouse aesthetic is one of the most historically coherent design traditions in American interiors. It’s rooted in real materials, real work, and real food. When it goes wrong, it’s usually because someone chased the look instead of the logic.
These seventeen farmhouse kitchen decoration ideas draw from that tradition. Some are materials decisions. Others are small shifts in how you arrange what you already own. All of them have a reason that predates Pinterest.
1. Shiplap Accent Wall Behind Open Display Shelving
Long before it became the shorthand for farmhouse style, shiplap was structural. The boards — each with a notched rabbet — were used as exterior sheathing in American farm buildings before drywall existed. On barns and utility buildings, they were left exposed. In farmhouses, they were typically covered with plaster, which is why discovering them during renovation still feels like genuine archaeology.
If you want shiplap to read as architectural rather than decorative, use real tongue-and-groove pine boards. MDF panels swell in kitchen humidity, especially near a sink. The seams begin to telegraph within a year or two. Pine moves slightly with the seasons, which is entirely appropriate for this kind of farmhouse kitchen decoration.
For paint, Benjamin Moore White Dove is a reliable go-to. It’s warm without being cream. Sherwin-Williams Accessible Beige works well in kitchens with mixed wood tones. If you want something less expected, a deep sage or dusky blue-grey is historically plausible. Not every American farmhouse was white.
The open shelving combination works because the horizontal lines of the shiplap contrast with the vertical rhythm of stacked plates and tall crocks. Install the shiplap first. Paint it. Then mount shelves using simple iron corbels at 10–12 inches deep. That’s rustic farmhouse kitchen charm built from the structure outward.
2. An Apron-Front Farmhouse Sink as the Kitchen’s Anchor
The farmhouse sink’s deep basin and exposed front panel weren’t designed to look beautiful. They were designed to prevent back injury. In kitchens before running water, hand-pumping meant leaning over a sink for hours at a time. The apron front eliminated the cabinet rail that caused that lean. It was a purely ergonomic innovation that happened to look exactly right.
Original farm kitchen sinks were stone or soapstone troughs. Cast iron with porcelain enamel arrived as an affordable upgrade in the late 19th century. Today you’re choosing between cast iron, fireclay, and stainless steel. Each involves real trade-offs worth understanding before you order anything.
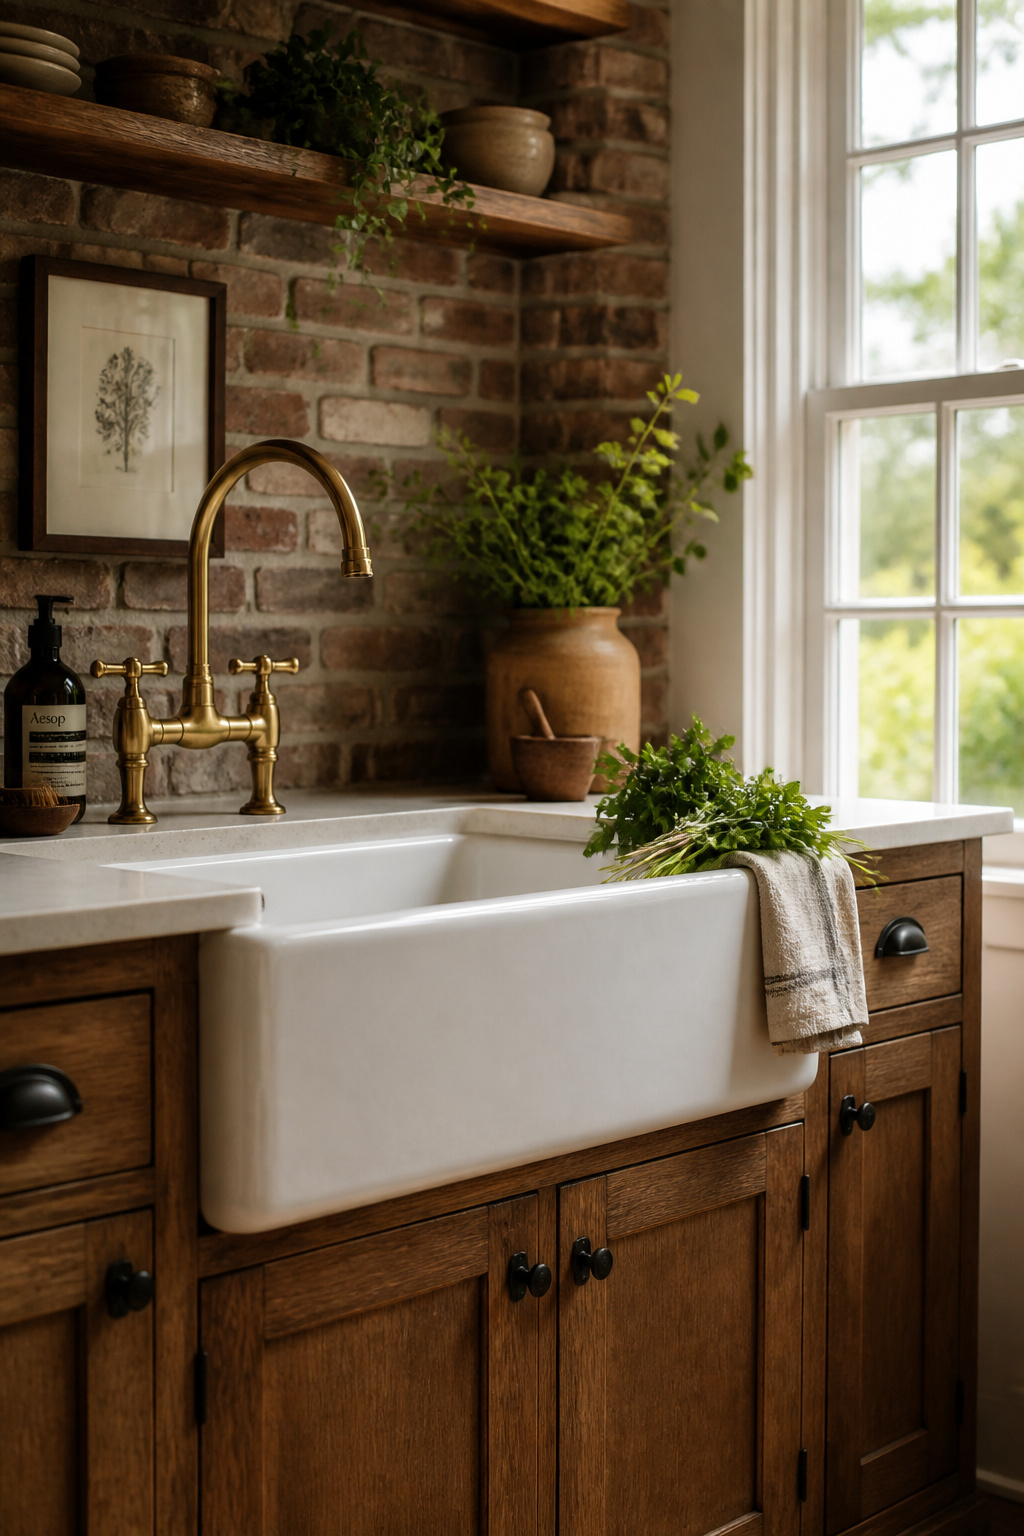
Cast iron looks the most period-correct. It can weigh over 200 pounds, which means your cabinet needs structural reinforcement before installation. Fireclay is durable and chip-resistant. However, it comes out of the kiln with up to a 2% size variation. So measure carefully and order the cabinet base after you have the sink spec sheet in hand. Stainless is the lightest and most practical choice. It’s also increasingly accepted in farmhouse interiors, even if it has less historical claim.
The most common mistake: ordering the cabinet first. Get the sink specifications, then have a cabinet maker cut the opening on-site. A 36-inch cabinet often won’t hold a 36-inch farmhouse sink due to the apron overhang and base rail geometry. For more ideas on pulling together the full kitchen, cozy farmhouse kitchen decor ideas is worth a look.
3. Open Wood Shelving in Place of Upper Cabinet Boxes
Enclosed upper cabinet boxes only became the standard after World War II, when prefabricated cabinetry became widely manufactured and cheap. Before that, kitchen storage was open shelving, hooks, and plate racks. You could see and reach everything quickly during food preparation. Replacing upper cabinets with open shelving isn’t following a trend. It’s reverting to the original kitchen logic.
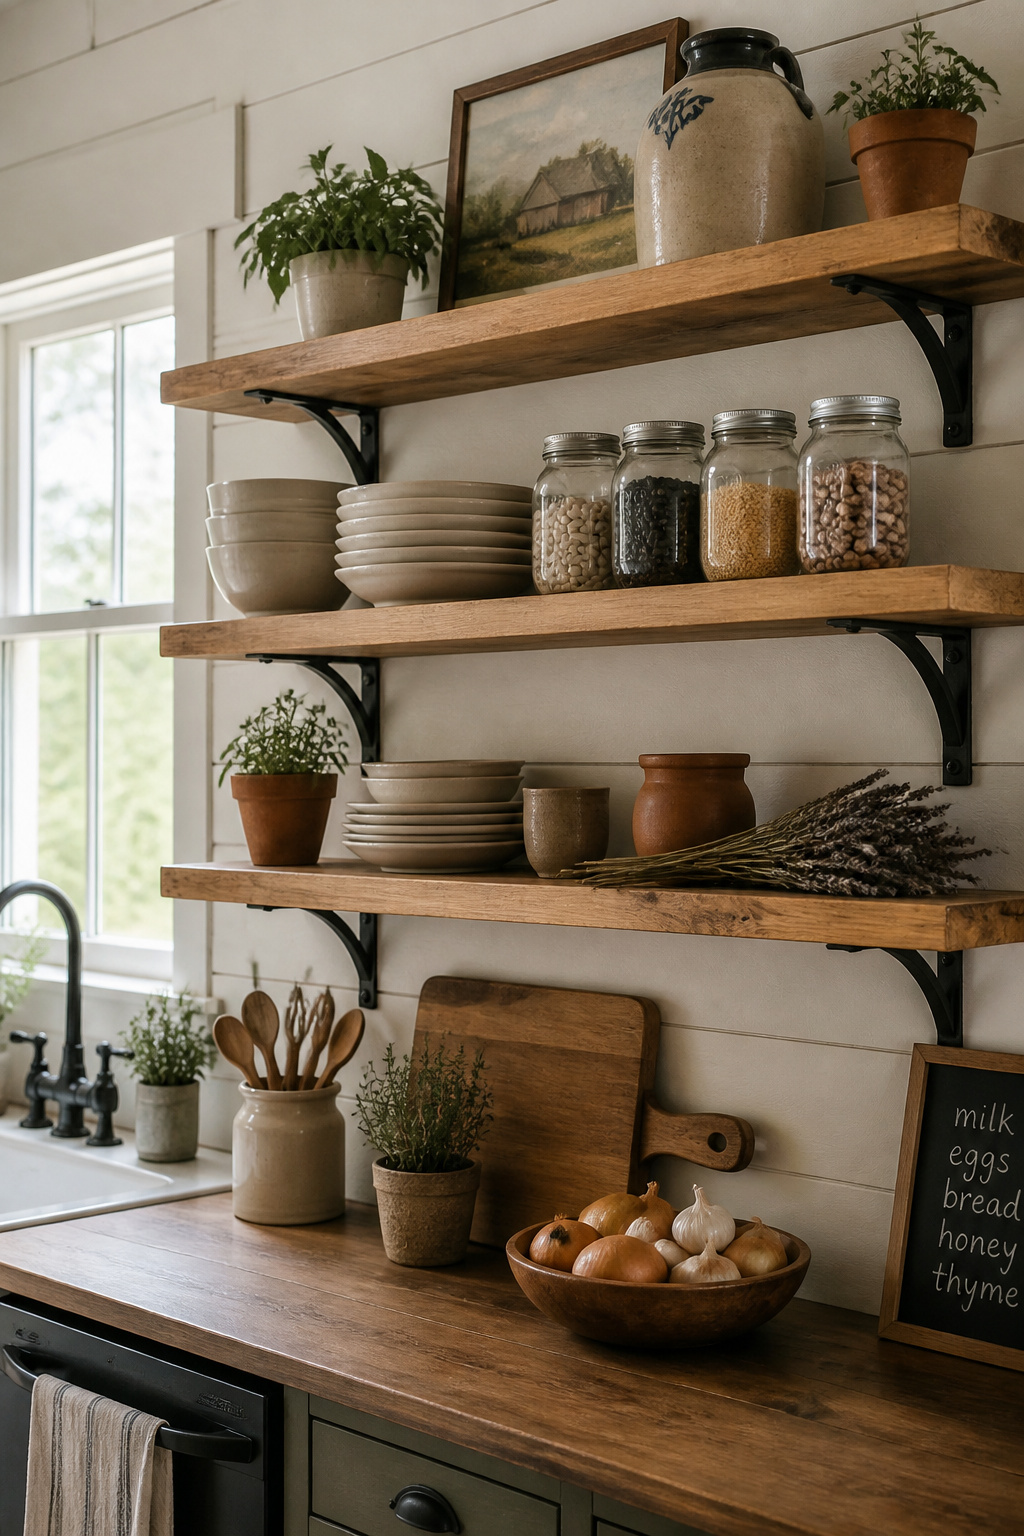
The specifics matter. Shelf depth should be 10–12 inches. Deep enough for plates, not so deep that things get lost at the back. Brackets should match your shelf depth or run 2 inches shorter. For wood species, white oak is the right choice for visible grain. Reclaimed barn wood works if you want genuine patina. Alder takes stain well and is a budget-friendly alternative.
The styling principle is counterintuitive: use less. Group items in odd numbers. Mix functional pieces — a stack of plates, everyday glasses — with a few decorative ones like a crock or a small framed print. The open shelves of a clever farmhouse kitchen storage approach weren’t display cases. They held what was used most frequently.
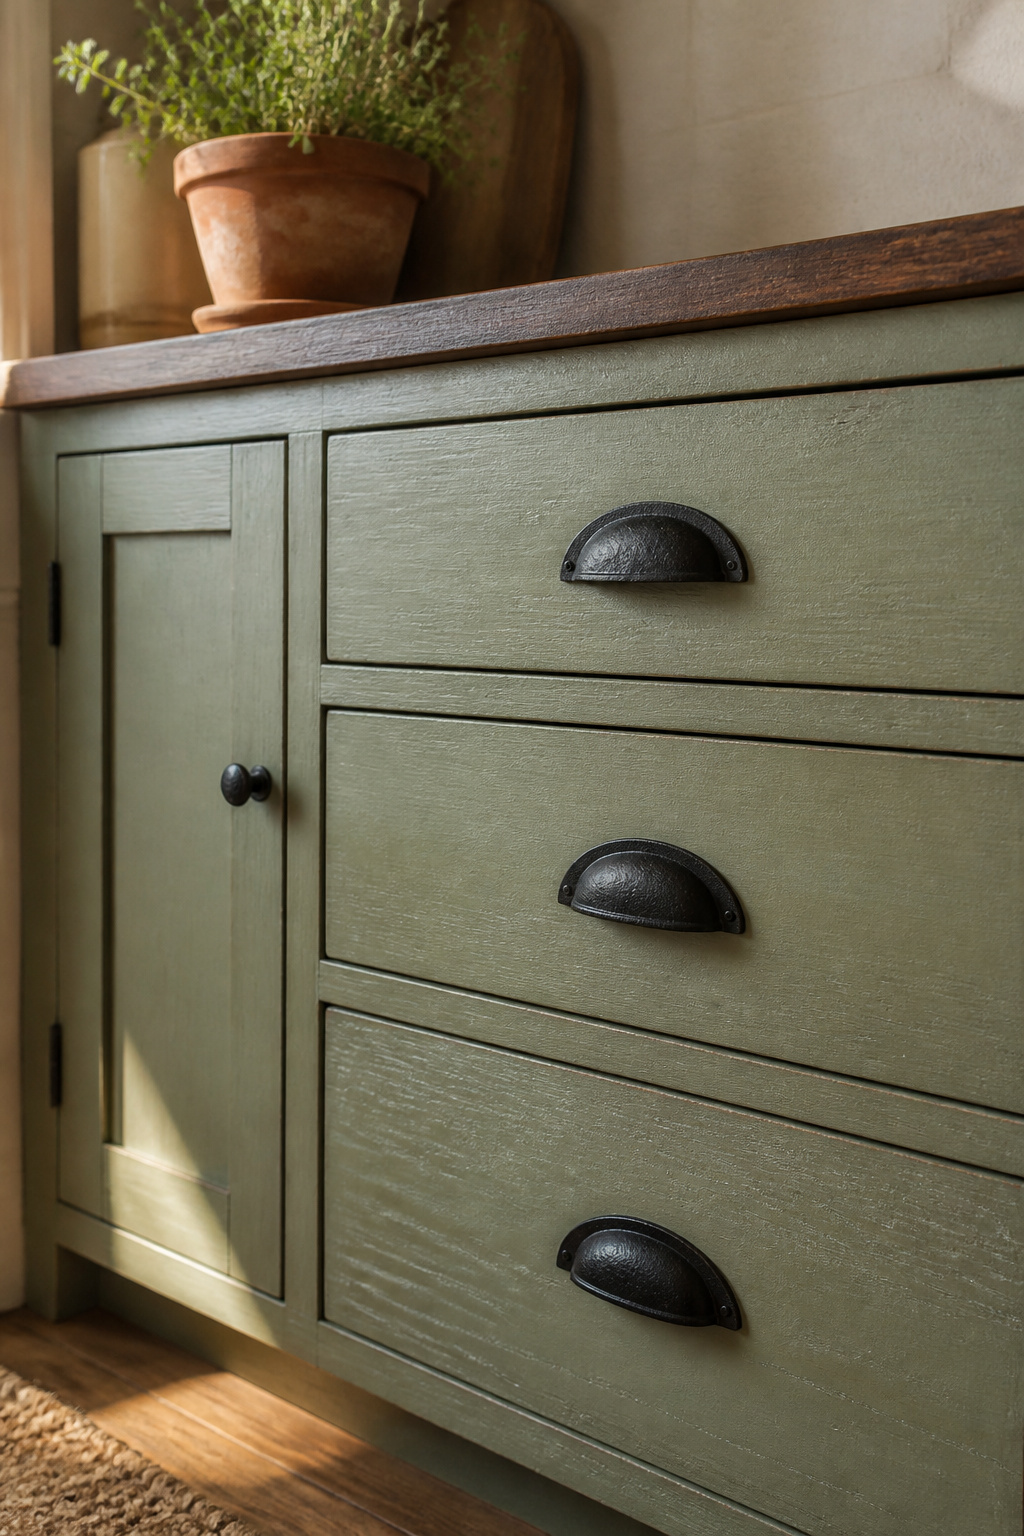
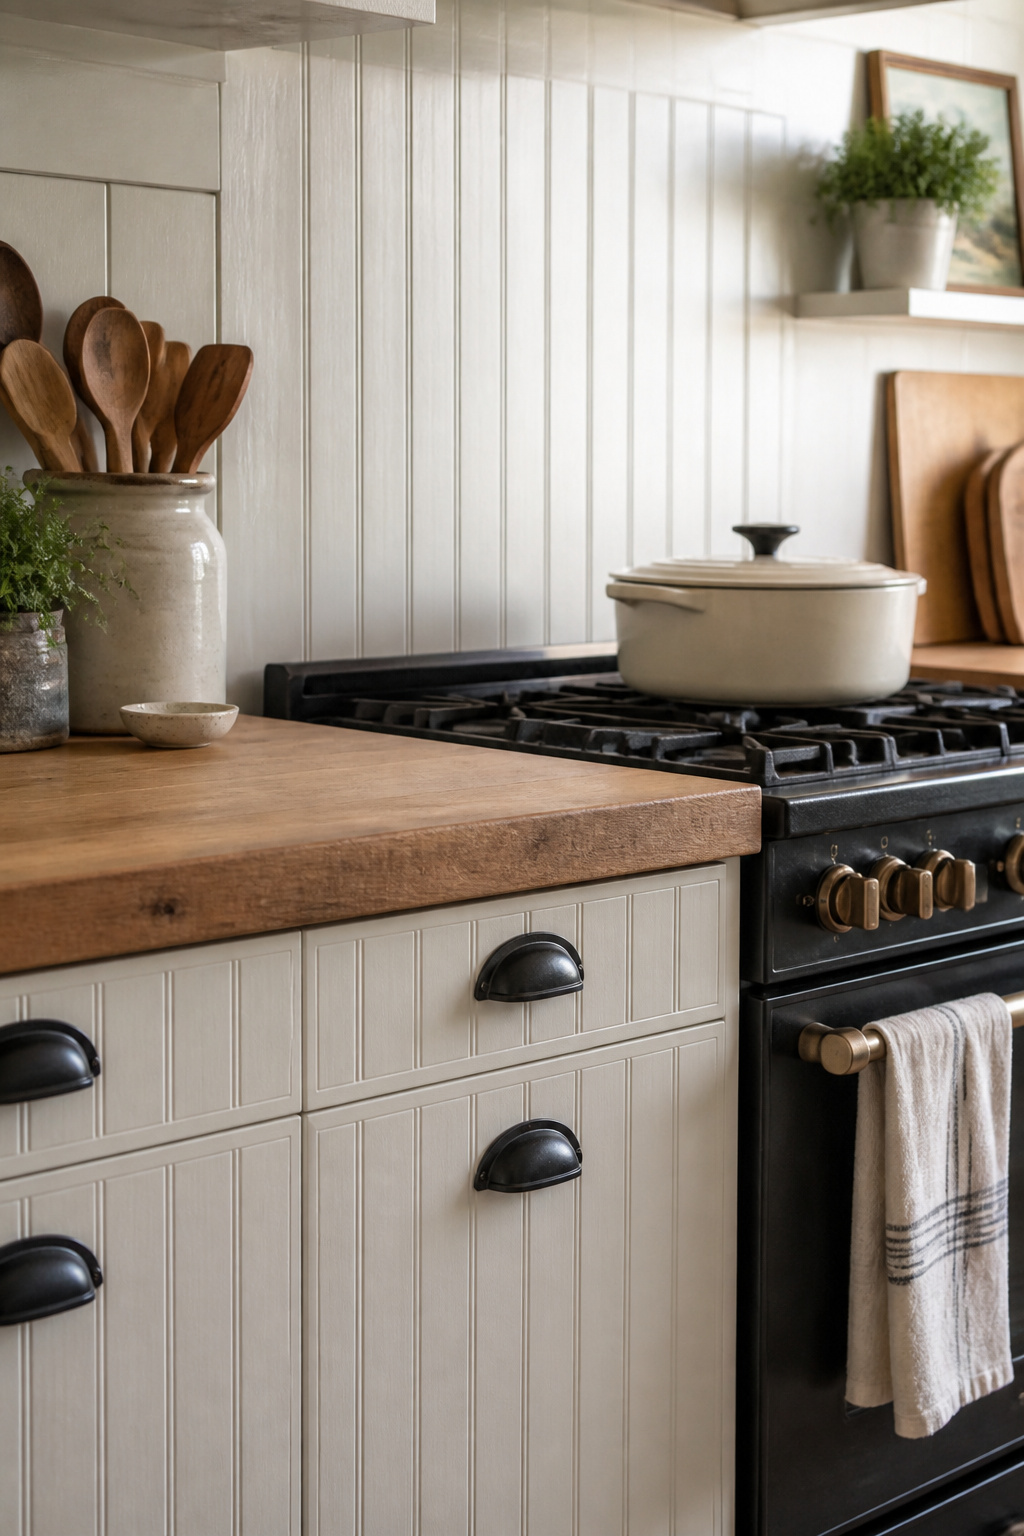
4. Farmhouse Kitchen Character Through Antique Hardware on Shaker Cabinets
Shaker cabinet doors trace back to furniture made by the Shaker religious community from the 1770s onward. Their theology held that beauty resided in function and craftsmanship, not decoration. The five-piece recessed-panel door — with a floating center panel designed to allow wood movement — was the physical expression of that belief.
Why Shaker Reads as Authentic Farmhouse
This makes Shaker doors the most historically credible cabinet front for farmhouse kitchen decoration. They don’t fight with rough materials. Put a Shaker door next to exposed brick, wrought iron hardware, and a butcher block countertop. It holds its own without competing.
Hardware: The Farmhouse Detail That Actually Lands
The traditional arrangement is cup pulls (also called bin pulls) on drawers and small knobs on cabinet doors. On genuine vintage bin pulls, the face screws are functional fasteners. On reproductions, they’re often decorative. It’s a useful way to distinguish originals at antique markets.
Period-appropriate finishes: antique pewter, aged brass, and oil-rubbed bronze. Matte black iron is the most historically connected finish. Iron was the original hardware material on American farm buildings. It’s also the most versatile across different wood tones and paint colors. Avoid polished nickel or brushed chrome — these read as contemporary, not historical.
If your existing cabinet boxes are sound, you don’t need a full renovation. Order replacement Shaker-profile doors to fit existing boxes — measure each one separately, since they’re rarely perfectly uniform. Swap the hardware. The room transforms for a fraction of the cost. For a broader look at historical cabinet options, the range of traditional kitchen cabinet styles is worth exploring before you commit.
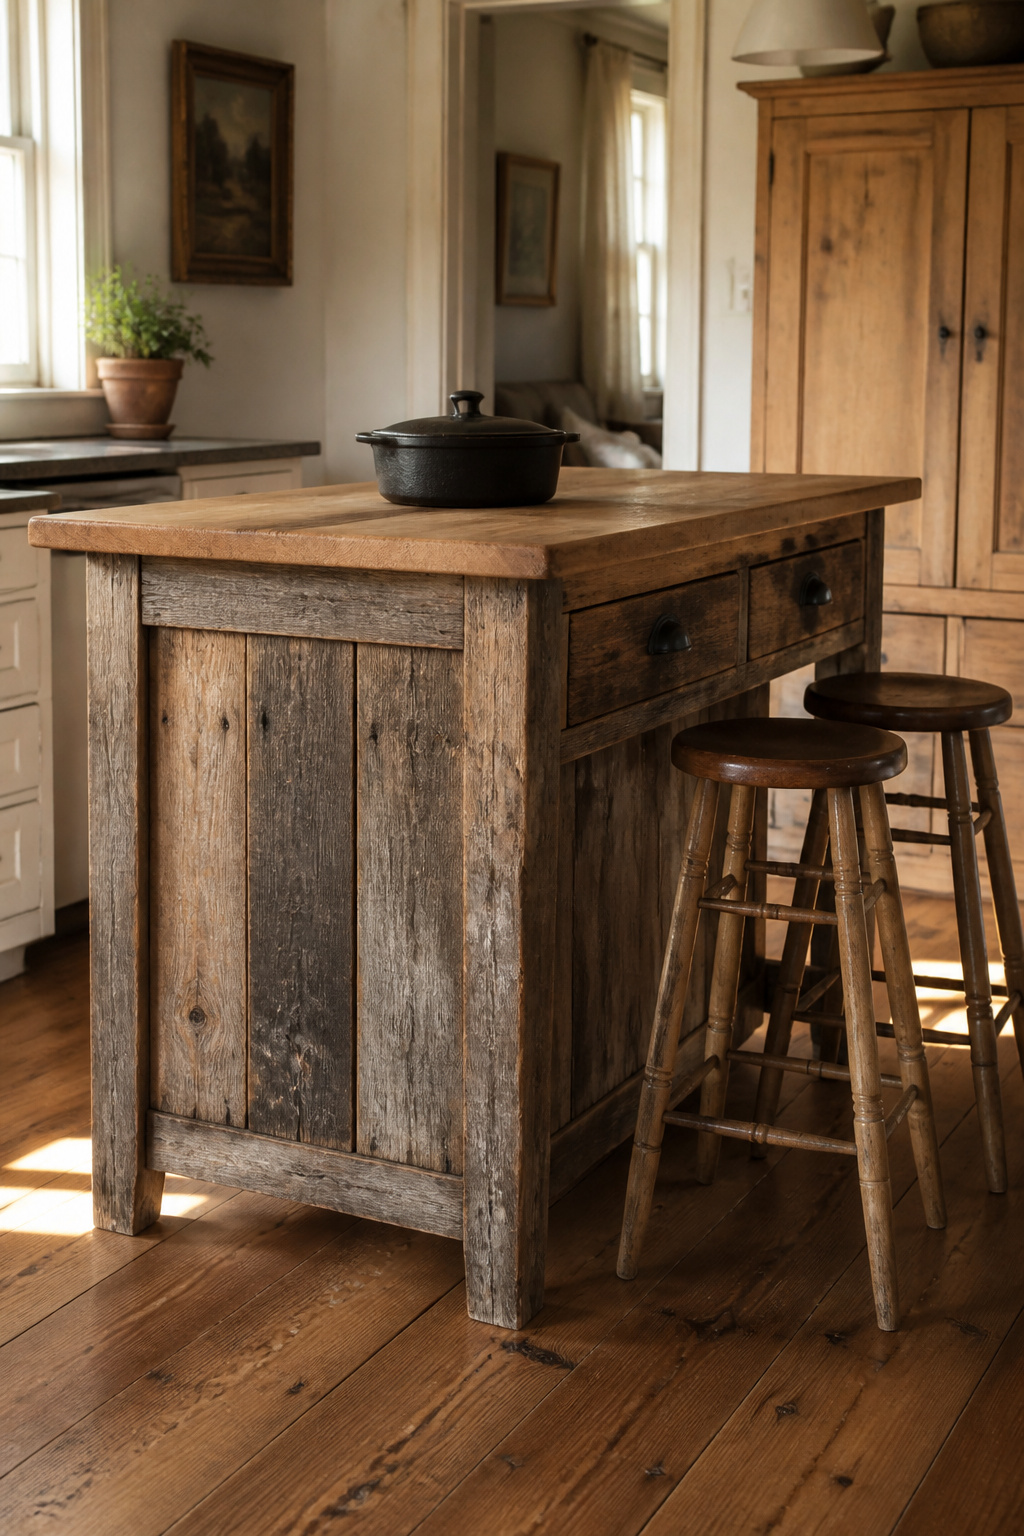
5. A Reclaimed Wood Island With Butcher Block or Concrete Top
New wood cannot replicate old-growth wood. This is dendrology, not sentimentality. The white oak and pine used in American barns grew slowly over a hundred or more years. They produced wood with tight grain, mineral deposits, and density that modern fast-grown lumber doesn’t have. The nail holes, saw marks, and weathering on reclaimed barn wood are genuine history. No distressing technique fakes them convincingly at close range.
Sourcing Reclaimed Wood
For sourcing, look first at local salvage: barn demolition projects, urban deconstruction companies, and timber framers who work with old industrial buildings. Local salvage is cheaper and more interesting than generic suppliers. The wood often has a documented origin. Custom reclaimed countertops run approximately $74–$79 per square foot with shipping.
Sizing and Countertop Options
For island sizing, the working minimum is 42 inches of clearance on all sides. A freestanding island — not built in — often reads more authentically farmhouse than a fixed installation. It suggests accumulation over time rather than a single design decision.
Butcher block is the most historically appropriate countertop. It was the actual work surface in farm kitchens. Budget $30–$60 per square foot installed. It requires regular treatment with food-safe mineral oil. Soapstone is a quieter alternative. Its soft surface marks and scratches over time, and those marks become part of its character.
6. Vintage Pendant Lighting That Echoes Farmhouse Kitchen History
The schoolhouse pendant — a globe-shaped shade in opal or milk glass, mounted on a metal stem — was designed for early 20th-century schools and municipal buildings. It was a working institutional fixture before it became a farmhouse kitchen design choice. That institutional origin is exactly why it works here. It’s functional, not decorative, in its DNA.
Industrial enamel shades in green, black, or white have a slightly different lineage — manufacturing environments from the 1890s onward. Still, they arrived in domestic kitchens as part of the same utilitarian aesthetic. Cage bulbs with visible filaments reference even earlier incandescent technology. All three styles share the quality of being designed to provide light first.
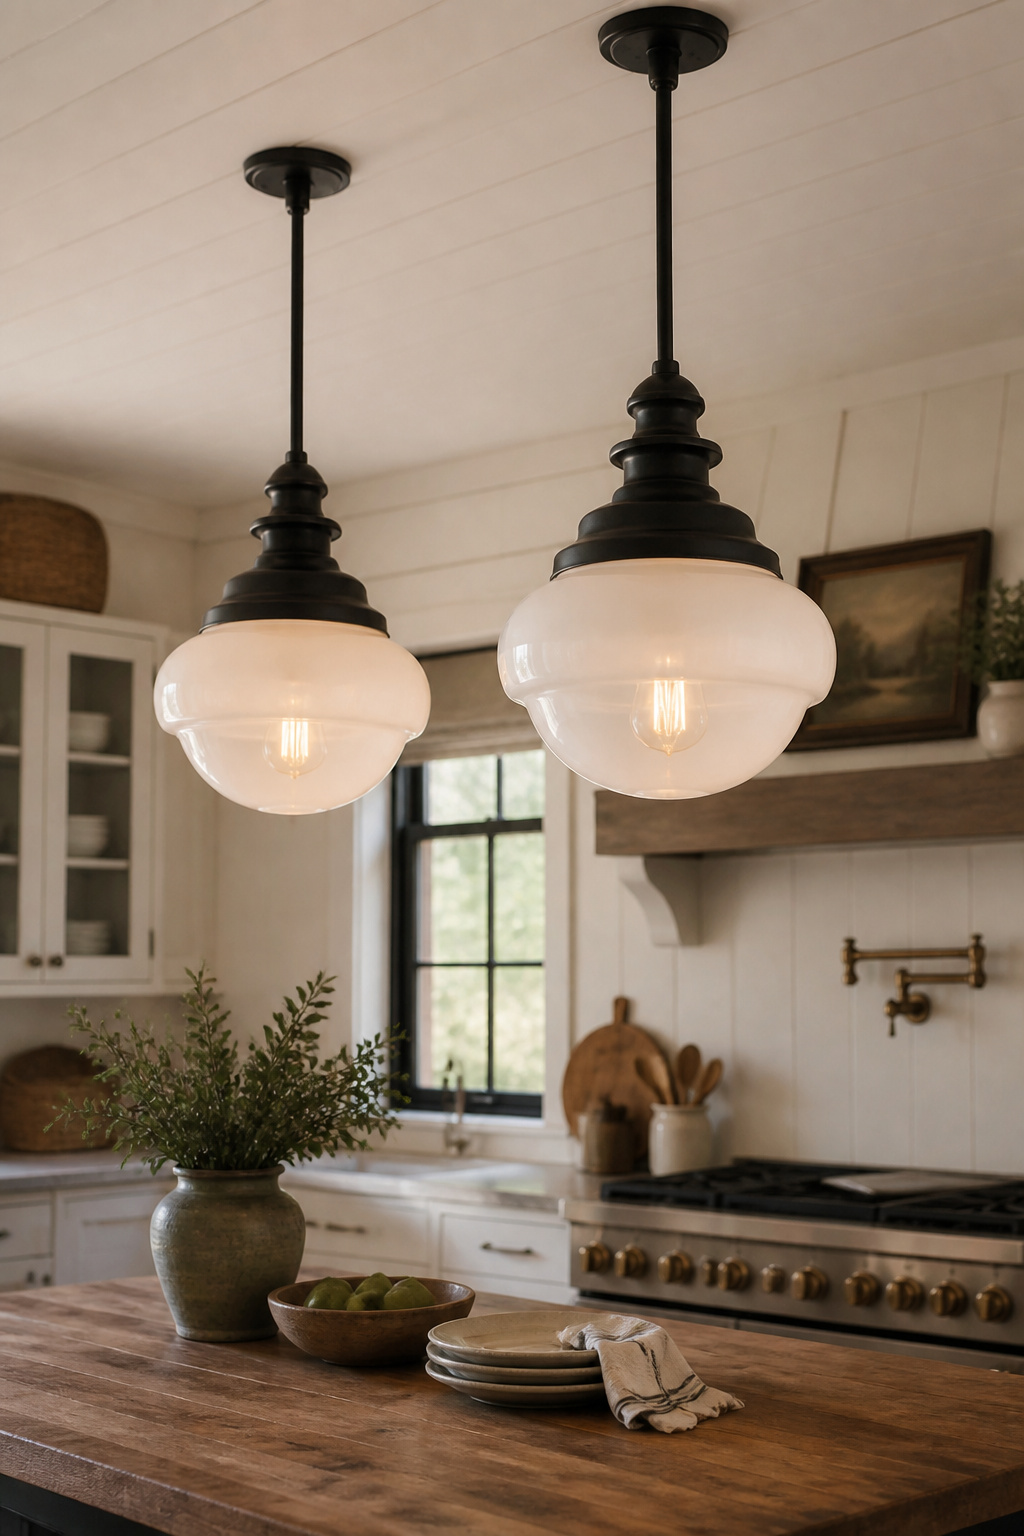
The sizing and spacing rules are specific. Hang pendants 30–36 inches above the countertop surface. Choose a shade diameter that’s one-third to one-half the width of the island. Space multiple pendants at least 30 inches apart on center, with 12 inches of clearance from each end. A 48-inch island takes 16–24-inch shades. Anything larger and the pendants read as too heavy. A good deeper reference is this guide to kitchen lighting over island.
For sourcing: authentic vintage schoolhouse pendants from eBay and architectural salvage markets need rewiring, but the quality is superior to most reproductions. Budget $50–100 per fixture with an electrician. Barn Light Electric and Vintage Hardware & Lighting produce accurate reproductions with modern wiring if rewiring originals isn’t practical.
7. Beadboard Paneling on Lower Cabinet Fronts and Backsplash Sections
Beadboard was common in American homes from the 1860s and near-ubiquitous in kitchens and utility rooms by 1880. It was a service-grade finish for rooms used by household workers — durable, easy to clean, and cheaper than plaster. The beaded profile along each board’s edge was a practical detail. It drew the eye away from the gaps that inevitably opened as the wood swelled and contracted with seasonal humidity.
Real tongue-and-groove beadboard was installed one board at a time, blind-nailed like flooring so no nail heads appeared. Boards were typically 3/4-inch to 1-inch thick and about 4 inches wide, cut from Southern pine or cypress. These materials handled kitchen humidity far better than what most contractors use today.
MDF beadboard panels are cheaper and easier to install. They’re an acceptable choice for cabinet door inserts — a dry application without direct moisture exposure. But as a kitchen backsplash or lower wall panel, MDF fails. Moisture from cooking and cleaning causes it to swell and separate. In a kitchen, use real wood. It costs more upfront and lasts significantly longer.
Placement decisions: beadboard works well on lower cabinet fronts, on a lower wall section below a chair rail, or behind a range. Avoid it behind the sink. And in a low-ceiling kitchen, don’t take it floor to ceiling — a wainscot height of 36–48 inches keeps it reading as kitchen, not closet.
8. Farmhouse Kitchen Decor Through Collected Pottery, Crocks, and Stoneware
American stoneware production began in earnest after the Revolutionary War. Potters in New England, the Mid-Atlantic, and the Ohio Valley started producing salt-glazed vessels for a growing nation. These crocks weren’t decorative objects. They were the refrigerators of their era — used for storing salted meat, butter, and flour, for fermenting sauerkraut and pickles, for preserving everything that needed to survive a winter without mechanical cooling.
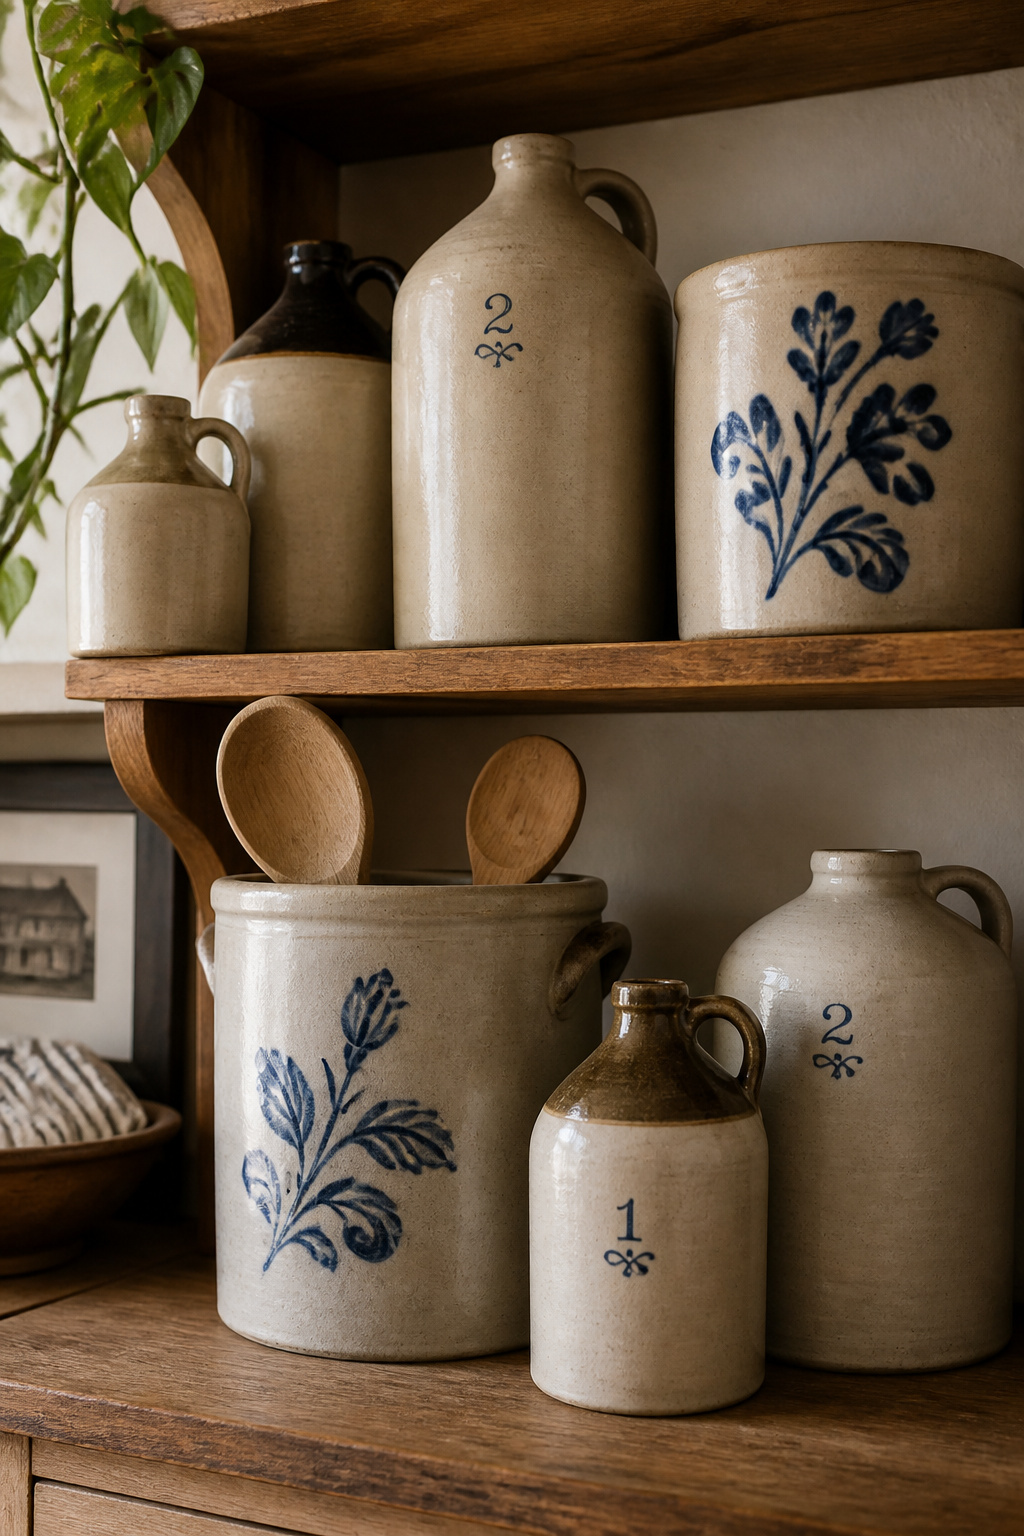
Red Wing Stoneware, founded in 1861 in Minnesota, was among the most prolific American makers. Their pieces are identified by the distinctive red-wing logo. More commonly found at estate sales are unsigned pieces from small regional potteries — plain salt-glazed crocks with impressed capacity markings, occasionally decorated with hand-painted cobalt blue birds or flowers.
The difference between authentic antique stoneware and a modern reproduction is visible if you know what to look for. Authentic pieces have slightly irregular rims. The cobalt decoration is hand-painted directly on the clay, not printed or transfer-applied. Running a flashlight across the rim often reveals faint indentation marks from the potter’s tools.
Display principle for farmhouse kitchen decor: group pieces in odd numbers with graduated heights. Put the largest piece at the end or back, not the center. Use them as they were intended — an open crock as a utensil holder, a handled jug for wooden spoons. The best farmhouse kitchen decoration is decoration that could also be put to work.
9. Exposed Brick or Reclaimed Brick as a Farmhouse Backsplash
Brick in the farmhouse kitchen has a specific historical origin. In 18th-century American farm homes, cooking happened in a large hearth — an exposed brick fireplace that was the functional center of the kitchen. By the late 19th century, wood-burning ranges had replaced fireplace cooking. But brick chimney surrounds and backsplash sections persisted in many farmhouse kitchens. A brick backsplash isn’t a trend. It’s a material memory.
The choice hierarchy runs like this: genuine exposed brick where it already exists is the most authentic option. Reclaimed thin brick veneer — actual antique bricks from demolished buildings, sliced to approximately half an inch thick — is the best alternative for new installations. Brick-look ceramic tile is the least expensive and most identifiable at close range.
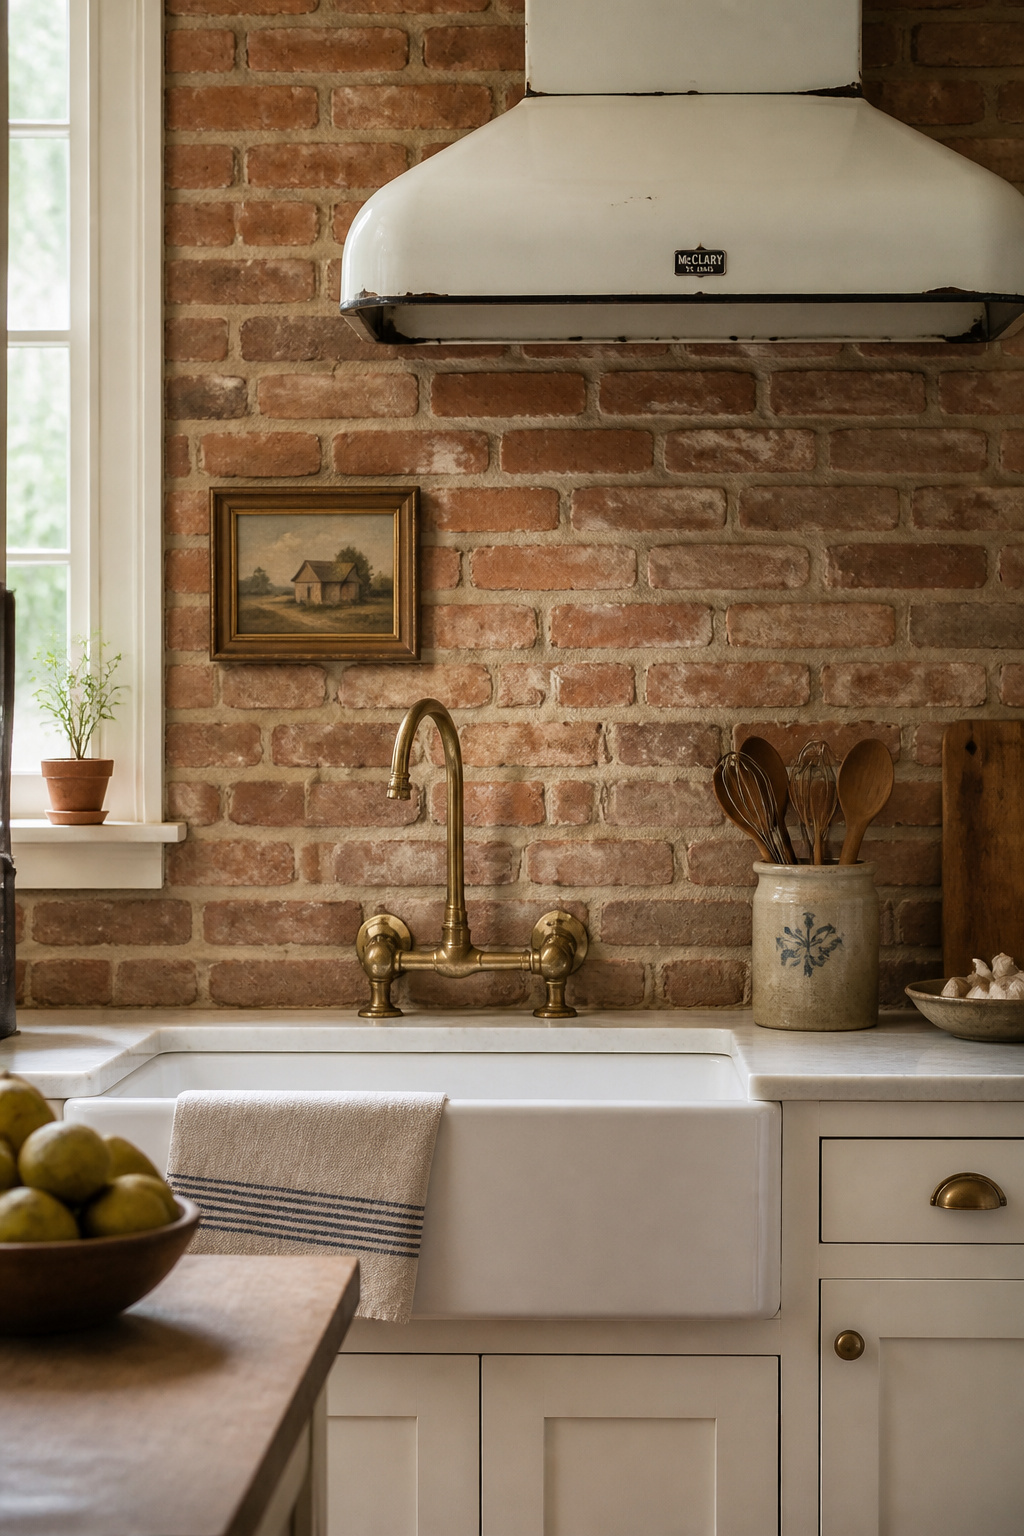
Thin brick veneer runs approximately $8–$15 per square foot for material. The mortar joints should roughly match the brick color rather than contrasting sharply. The traditional American farmhouse approach used a tan or buff mortar that didn’t call attention to the joints.
Sealing requires a silane-based breathable masonry sealer, not an acrylic product. Acrylic sealer traps moisture and leads to efflorescence — the white mineral deposits that push through the surface. A matte breathable sealer protects from grease splatter and needs reapplication every 3–5 years. For ideas on how brick pairs with countertop materials, kitchen backsplash and countertop combinations has useful reference points.
10. Classic Subway Tile With a Handmade or Offset Pattern for Depth
Subway tile was designed in 1904 by architects George Heins and Christopher La Farge for the opening stations of the New York City subway system. The 3-inch by 6-inch white ceramic rectangle was chosen for two specific properties. First, it reflected light in the subterranean tunnels. Second, it was easy to clean in a high-traffic environment. By the late 1920s, the same format was standard in American kitchen and bathroom installations. The tile is over 120 years old. That gives it a stronger historical claim in a farmhouse kitchen decoration project than almost any other tile choice.
Handmade vs. Commercial Subway Tile
The difference between commercial and handmade subway tile isn’t subtle when you’re standing in front of it. Handmade tiles are hand-glazed — color varies slightly across each tile, producing a shimmer in natural light. They’re also hand-cut, which introduces slight variation in thickness and edge profile, creating shadows between tiles that a perfectly flat commercial tile cannot.
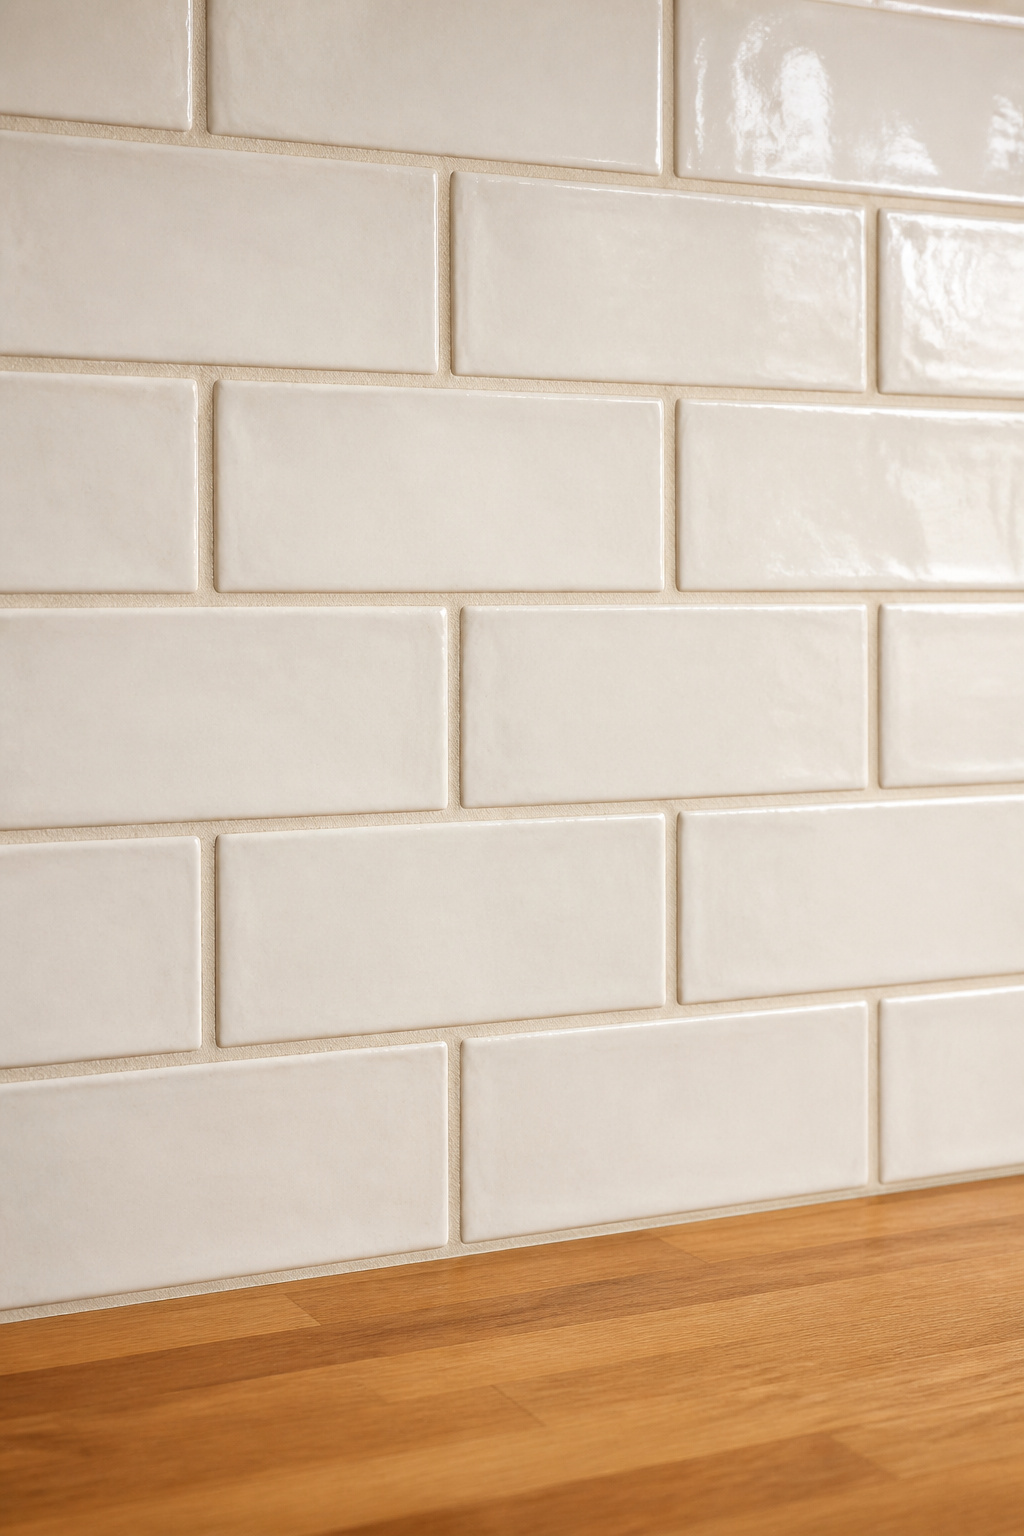
The premium is real: handmade subway tile runs $10–$20+ per square foot versus $2–$8 for commercial. In a backsplash zone that reads closely — directly behind the range or above a sink — the difference is visible enough to justify the cost.
Pattern Choices for a Farmhouse Kitchen
For a farmhouse kitchen decoration approach, the traditional 1/3 offset (running bond) pattern is the historically correct choice. Use a slightly wider grout joint — 3/16-inch instead of 1/16-inch — and choose a warm white or off-white grout rather than bright white. The result reads as 1920s American kitchen, not contemporary renovation.
Herringbone works well if you want a more crafted result. However, it requires handmade tile to look right. With commercial tile, herringbone reads as a trendy restaurant, not a farmhouse. It also increases labor cost by 20–30% due to additional cuts.
11. Wrought Iron Details: Hardware, Rods, and Light Fixtures Together
Wrought iron has a specific historical presence in American farmhouses that cast metal cannot replicate. The word “wrought” is old English for “worked.” Wrought iron is iron that has been repeatedly heated and hammered. The hammering aligns the metal’s fibrous grain structure. This produces a surface texture and density that makes every piece slightly different. It was used for everything from farm gates and fireplace tools to hinges, latches, pot hooks, and curtain rods in the farmhouse kitchen.
Using Iron as the Kitchen’s Single Metal Language
Cast iron and die-cast metal hardware look similar in a catalog. In person, the surface reads differently. In a farmhouse kitchen decoration project where the goal is honest materials, that distinction matters. Hand-forged wrought iron hardware from makers like Bushere & Son Iron Studio or Old West Iron is available and worth using if the budget allows.
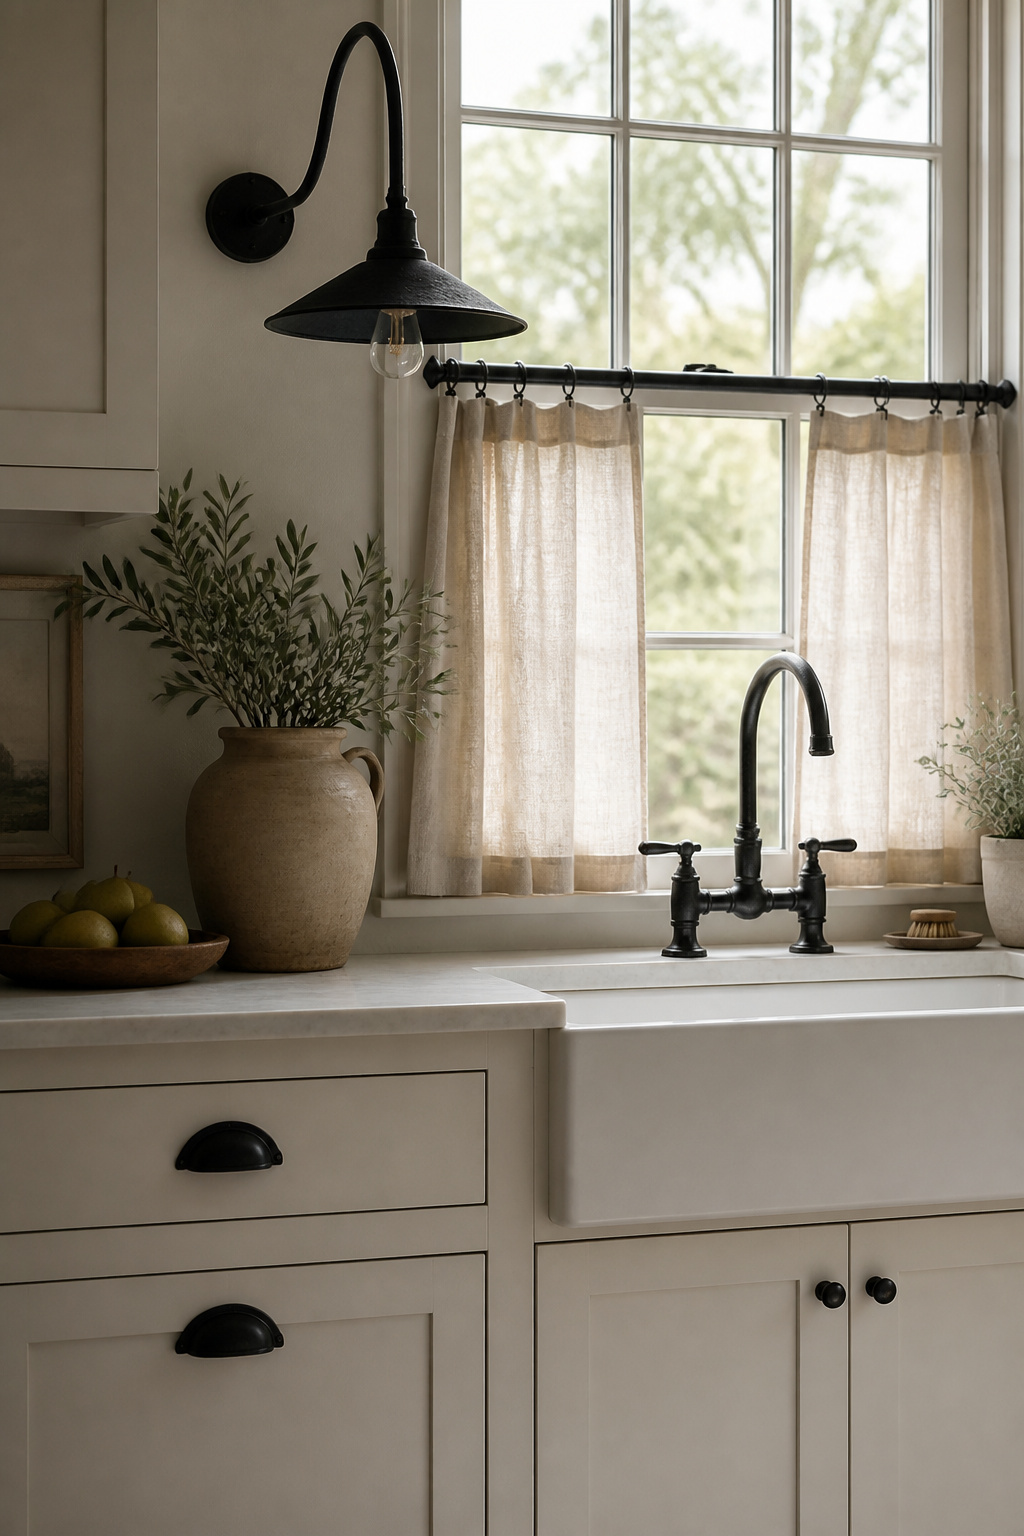
The design principle: iron should function as the kitchen’s single metal language. Use it for cabinet hardware, pendant light fixtures, curtain rods, and towel bars. Don’t split the difference between matte black iron and oil-rubbed bronze. They look similar in photographs and clash in a room.
Mixing Iron With Brass and Copper
Iron mixes well with aged unlacquered brass and natural copper. Both have historical presence in American farmhouse kitchens. The rule is that all metals should have a non-reflective, aged quality. Iron and aged brass: historically credible — iron hardware on cabinetry, brass faucet, brass shelf brackets. Iron and copper: also historically appropriate — copper pots on iron hooks is the classic American farm kitchen combination.
Avoid polished nickel, polished chrome, or shiny brass in a farmhouse kitchen decoration scheme. These metals have no shared historical context in an American farmhouse kitchen.
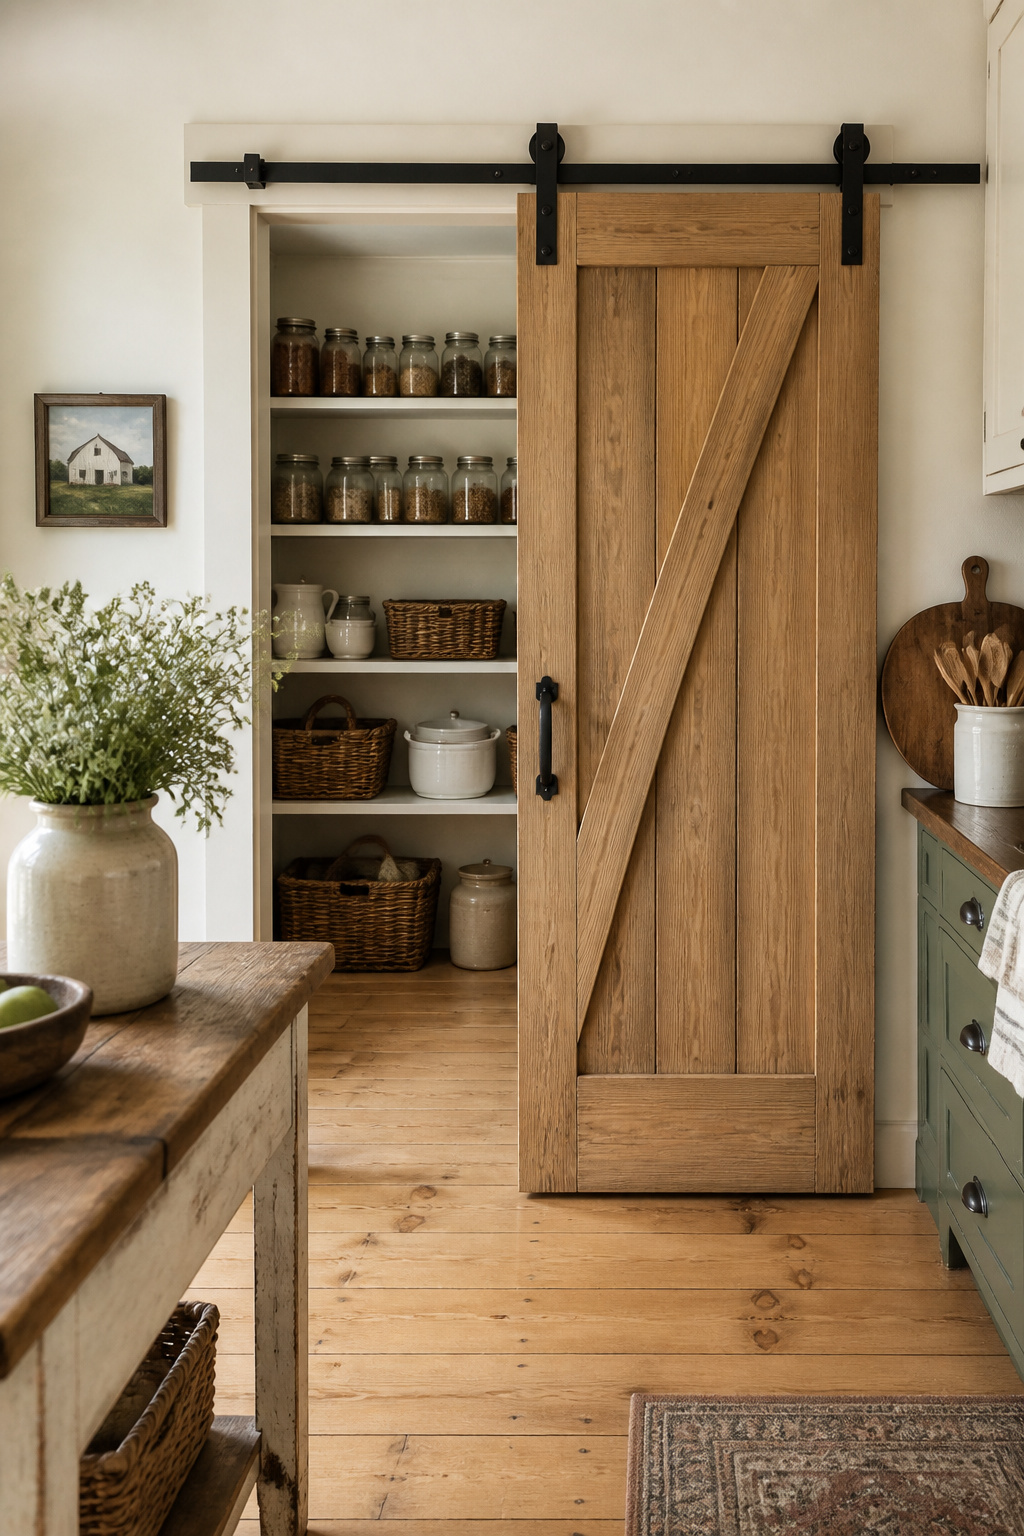
12. A Farmhouse Kitchen Pantry With a Sliding Barn Door
The dedicated pantry was one of the most functional rooms in the American farmhouse — a north-facing, thick-walled space designed to stay cool through summer and winter. Before refrigeration, the pantry was the food system. The open shelving inside held crocks, Mason jars, enamelware canisters, and the tools of a working farm kitchen.
The barn door for a pantry entrance borrows from agricultural hardware — the sliding track system that kept barn doors from swinging into animals or machinery. Its adoption for interior use is relatively recent. But the hardware itself is genuinely of agricultural origin. In a farmhouse kitchen decoration context, it reads as authentic in a way that a louvered door does not.
Barn Door Hardware Specifications
Specifications that most people overlook: the track must be at least twice the width of the door opening. A 36-inch doorway needs a minimum 72-inch track plus additional overlap. You also need clear wall space beside the opening equal to the door width — the door needs somewhere to go when it’s open.
For heavy solid wood doors, use hardware rated for 300 lbs. Standard hardware at 200 lbs capacity handles most composite doors but can sag with solid hardwood. For a comprehensive look at what to do with the space inside, genius kitchen storage pantry ideas covers the organization side well.
Inside the pantry, keep the open shelving logic of the farmhouse kitchen: adjustable shelves at varying heights, wire or wicker baskets for dry goods, and Mason jars for grains, legumes, and spices. The pantry should look like it’s working.
13. Wide-Plank Wood Floors in the Farmhouse Kitchen: What Actually Works
Colonial American farmhouses used wide-plank Eastern White Pine flooring not because it was beautiful but because it was there. New England forests were full of large-diameter white pine. The trees produced boards far wider than the hardwoods that would be milled in later centuries. Standard farmhouse pine planks ran 10–16 inches wide. Anything narrower than 5 inches — the strip flooring that became standard in the 20th century — reads as modern remodeling, not farmhouse history.
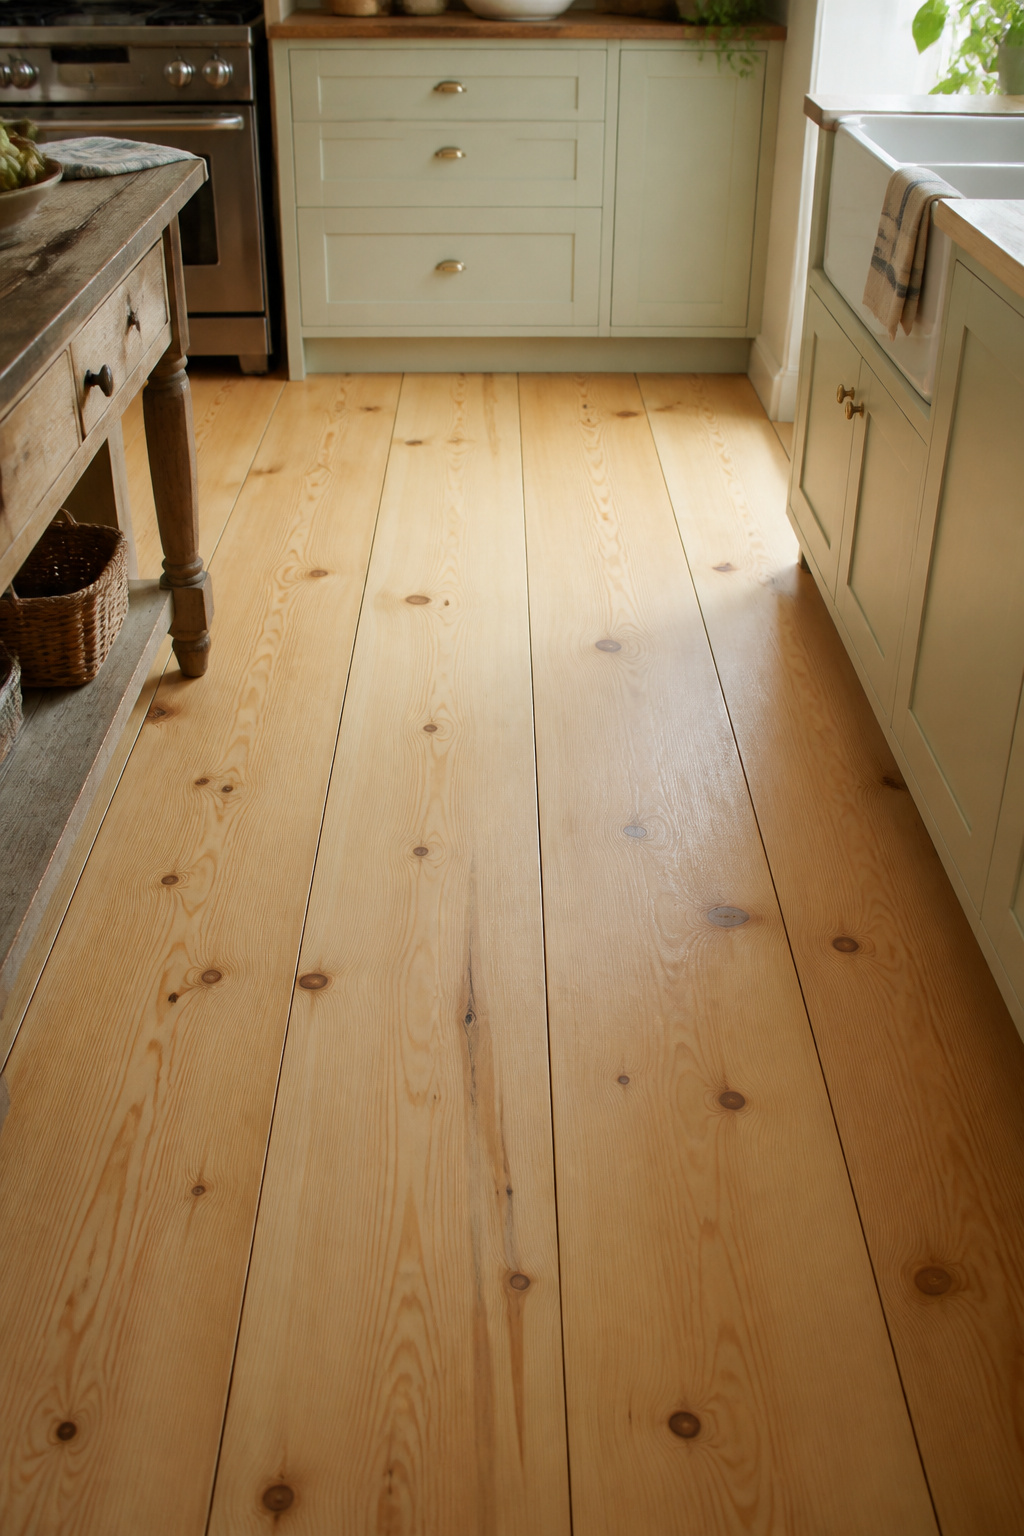
Reclaimed wide-plank pine carries the knots, mineral streaks, and worn surface of floors that have been lived on for generations. For new construction or renovation, engineered wide-plank flooring is the right technical choice. It uses a real hardwood wear layer (2–4mm thick) bonded to a cross-layered plywood core. This structure handles the moisture fluctuation that causes solid wide planks to cup and buckle in kitchens.
For finish, avoid oil-based polyurethane — it yellows over time, producing a golden-amber tint that reads as 1980s renovation rather than farmhouse. Bona Traffic HD waterborne polyurethane is what historic renovation professionals use on kitchen floors. It doesn’t yellow, holds up to heavy use, and dries fast. A penetrating oil finish is the more historically accurate option. It produces a beautiful matte surface, but requires re-oiling every 1–3 years.
The floor is the largest horizontal surface in the kitchen. Get this right and almost everything else becomes easier.
14. Cast Iron Cookware and Copper Pots as Farmhouse Kitchen Decoration
Pre-20th-century farmhouse kitchens had limited built-in storage. Cookware was hung on hooks and wall racks because it was accessible, not because it was decorative. Cast iron skillets and copper pots on hooks above the range were the original kitchen display — tools that happened to look right because they were genuinely in use.
Lodge Cast Iron, founded in 1896 in South Pittsburgh, Tennessee, is the oldest American cast iron manufacturer still in operation. Their skillets and Dutch ovens are the historically credible choice. Copper pots — excellent heat conductors before modern ranges — were the premium cookware of American farm kitchens.
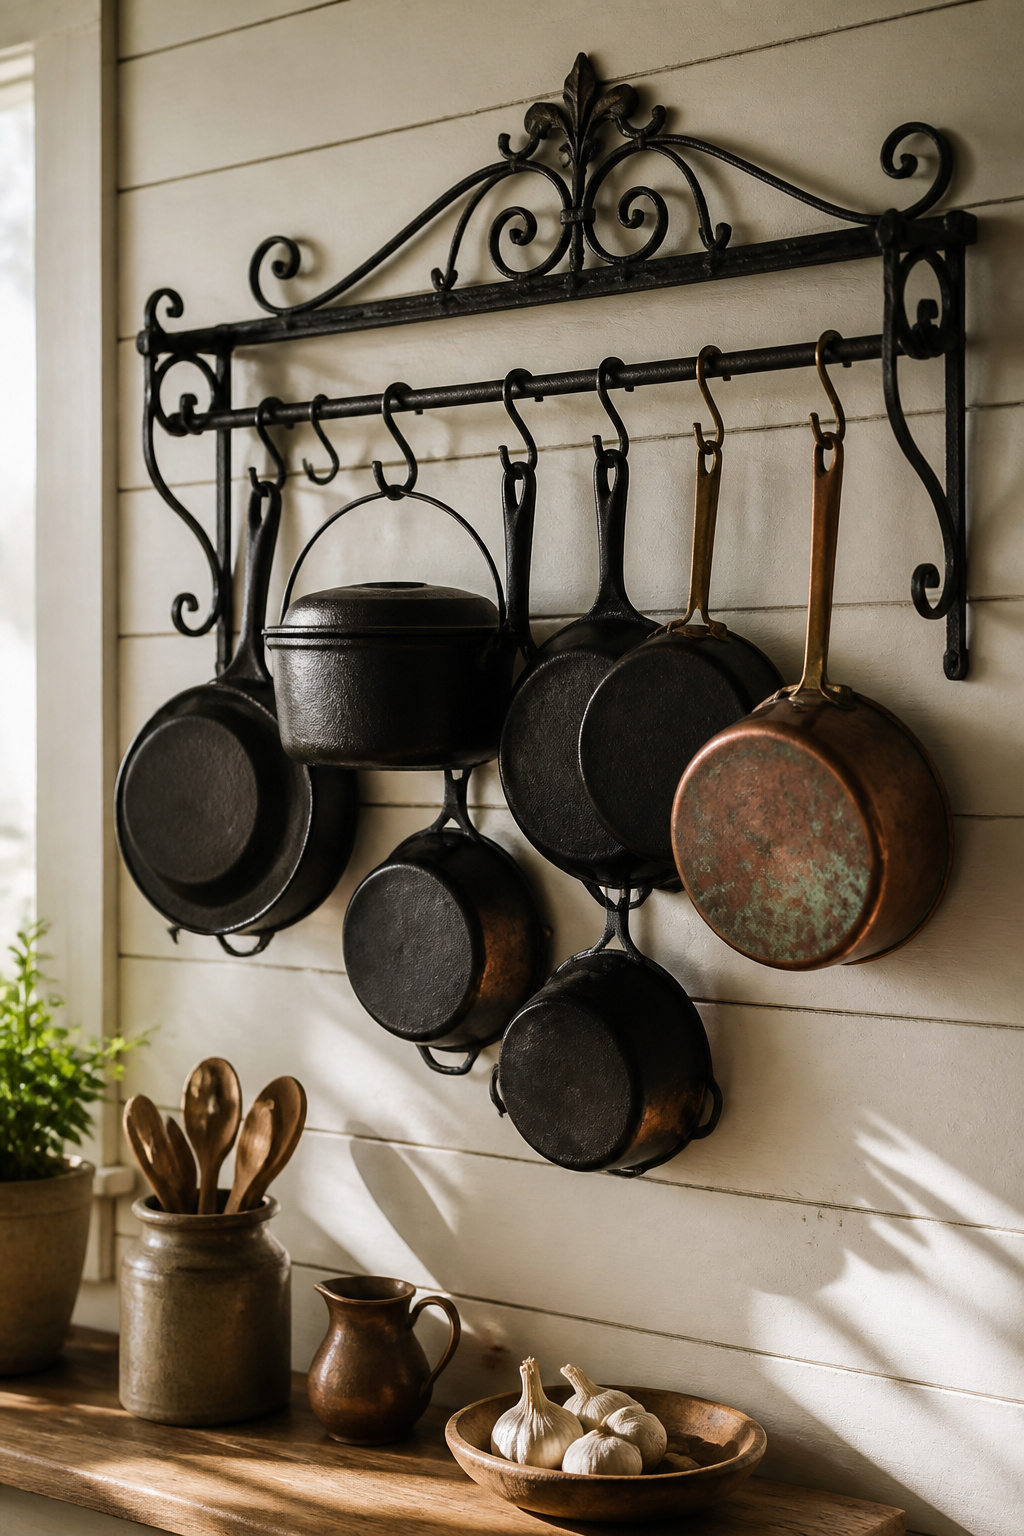
For hanging cookware, a ceiling-mounted pot rack requires ceiling joist access and can support approximately 100 lbs. Check joist location with a stud finder before ordering any rack. Not every kitchen ceiling can accommodate one. Wall-mounted hooks on a wrought iron bar are more flexible, lower cost, and work on any solid wall, including shiplap and brick.
Maintenance note: cast iron should be washed in warm water (not soaked), dried immediately, and given a thin coat of oil before storage. For copper, unlacquered copper develops a natural green-grey patina over time. This is the honest farmhouse look, not damage. Avoid lacquered copper — it prevents patina development and produces an obviously artificial shine that reads as decorative prop rather than working equipment.
15. Farmhouse Kitchen Decoration With Fresh Herbs and Botanical Prints
The kitchen garden was an essential part of 18th- and 19th-century American farm life — a small enclosed plot immediately adjacent to the dwelling, providing herbs, vegetables, and fruit for daily use. The proximity was practical. Before refrigeration, fresh herbs needed to be harvested immediately before cooking. The garden was literally steps from the kitchen door.
Window Herb Gardens for the Farmhouse Kitchen
Bringing herbs inside restores something of that direct connection between food and kitchen that’s fundamental to farmhouse kitchen decoration. A window sill with terracotta pots of thyme, chives, and mint isn’t just decoration. It’s a working herb garden that earns its place by being used.
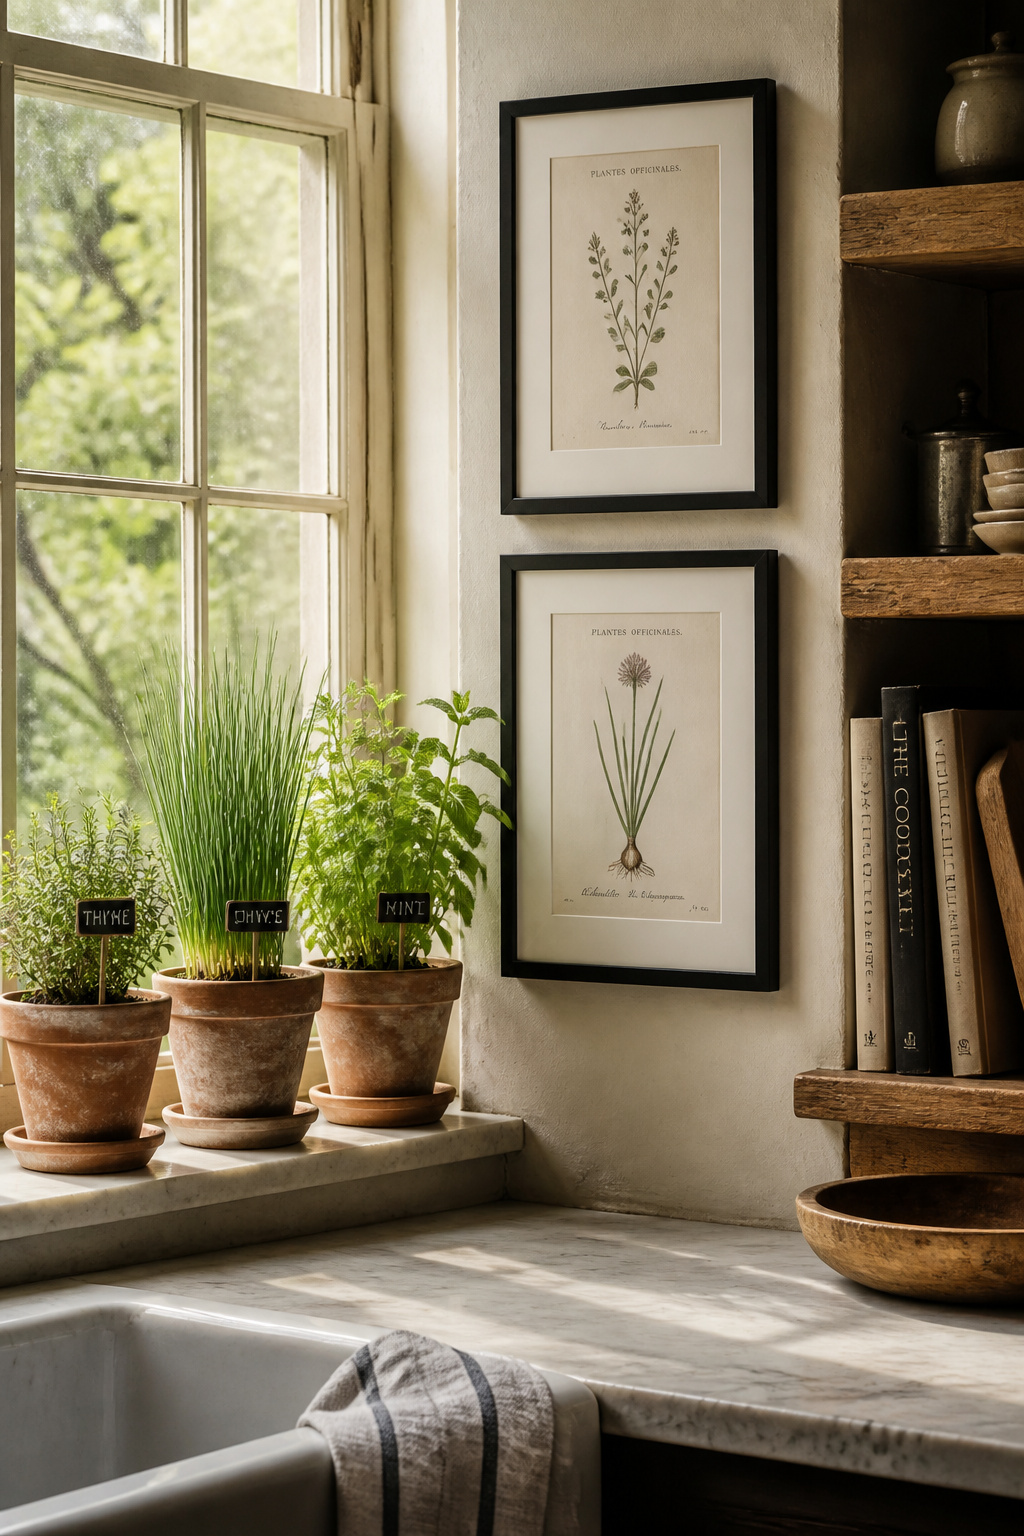
Light is the deciding factor. South or west-facing windows work for most culinary herbs. Basil needs 6+ hours of direct light. Chives manage on 4–6 hours. Mint is the most forgiving and handles partial shade without complaint. Use small terracotta or galvanized tin containers. Plastic pots undermine the aesthetic immediately.
Period Botanical Prints as Farmhouse Kitchen Art
Botanical illustration reached its golden age in the 18th and 19th centuries. Johann Wilhelm Weinmann produced major plant folios in the 18th century. Pierre-Joseph Redouté’s rose and lily studies in the early 19th century set the standard for the form. Authentic prints from this period are available from specialist dealers — George Glazer Gallery and Capricorn Press both carry genuine antique botanicals — for $50–$500 depending on rarity and condition.
Quality reproduction prints from major museum collections are printed on acid-free paper and available for $20–$80. They’re a credible alternative. For framing: simple dark-stained wood or black frames with white mat boards. Not gilded, not elaborate — those belong to a Victorian parlor, not farmhouse kitchen decoration.
16. Milk Glass, Mason Jars, and Enamelware as Authentic Period Accessories
These three categories share a quality that most modern farmhouse accessories don’t: they were working tools before they were decorative objects. Displaying them is historically honest rather than nostalgic.
Mason jars were patented in 1858 by John Landis Mason. Together with Boyd’s milk glass lid liner, they became the American standard for home food preservation. Before refrigeration, canning preserved the harvest through winter. Ball and Kerr are the most collected brands. Older pre-1960 jars are identified by slight glass irregularities and embossing variations that reproductions don’t have.
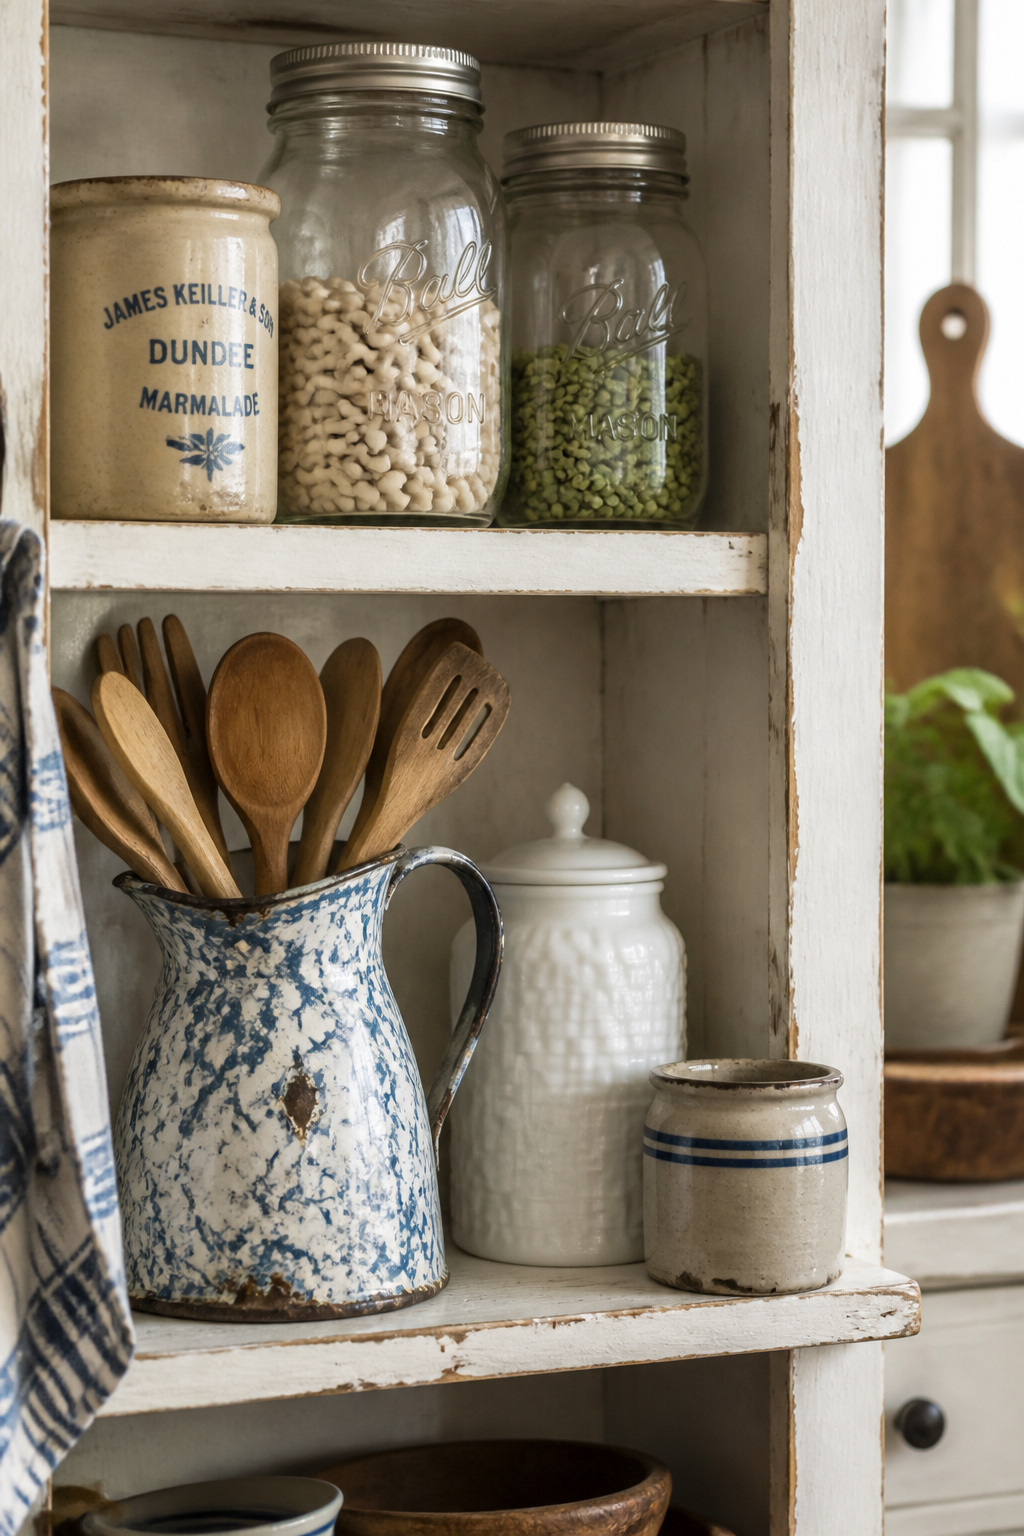
Enamelware originated in Germany in the 1760s and became popular in America from the 1850s onward. Genuine pieces always show some chipping that reveals the dark grey metal beneath. Avoid pieces without chips — they’re likely reproductions. Milk glass found its way into kitchen storage jars, canister sets, and light fixture shades across the late 19th and early 20th centuries.
The sourcing guide: estate sales in the Northeast and Midwest for Mason jars and stoneware; flea markets for enamelware (verify chipping); antique mall dealers who specialize in American glass for milk glass.
Use these objects as they were intended. Mason jars as kitchen storage for grains, legumes, and spices on open shelves look intentional because they are functional. An enamel colander, an enamel pitcher as a utensil holder, an enamel canister set — all of these earn their display by being in use. A kitchen full of objects that are only decorative looks like a set. A kitchen full of objects that happen to also look right looks like a home.
17. A Farmhouse Kitchen Dining Area That Honors the Communal Table Tradition
The communal table was not a separate dining room feature in most American farmhouses. It sat in the kitchen, or in an adjacent room open to it. Meals were the organizing structure of farm life — three times a day, extended family and farm workers gathered at the same table. The table was sized accordingly. Most historic farmhouse tables ran 8–10 feet long. It was made from whatever wood was plentiful and workable.
Trestle, Farm Table, or Refectory: Which Style Is Right
Three historical table structures are worth knowing. The trestle table — a tabletop resting on two X-shaped supports connected by a low stretcher bar — is one of the oldest designs. It’s appropriate for kitchens evoking medieval-to-early-American periods. The farm table with four turned or straight legs and a thick plank top is the most common American farmhouse style from the 18th century onward. It’s the default correct choice. The refectory table originated in monastery dining halls and is more formal than a working farmhouse would have used.
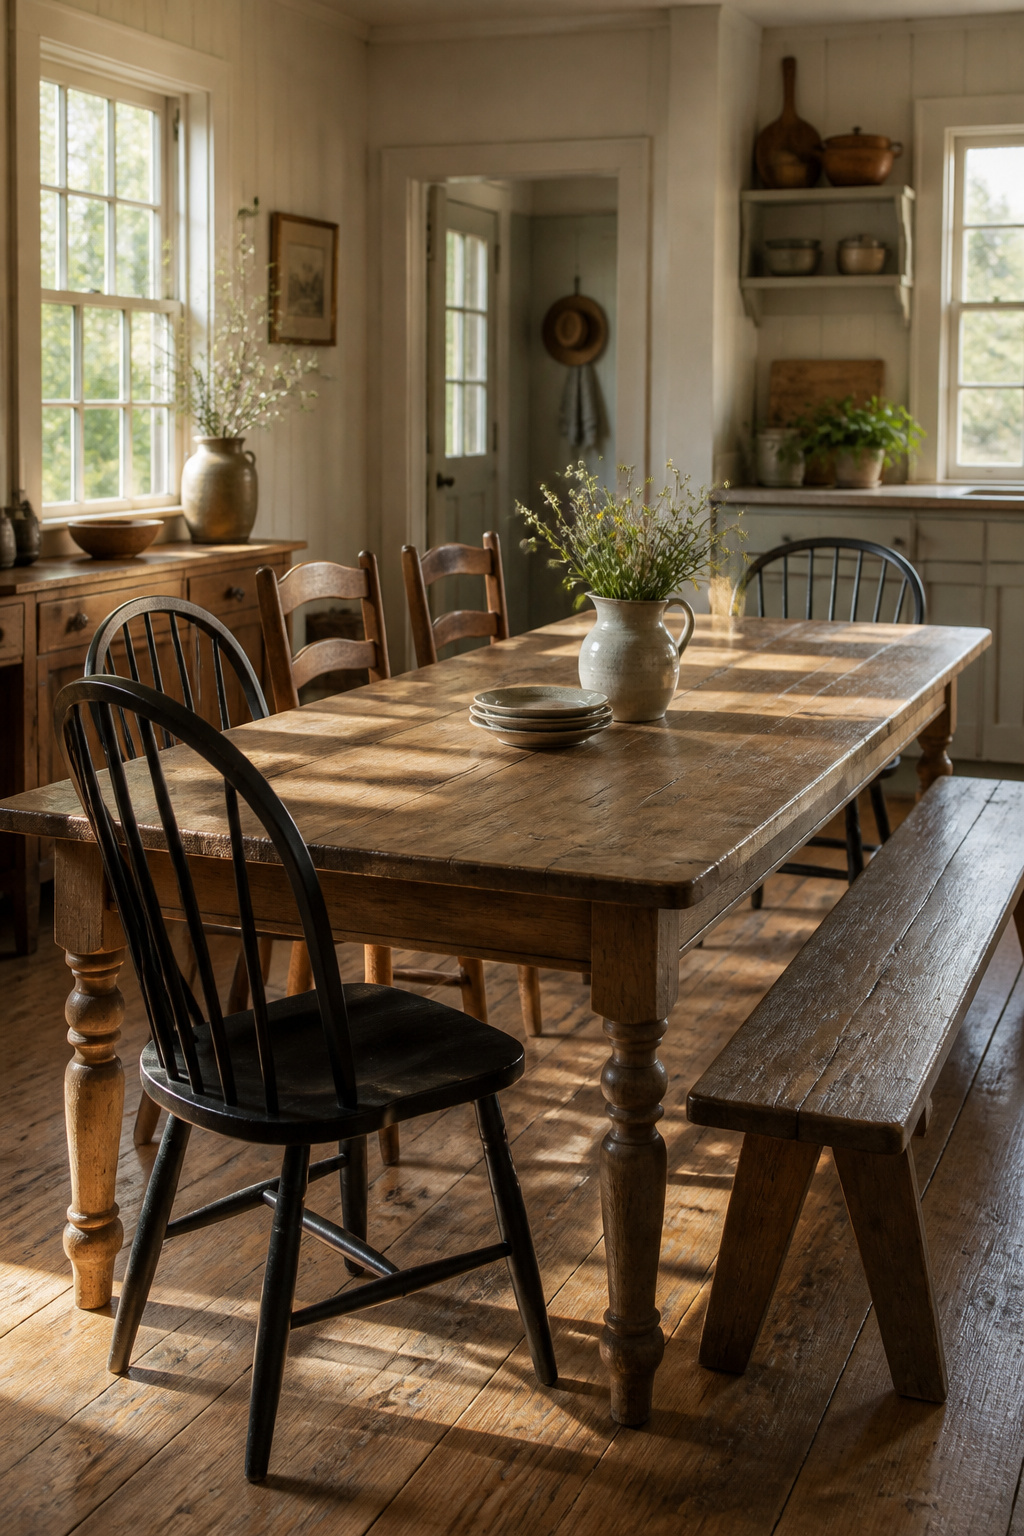
Period-Correct Seating for Farmhouse Kitchen Dining
Windsor chairs — defined by spindle backs, solid seats, and turned legs — have been in continuous American production since the 18th century. The bow-back Windsor is the most farmhouse-appropriate version. Ladder-back chairs, with their horizontal slat backs, are simpler and slightly more rural in character. Both are correct.
A farm bench along one side is the most authentic seating choice. Benches seat more people per linear foot. They were standard in working farmhouses where matched sets of chairs would have been an unnecessary expense. Mix seating types. Authentic farmhouse dining seating was accumulated over time — the chairs didn’t match because they weren’t purchased as a set. For further ideas on creating a dining space that works with your farmhouse kitchen decoration, farmhouse dining room decor ideas covers the full dining context well.
Starting Your Farmhouse Kitchen Decoration Project: Where to Begin
The question I’m asked most often: where do I start when I can’t afford to do everything at once?
Start with hardware if budget is genuinely tight. A full kitchen’s worth of cabinet hardware — bin pulls, cup pulls, and iron knobs — runs $150–$400. It transforms the room faster than any other single change. It takes an afternoon to install and is entirely reversible.
The next tier is cabinetry: new Shaker-profile doors on existing boxes, painted in an off-white or sage green, plus the hardware swap. This is a half-renovation that delivers most of the impact of a full one for a fraction of the cost.
The anchor investment — the one that changes how the kitchen feels rather than just how it looks — is the farmhouse sink. Budget $800–$2,500 for the sink itself, plus the custom cabinet modification and plumber’s time. It’s not the first thing to tackle. But it’s the decision that most consistently makes clients feel they’ve arrived at a genuine farmhouse kitchen decoration rather than one that approximates it.
Sequencing matters as much as selection. Do structural and plumbing work first — the sink, the flooring, any wall removal. Cabinetry and lighting come second, since electrical work should be done before walls are finished or tiled. Open shelving, accessories, and textiles come last. These are adjustable, reversible, and benefit from the rest of the room being settled before they’re placed.
The farmhouse kitchen is a patient project. The kitchens that feel most genuine were built that way — not renovated all at once, but refined over years.