I know the feeling. You walk into your kitchen for the hundredth time, make your coffee, and think — I really need to do something about this room. Not a full renovation. Not new cabinets or new countertops or a gut job. Just something that makes it feel less like a rental kitchen in 2009 and more like a room someone actually thought about. The thing is, after years of transforming spaces for entertaining on tight timelines and tighter budgets, I’ve learned that a kitchen’s problem is almost never its bones. It’s the details — the finishes, the color, the soft touches — that have been left on autopilot for years.
That’s the whole point of kitchen decor on a budget: you don’t need to spend thousands to change how a room feels. You need to change the right things. These 15 ideas range from a quick afternoon swap to a weekend project, and every single one can be done without a contractor, a renovation budget, or a particularly skilled hand. I’ve picked these because they actually work — meaning they create a shift you can feel the moment you walk through the door.
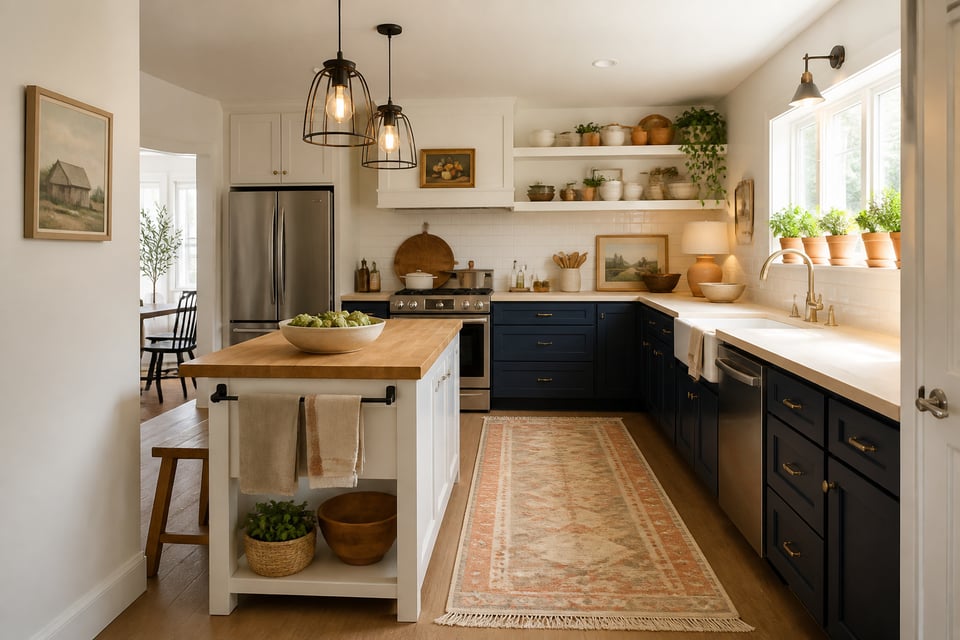
1. Painting Lower Cabinets in a Rich Accent Color to Anchor the Kitchen
There is no single budget kitchen update more transformative than painting your lower cabinets in a rich accent color. Not the uppers — just the lowers. This two-tone approach has dominated kitchen design for good reason: it anchors the room visually, makes the space feel considered rather than default, and costs roughly $50-100 in paint and supplies. Compare that to new cabinet boxes at $3,000-8,000 and the math is persuasive.
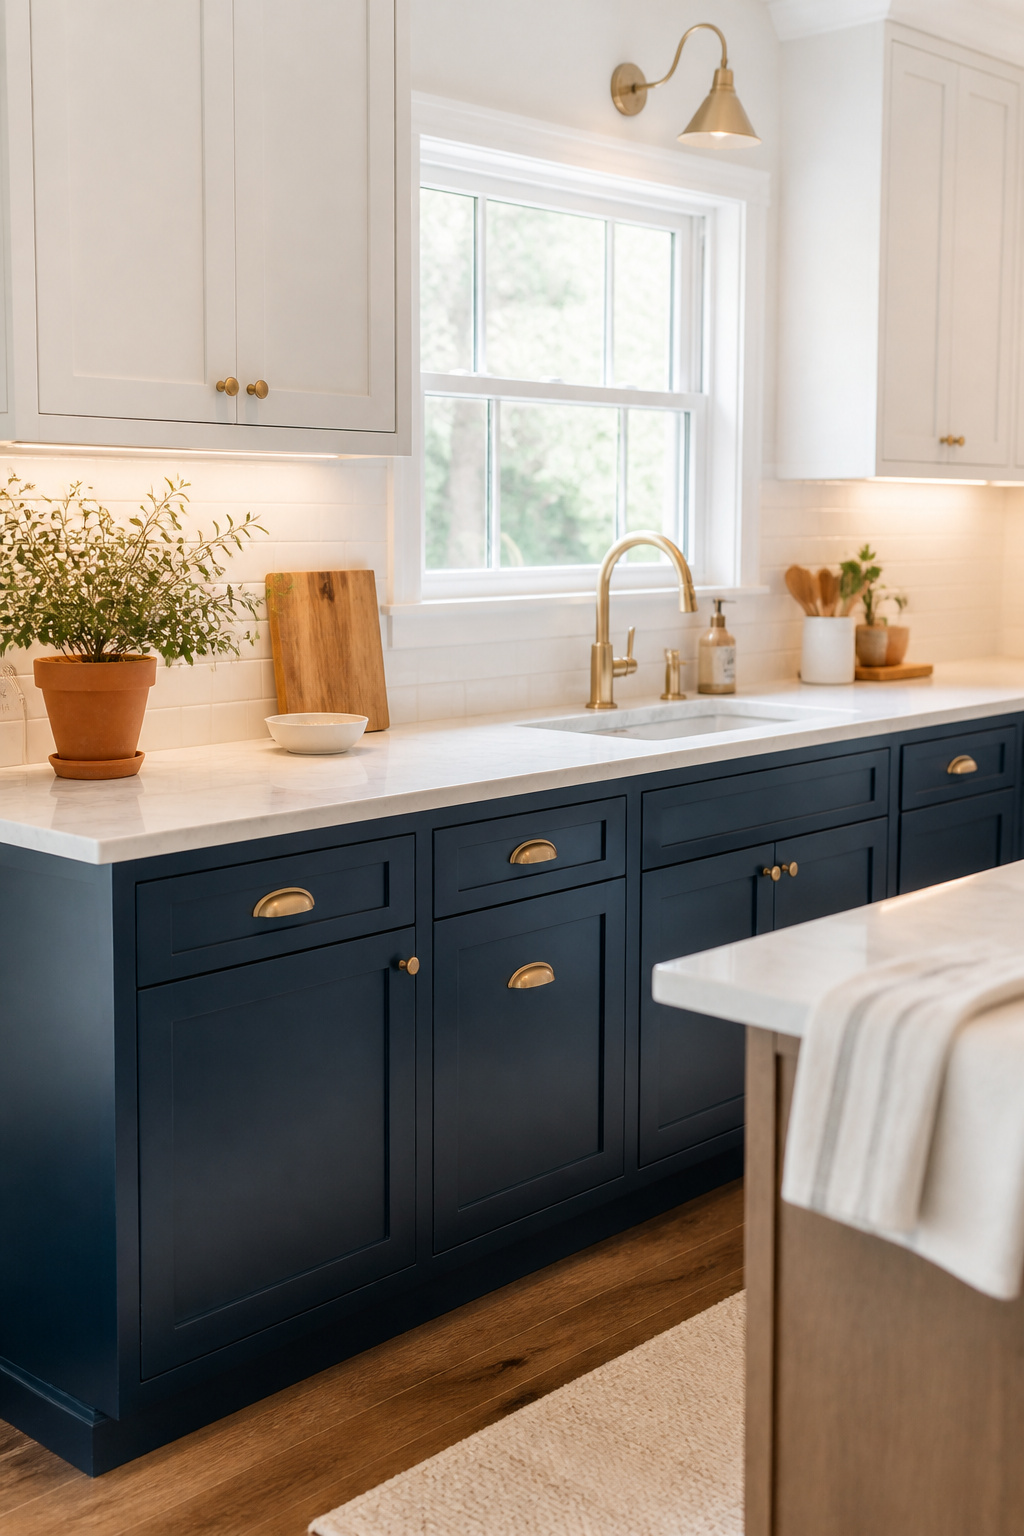
The colors doing the most work in 2026 are deep navy, sage green, forest green, warm charcoal, and dusty terracotta. If you’ve been living with white or beige lowers, switching to Sherwin-Williams Svelte Sage or Benjamin Moore Hale Navy will make the kitchen feel like a different room.
Prep and Paint: The Steps That Make It Last
The key is preparation. Kitchen grease is invisible but it’s everywhere, and it will ruin paint adhesion before a single brush stroke dries. Degrease thoroughly first, then scuff-sand with 220-grit sandpaper to break the factory finish — skipping this step is the number one reason cabinet paint peels within the first year. Prime with a bonding primer (Benjamin Moore Stix is excellent), then apply two thin coats of waterborne alkyd paint. Benjamin Moore Advance and Sherwin-Williams Emerald Urethane Trim Enamel are the most consistently top-tested cabinet paints on the market. Behr’s Urethane Alkyd Enamel is the best budget option — it performs nearly as well at roughly half the price.
One thing most people get wrong: they assume the job is done when the second coat dries. Give freshly painted cabinets 2-3 weeks to fully cure before wiping them aggressively. Patience here means the difference between a finish that lasts five years and one that shows wear within months.
2. A Quick Handle Swap: The Fastest Affordable Kitchen Decor Upgrade
If you want exactly one afternoon of work that punches above its effort level, swap every handle and knob in your kitchen. Cabinet hardware is the jewelry of this room — it’s touched dozens of times a day, it’s always visible at close range, and it’s one of those things visitors notice without being able to articulate why. Old brushed chrome bar pulls from a mid-2000s renovation make the whole room feel tired, even with fresh paint on the walls.
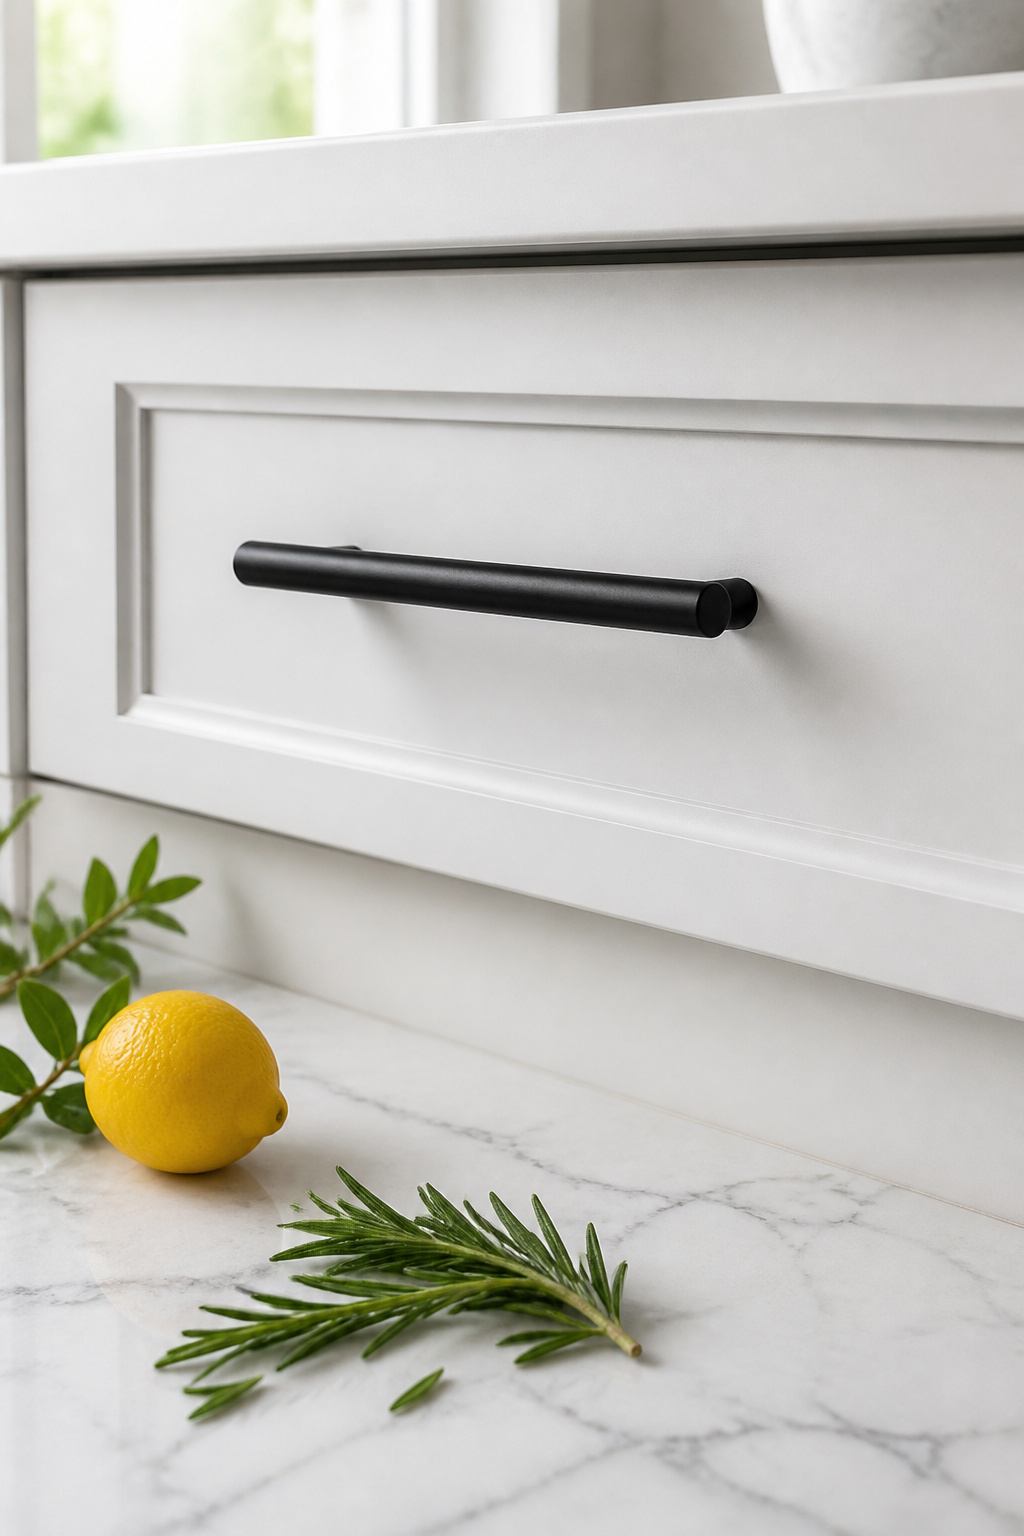
A full kitchen hardware swap typically runs $60-150 in materials depending on cabinet count. The actual work takes 2-3 hours and requires nothing more than a screwdriver. Before ordering, though: measure existing hole spacing center-to-center. The most common spacings are 3 inches for smaller drawers, 3.75 inches for medium, and 5 inches for larger drawer fronts. Order hardware that matches, or you’ll be drilling new holes — doable, but it adds time.
For finishes, matte black is the dominant 2026 choice for high-contrast kitchens with white or light wood cabinets. It resists fingerprints better than polished chrome and photographs beautifully. Brushed brass reads as warm and considered, pairing especially well with navy, sage, and white cabinet combinations. Satin nickel remains the safest all-conditions neutral, coordinating with stainless appliances without competing with any cabinet color.
Good-looking, solid hardware doesn’t have to be expensive. Ravinte and Homdiy both offer minimalist designs in quality zinc alloy finishes starting around $1.50-2.50 per piece — and at that price, a 30-piece order to outfit an entire kitchen comes in well under $80. As affordable kitchen decor upgrades go, this one has the best effort-to-impact ratio on this entire list.
3. Peel-and-Stick Backsplash Tiles That Look Genuinely Installed
Peel-and-stick backsplash tile has come a long way from the thin, obviously fake vinyl sheets that first hit the market. Smart Tiles — the Canadian brand that’s been making these since 1999 — now produces panels with a genuine 3D gel finish that mimics real grout lines and glazed tile texture convincingly enough to fool people looking right at them. Prices run $6.50 to $17.99 per panel, and a typical kitchen backsplash (20 square feet) costs $80-200 total. Professional ceramic tile installation for the same area starts around $400 and typically runs much higher. For genuine modern kitchen backsplash ideas at any price point, peel-and-stick is now a credible contender rather than an obvious compromise.
Surface Prep Is Everything
The installation is genuinely beginner-friendly — but the most important step before a single panel goes up is surface prep. Wipe the wall with a kitchen degreaser and let it dry completely, ideally for 24 hours. Kitchen grease is invisible and deadly to adhesive. Install over a greasy surface and tiles will lift within weeks. After degreasing, work in rows from bottom to top, pressing each panel firmly and using a credit card or squeegee to smooth out bubbles as you go. Cut panels with scissors or a craft knife against a metal ruler.
These panels handle heat from electric stovetops well. Avoid placing them directly behind gas burners — the open flame heat, not just the radiant surface heat, can cause edges to lift over time. Smart Tiles, Art3d, and Tic Tac Tiles are the three brands with the most consistent long-term reviews. As a form of kitchen decor on a budget, a tiled-looking backsplash delivers an outsized impression relative to its cost.
4. Removing Upper Cabinet Doors for a Built-In Open Shelf Effect
This one costs exactly nothing. Remove the upper cabinet doors, store them flat in a closet, and your kitchen suddenly has the open shelving look designers charge good money to create. The project requires a Phillips screwdriver and about 20 minutes per cabinet section. Concealed European hinges (the kind on most post-2000 kitchens) unscrew cleanly and leave minimal marks. Face-frame hinges leave more visible hardware holes — fill with wood filler and touch up with paint.
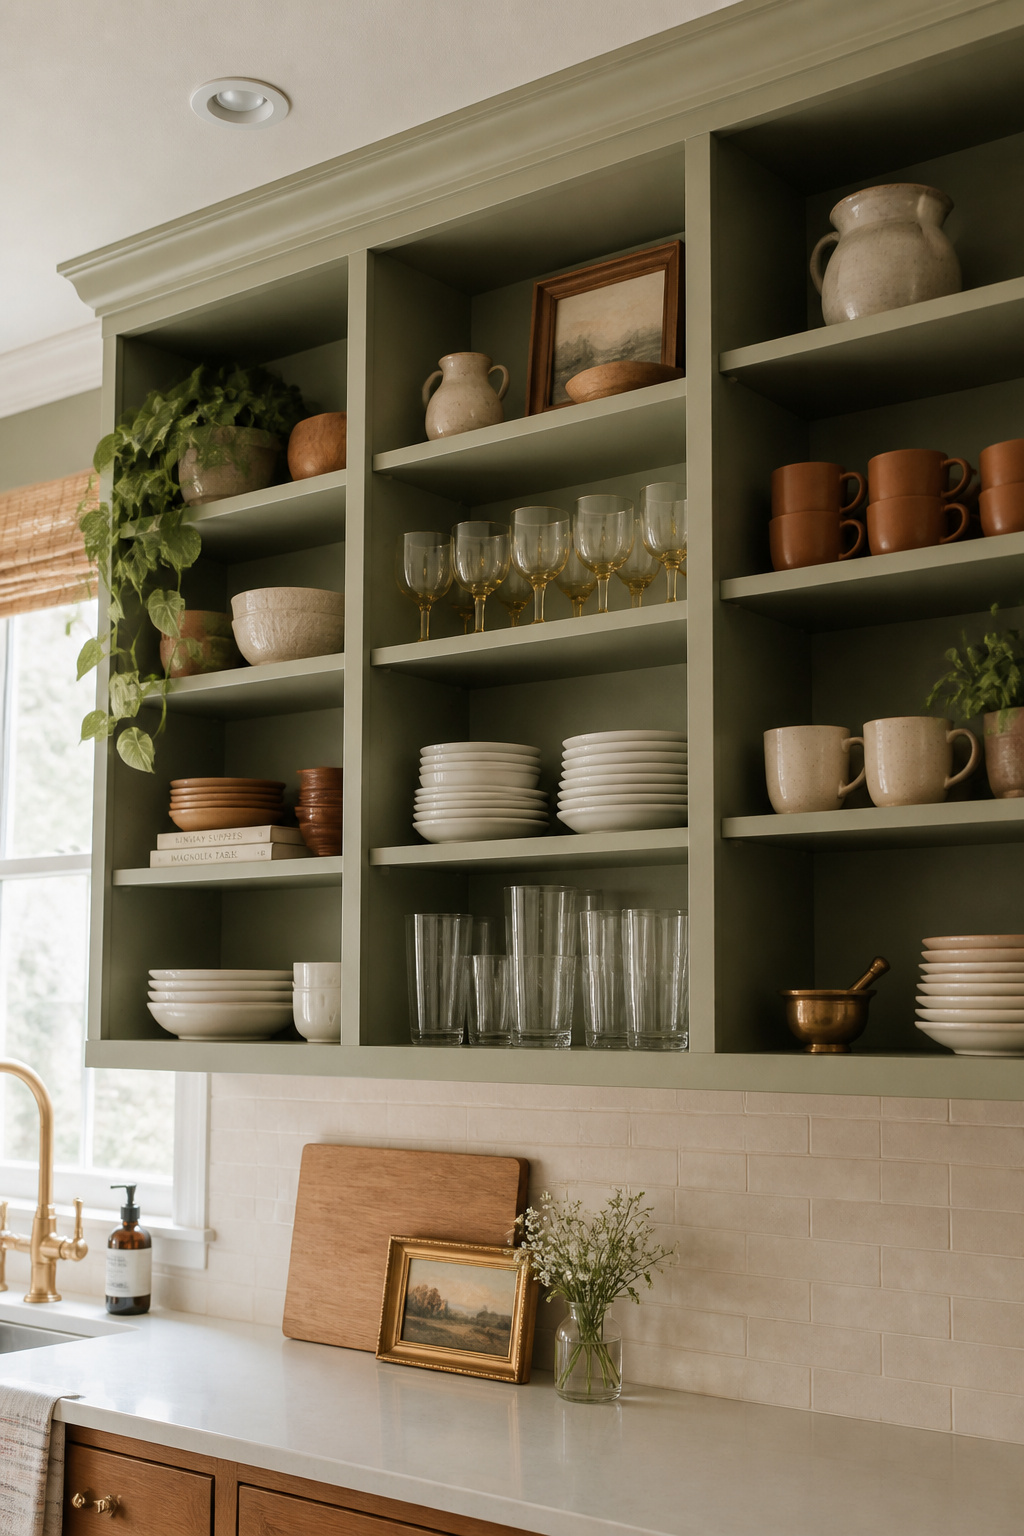
Open shelves make small kitchens feel larger almost immediately. Closed upper cabinets create a visual wall; open shelves create depth and a sense of layered space. The catch — and there is one — is that open shelves require genuine discipline about what goes on them. Overcrowding is the most common failure mode. If everything from the closed cabinet goes directly back on the open shelf, you’ve just created very visible clutter. Aim to display 60-70% of what was previously stored there and relocate the rest to a pantry or closed lower cabinet.
The styling approach matters. Use the top shelf for decorative and infrequently used items — a pitcher, a few canisters, a trailing plant. Reserve the lower shelves for daily dishes. And before removing the doors, paint or line the cabinet interior — peel-and-stick wallpaper inside the box creates a beautiful backdrop visible through the opening, a detail that closed doors would have hidden entirely.
5. Replacing the Overhead Light With Pendant Fixtures on a Budget
Of all the fixes on this list, lighting delivers the most dramatic mood shift per dollar spent. The same kitchen under cold overhead fluorescents versus warm pendant light at 2700K — the bulb temperature that matches golden hour — feels like a different room. Not a different color or different hardware. A different room. That’s the power of light, and the main reason I tell anyone refreshing a kitchen to prioritize this step in their budget kitchen ideas list.
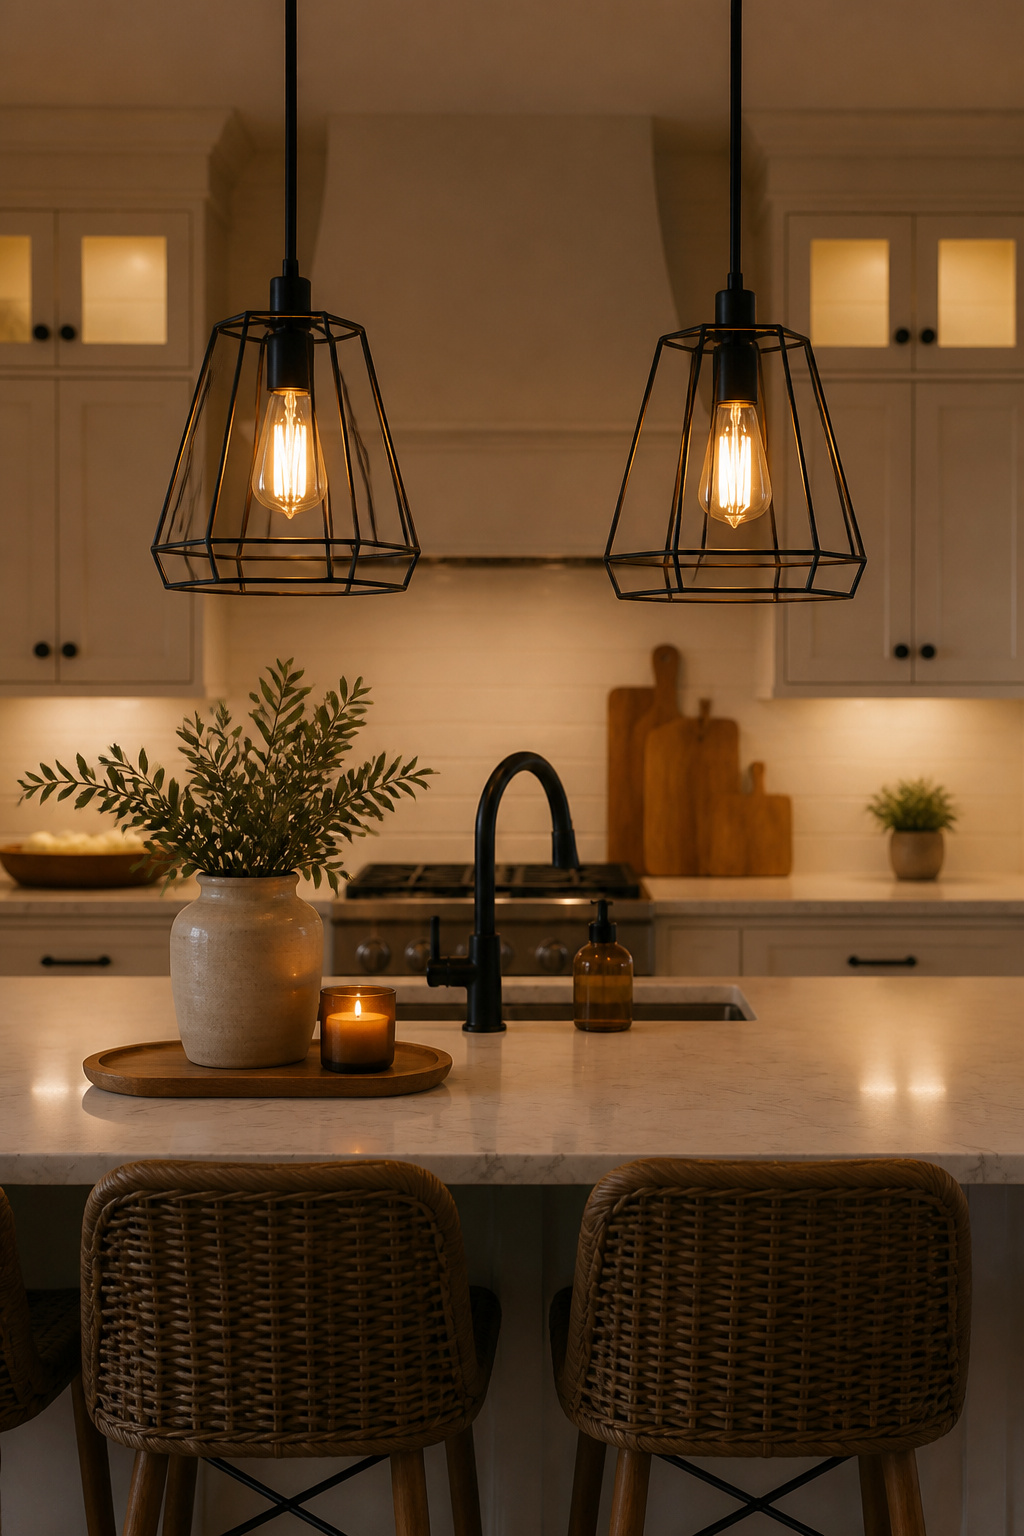
Budget pendant options in 2026 are genuinely good. The WimiSom 3-pack — clear glass shades with matte black metal hardware — runs under $35 for all three fixtures, about $11 per pendant. The Sheetea Farmhouse cage pendant 2-pack comes in just under $60 and suits industrial and farmhouse kitchens. For guidance on placement, spacing, and layered approaches, the full range of kitchen lighting over island ideas covers the details thoroughly. Also worth reading if you want to look beyond pendants: kitchen lighting fixtures covers the full spectrum from undercabinet strips to overhead statement pieces.
The rule for pendant height: 30-36 inches above the countertop surface for island pendants, 30-34 inches above the table for dining area pendants. Above 40 inches and the fixture loses its intimacy entirely — a common mistake that makes expensive pendants look awkward.
For installation: if you already have a ceiling junction box from an existing fixture, any hardwired pendant swaps directly in — no electrician required for a like-for-like replacement. Plug-in pendants work in rentals — they run a cord to a nearby outlet and use ceiling hooks and cord covers for a cleaner look.
6. A Kitchen Runner Rug That Adds Pattern Without Commitment
A kitchen runner is one of the most underrated pieces of kitchen decor on a budget. In under five minutes — literally just unrolling and placing — you introduce pattern, texture, color, and warmth into a room dominated by hard surfaces. In an all-white or all-neutral kitchen, the rug is often the only non-neutral element, making it a disproportionately powerful design decision relative to its cost.
For galley kitchens, a 2×7 or 2×10 runner in front of the counter and sink runs the length of the work zone. For an L-shaped kitchen, a 3×5 rectangle can anchor the area in front of the stove and sink together. The most important material decision: stay with flatweave or low-pile construction. High-pile rugs trap crumbs and grease, become difficult to clean, and are a genuine trip hazard in a space where you’re often moving quickly while carrying things.
Machine-washability is non-negotiable. Ruggable’s two-piece system — a washable cover that attaches to a non-slip pad — is the category standard. The cover goes directly into a standard washing machine and the dryer on low heat. Sizes include 2×3, 2.5×7, 2.5×10, and 2.5×12. They earned best-overall ratings in multiple 2026 comparisons. If Ruggable’s price point is a stretch, Mohawk Home and Ottomanson both make flatweave kitchen runners with integrated non-slip backing at roughly half the price.
7. A Windowsill Herb Garden as Living Kitchen Decor on a Budget
A row of terracotta pots on a sunny kitchen windowsill does two jobs simultaneously: it gives the kitchen genuine living organic energy — the thing that separates a designed space from a merely decorated one — and it saves somewhere between $200-400 per year in fresh herb purchases. A south or southwest-facing window with 5-6 hours of direct sun can grow basil, chives, parsley, thyme, and mint reliably year-round. As kitchen decor on a budget ideas go, this one pays for itself inside two months.
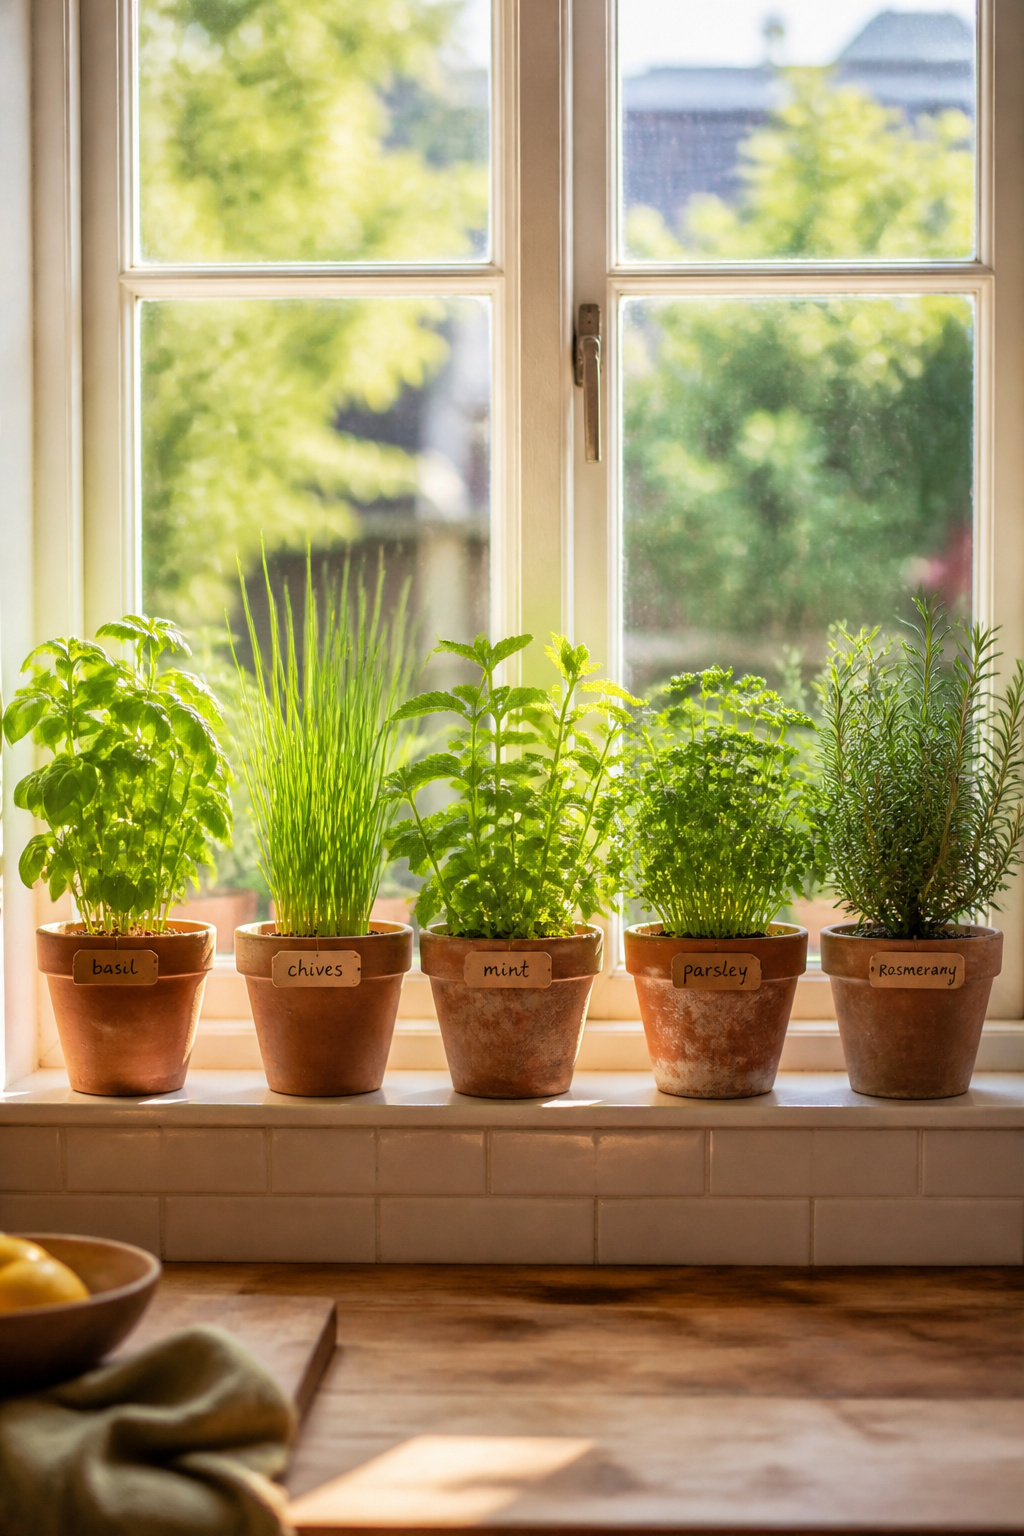
Setup is straightforward and cheap. Each herb needs its own 6-inch pot with drainage holes and a well-draining potting mix — look for one with perlite, since standard garden soil compacts and prevents drainage. The full setup — five pots, soil, and a mix of starter plants and seeds — typically runs under $20.
For the easiest indoor success: chives are nearly foolproof, parsley and thyme tolerate inconsistent watering, and rosemary is practically indestructible once it establishes. Basil needs the most sun and the most consistent moisture. Mint is aggressive — give it its own pot and keep it away from other herbs or it will take over. Cilantro bolts quickly indoors; dill gets unwieldy fast. Both are better grown outside if you have space. This is kitchen decor on a budget that feeds you back.
8. Building a Coffee Station Display From Thrifted Finds
A dedicated coffee station is less about adding something to your kitchen and more about containing what’s already there. Every kitchen has a coffee maker, mugs, pods or beans, a sugar bowl, spoons. Without a defined zone, that spreads across two feet of counter in a way that reads as chaos rather than function. A tray, a few height-varied items, and a 2-3 color limit transforms those same objects into a vignette that looks intentional.
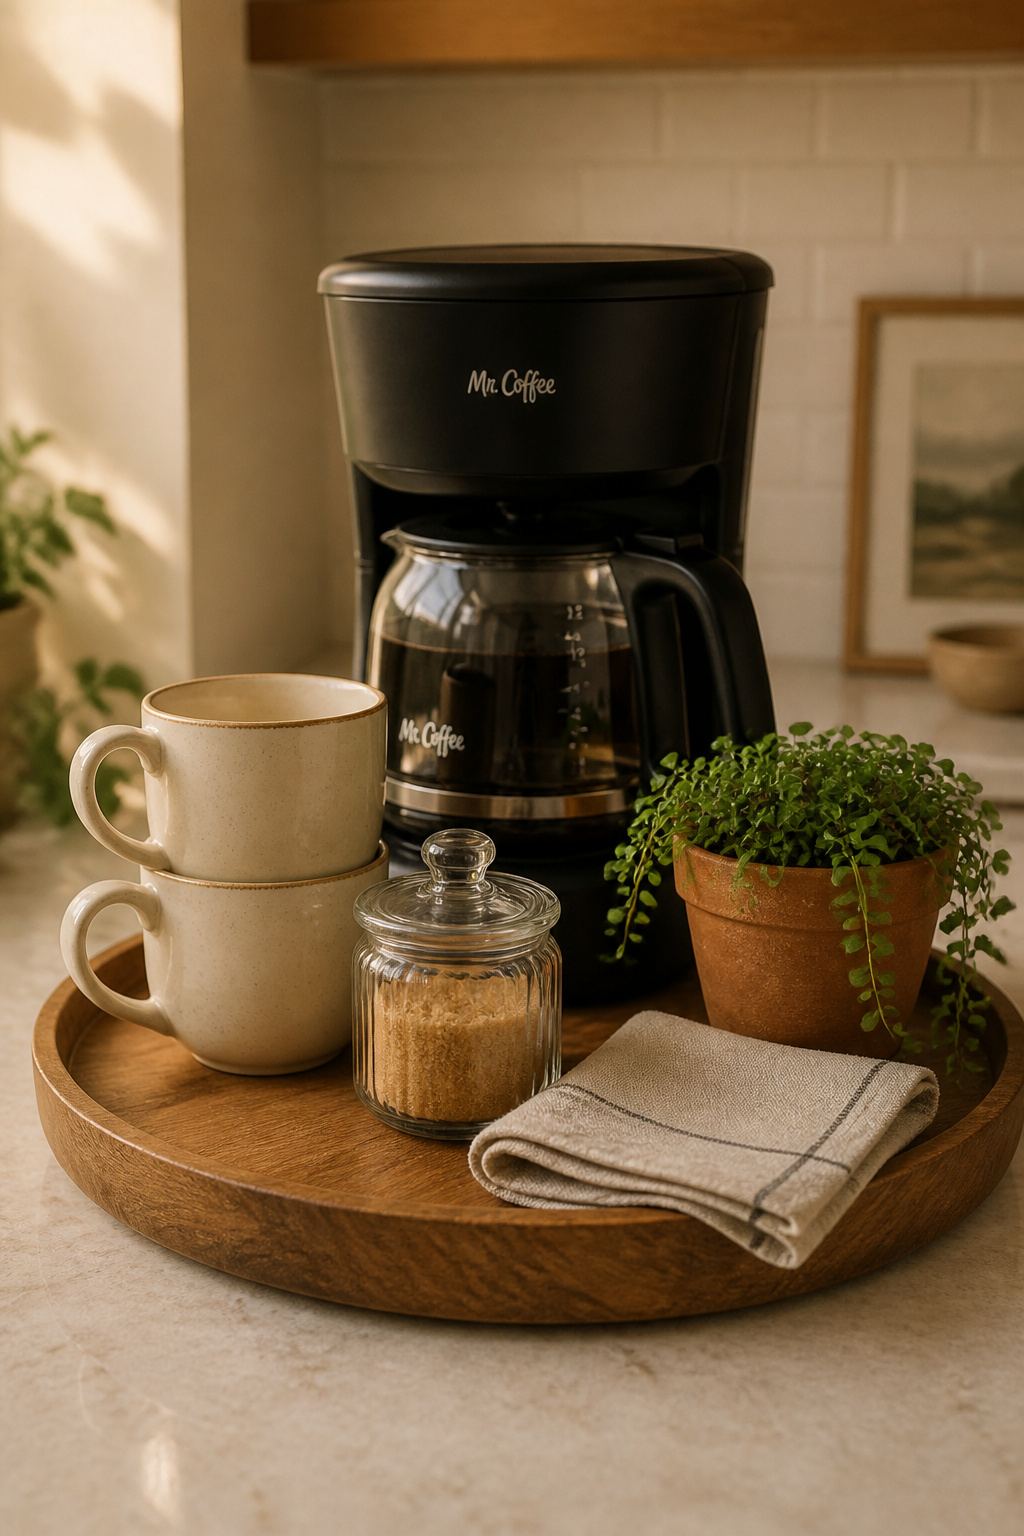
Start with a tray — even a $5 thrifted wooden tray anchors the display and makes everything within it read as a collection. From there: your coffee maker is the tallest element, mugs on a small hook rack or stacked provide mid-height, and a small jar for spoons or a tiny plant adds interest at the lowest level. Stick to two or three colors maximum and repeat each one at least twice — cream mug, cream sugar bowl, and cream candle creates visual coherence even if everything else varies.
Thrift stores are excellent for this. Goodwill regularly carries matching ceramic mugs in sets of 4-6 for $2-8, small wooden trays for $1-5, and linen cloth pieces to line the base of the display for under $2. Facebook Marketplace yields accent tables for $10-30 that become coffee carts with a lower shelf for supplies. In 2026, kitchen coffee bars are one of the most-photographed home design features — a well-done budget version participates in a current trend without spending like it.
9. Fabric Panels Instead of Lower Cabinet Doors for Texture and Color
This detail appears in traditional British cottage kitchens, French farmhouse interiors, and American country homes — fabric panels inside lower cabinet frames have a long, legitimate design history. They’re having a strong revival in 2026 because they do something that neither open shelving nor closed doors can do: they introduce soft texture into a room dominated by hard surfaces, while still concealing storage.
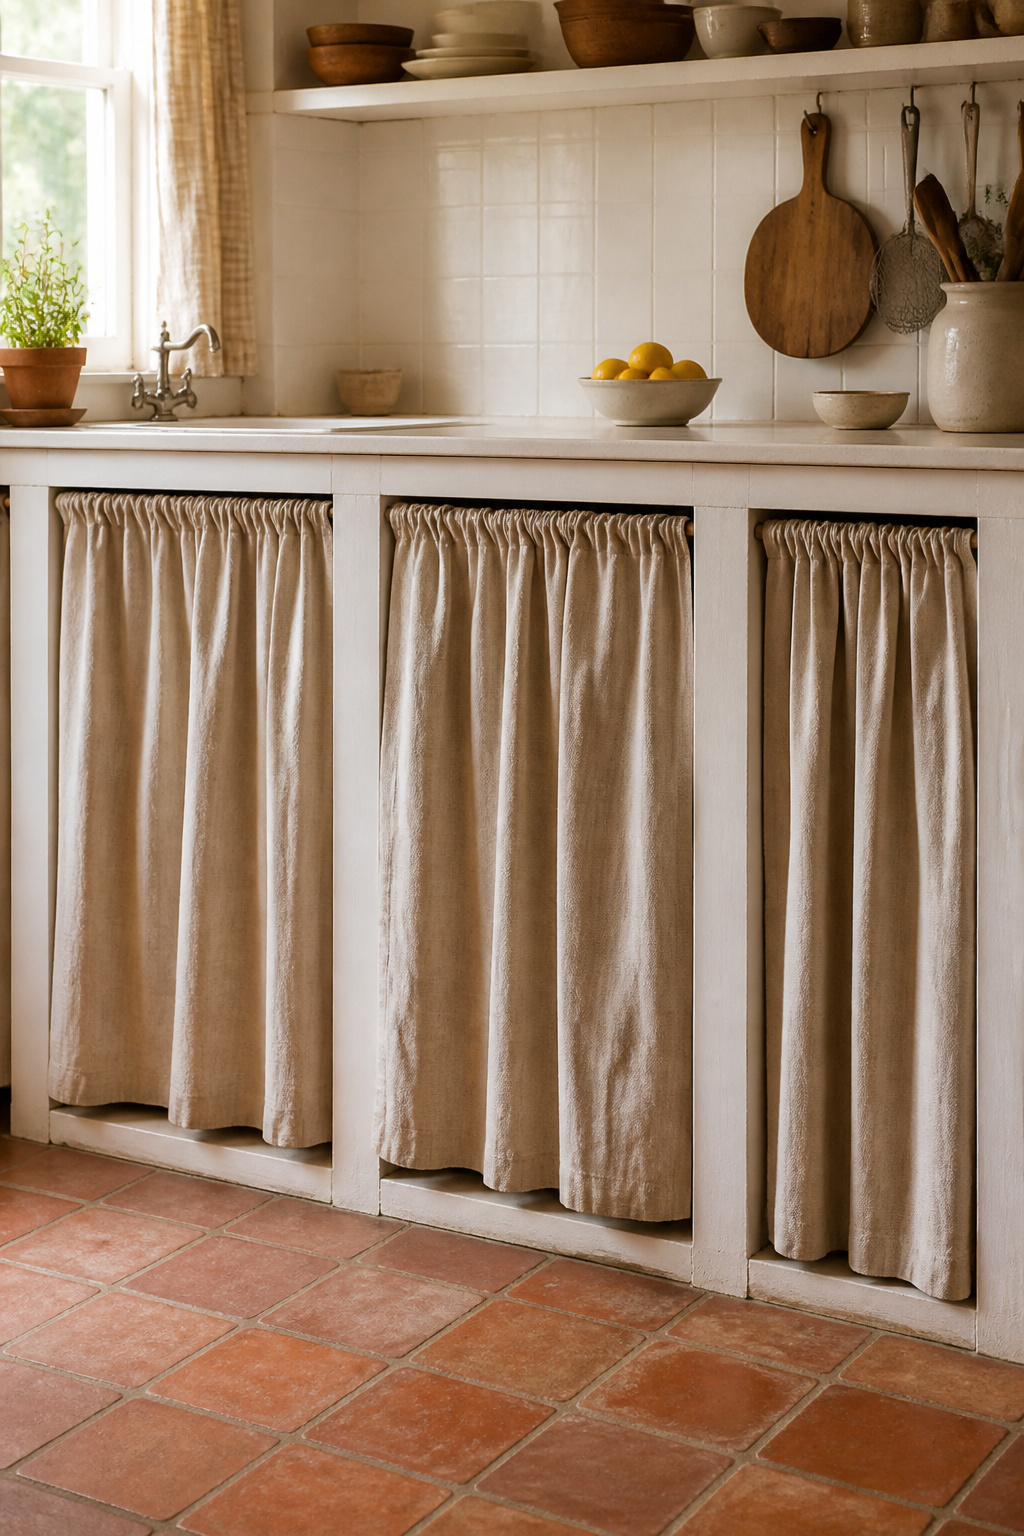
The project requires no sewing if you use tension rods and fabric fuse tape. Cut fabric to twice the width of the cabinet opening (the gather needs that extra width), fold a half-inch then another inch at the top to form a rod pocket, fuse it with iron-on tape, and thread a tension rod through. Install the rod inside the cabinet frame. The total cost for a full lower cabinet bank is typically $15-30 in fabric plus $5-10 in tension rods.
Linen and linen-cotton blends are the classic fabric choice — natural texture, breathes well, machine-washable, and ages beautifully. Duck cloth gives a more structured look if you want the panels to sit flat rather than gather. Avoid silk, velvet, or dry-clean-only fabric in a kitchen — they absorb grease and need regular washing. One critical prep step before cutting: wash and dry the fabric first. Unshrunk fabric will ride up above the cabinet base after the first laundry, and there’s no fixing that without starting over.
10. Peel-and-Stick Film as Kitchen Decor on a Budget for Worn Countertops
Adhesive countertop film has evolved far beyond the thin contact paper that peeled off under the first damp cloth. d-c-fix — the market leader — makes a thick PVC-based film that is waterproof, heat-resistant up to 170°F, cleanable with standard kitchen cleaners, and convincing enough in marble and butcher block patterns to read as real surfaces at countertop height. It’s one of the more credible forms of kitchen decor on a budget for renters or anyone waiting to save for a full countertop replacement. A lifespan of 2-5 years with good application makes it worth the cost. For a long-term view on permanent countertop options, kitchen countertop ideas for every style is worth bookmarking for later.
Application: The Steps That Prevent Peeling
Surface prep is everything. The counter must be degreased, fully dry, and at room temperature before the film goes down — cold surfaces dramatically reduce initial adhesion. Peel back a few inches of backing, position carefully, then squeegee from the center outward to prevent bubbles. Trim edges with a sharp craft knife against a metal ruler, then press the edge firmly with your thumbnail to fully bond it. Use a hair dryer or heat gun around any curves or corners to help the film mold into place.
Choosing the Right Pattern
Marble-look finishes — white with soft grey veining — are the most popular and most convincing, because real marble is also a flat-grain surface. Butcher block patterns work extremely well for the same reason. Avoid patterns with regular repeat lines simulating grout — the absence of actual grout depth is most visible there. One firm warning: don’t run this film right to the edge of a gas burner. Open flame heat can cause the edge to bubble and lift, whereas the regular surface heat of electric burners doesn’t present the same problem.
11. A Gallery Wall of Prints and Botanicals to Fill an Empty Kitchen Wall
Kitchen walls are probably the most underused decorating surface in most homes. People hang a clock, maybe a small sign, and call it done. But the wall above a kitchen table, or the wide end wall visible from the living area, is prime design territory — and a gallery wall with the right prints can make a kitchen feel like a room rather than a functional box.
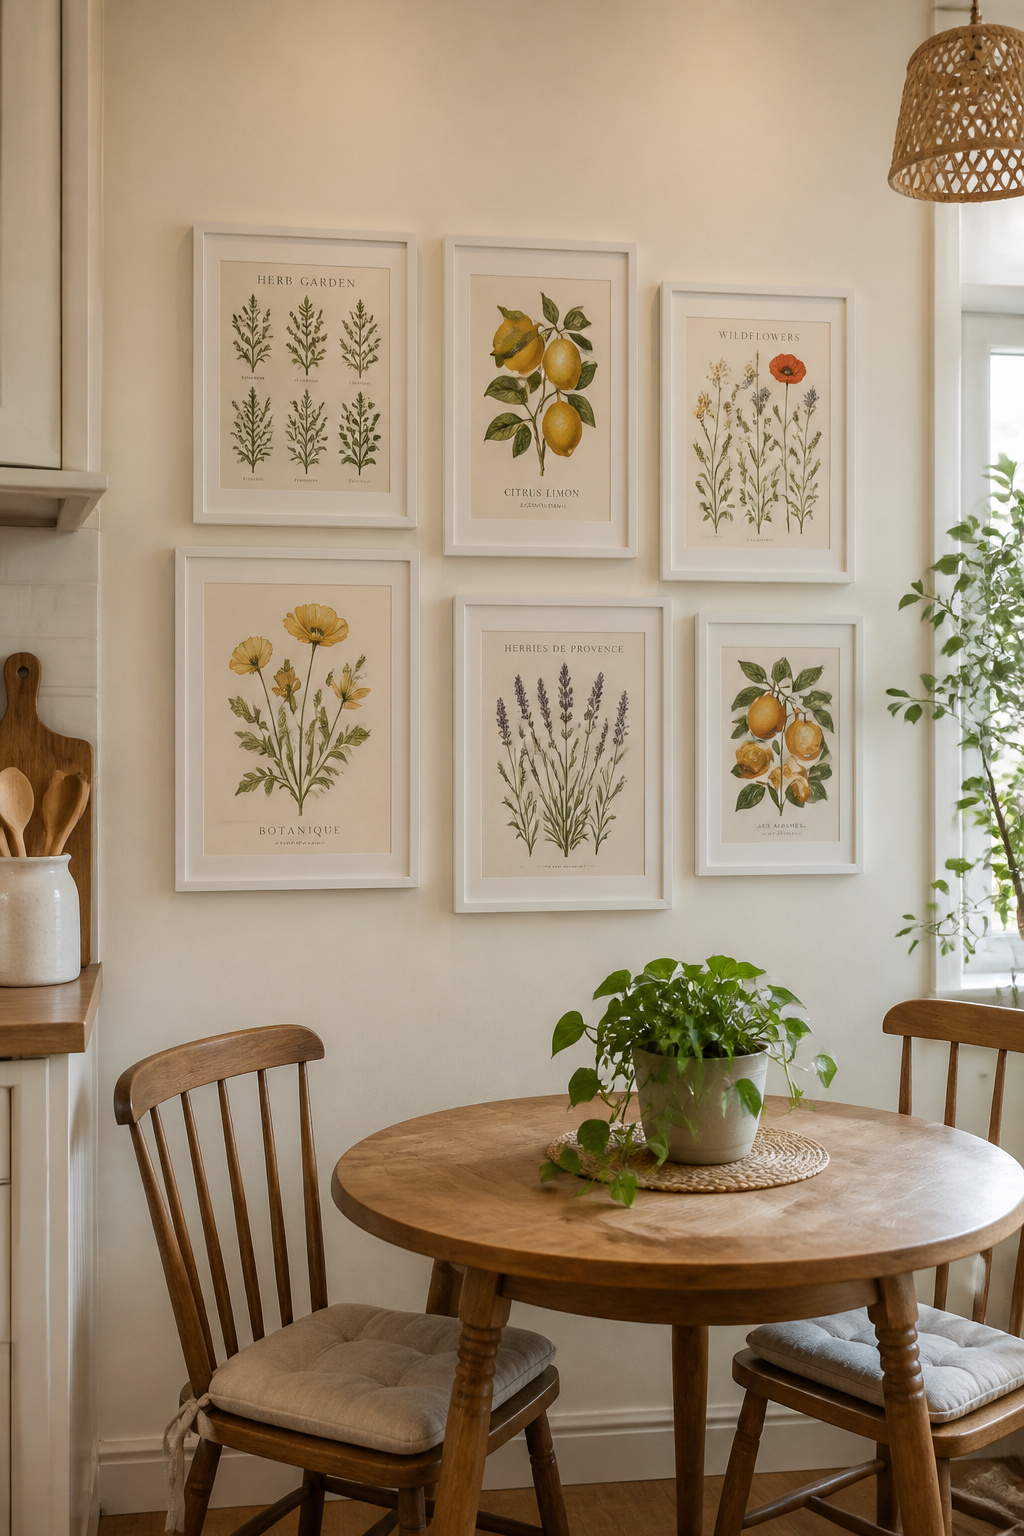
The art can be genuinely free or close to it. The Library of Congress has thousands of high-resolution botanical illustrations in the public domain, downloadable at no cost — food prints, herbarium plates, vintage seed packet illustrations, all perfect for kitchen contexts. Etsy sells digital download files for $1-5 that print at local pharmacy photo counters for another $1-3 per print. Total cost per framed piece: $2-8. IKEA Ribba frames at $10-15 each (with a white gallery-style matte already included) are the standard budget frame choice — neutral enough to disappear and let the art do the work.
Before hanging anything: lay frames on the floor to test arrangements until one feels right. This takes 10 minutes and saves you from a wall that looks like previous attempts. Alternatively, cut kraft paper templates in each frame size, tape them to the wall with painter’s tape, and adjust before committing. Command strips rated for the frame weight mean no nail holes — important in rentals.
12. Installing a New Faucet as an Affordable Stand-Alone Kitchen Upgrade
The kitchen faucet is used 20-30 times a day and sits at the visual focal point of the room. A dated brushed chrome arc faucet from 2004 undermines an otherwise updated kitchen the way a cheap tie undermines an otherwise good suit — you know something is off even if you can’t identify what. Replacing it with a matte black or brushed brass fixture is a statement the rest of the room doesn’t require. And the whole job, as DIY kitchen decor on a budget projects go, is genuinely one of the most approachable.

Most homeowners can do this swap in 45-90 minutes without a plumber. Check the sink for hole configuration first: most kitchens have either a single 1.375-inch hole or a 3-hole setup (for separate handles and a sprayer or soap dispenser). Buy a faucet that matches your configuration, or one with a deck plate to cover unused holes. Turn off the supply valves under the sink, disconnect the old supply lines, remove the mounting nut from below (a basin wrench helps in tight spaces), and install the new unit. Delta faucets are the easiest in the category — their InnoFlex pre-attached supply lines often eliminate the basin wrench step entirely.
For budget-to-look ratio: the Moen Adler single-handle arc faucet comes in under $90 in matte black and chrome, and looks significantly more expensive. Delta Foundations series starts around $60 in brushed nickel. If you’re thinking about broader kitchen changes alongside this, kitchen remodel on a budget covers what’s worth prioritizing across a full project. But for a single no-disruption update, this is genuinely hard to beat.
13. A Freestanding Cart or Island as Affordable Kitchen Decor With Character
Custom kitchen islands start at $2,000 installed. A freestanding butcher block cart costs $80-300 and requires zero installation, zero plumbing, and zero permits. The visual effect — an additional counter surface that looks like it was added thoughtfully rather than purchased as part of a package — is one of those details that makes a kitchen look designed rather than default. And as a piece of affordable kitchen decor, it does double duty as actual functional storage.
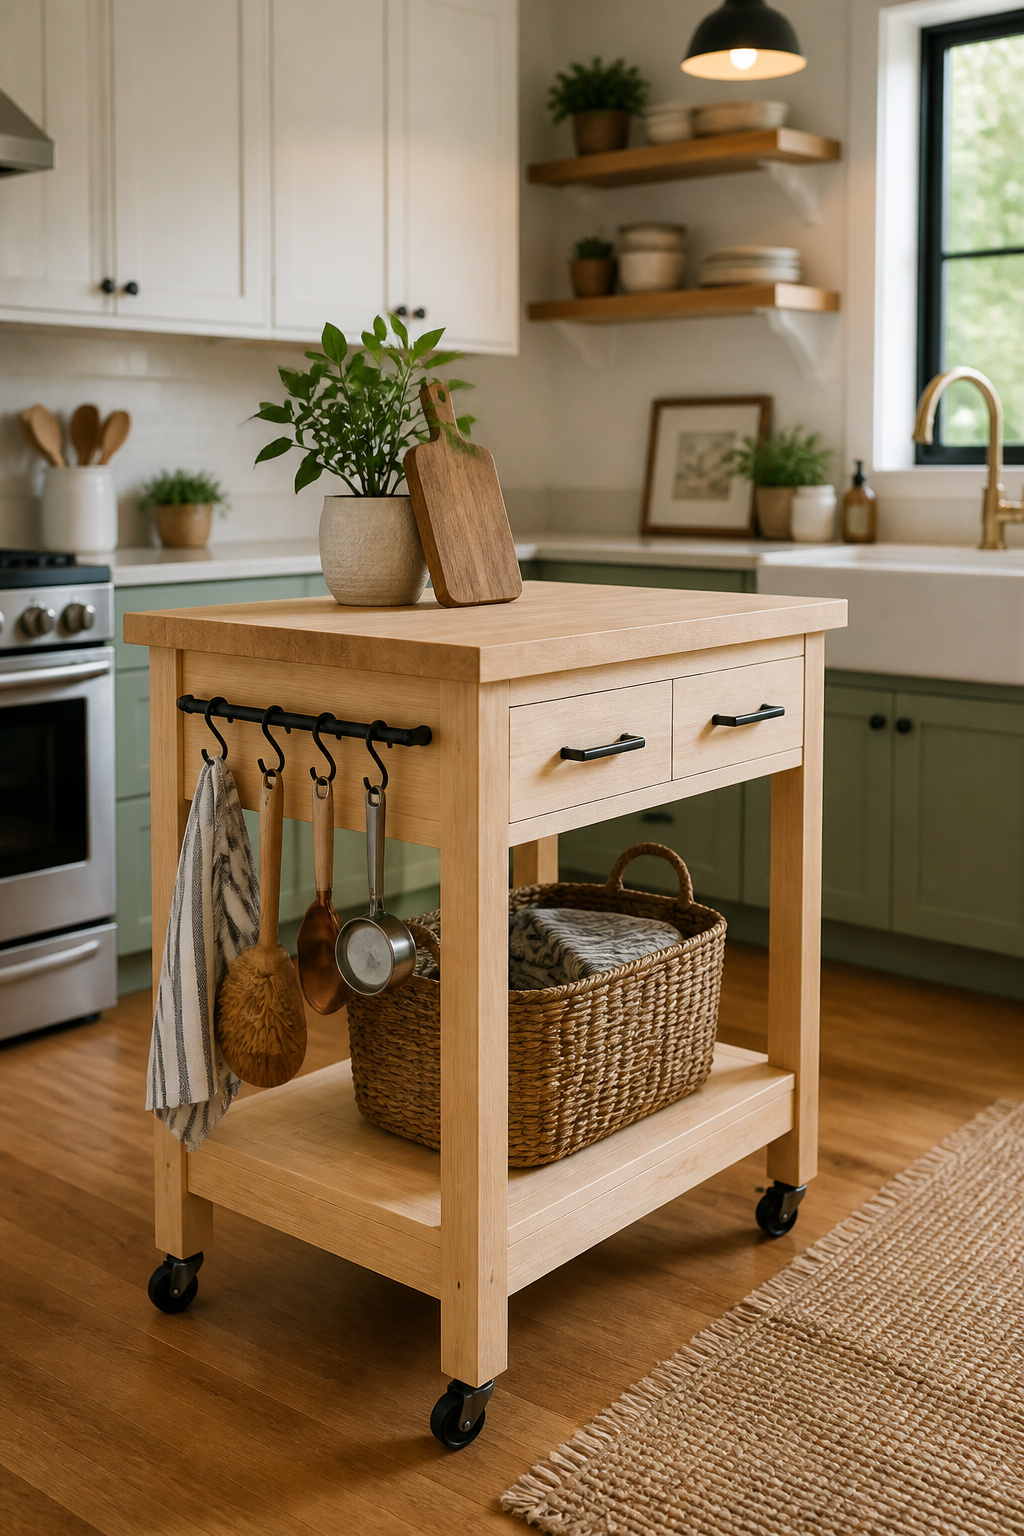
IKEA’s FORHOJA Kitchen Cart ($179) is the most-hacked piece in the kitchen category for good reason. Solid birch construction, butcher block top that handles real prep work and heat from small appliances, two open shelves below for storage. It reads as a purposeful addition in a modern, farmhouse, or Scandinavian kitchen. For more design possibilities, there’s a strong range of kitchen island ideas for every size of space worth browsing before committing to a style.
When buying any kitchen cart: match the height within 2 inches of your existing counter (standard 36 inches) so the top functions as a real prep surface. Depth should be 18-24 inches minimum. Locking casters are essential if you’ll use it for heavy prep work. Style the top by leaving 50-60% open, and store things in baskets on the lower shelf — loose items on a shelf always look messy regardless of how clean the top is.
14. Styling Open Shelves With Everyday Ceramics and Colorful Glassware
Open shelves that look like a design studio photo don’t require special dishware. They require understanding three principles that make any collection of everyday objects look intentional: the rule of thirds, odd-number groupings, and height variation. As budget kitchen ideas go, this one costs nothing — it’s a rearrangement of what you already own.
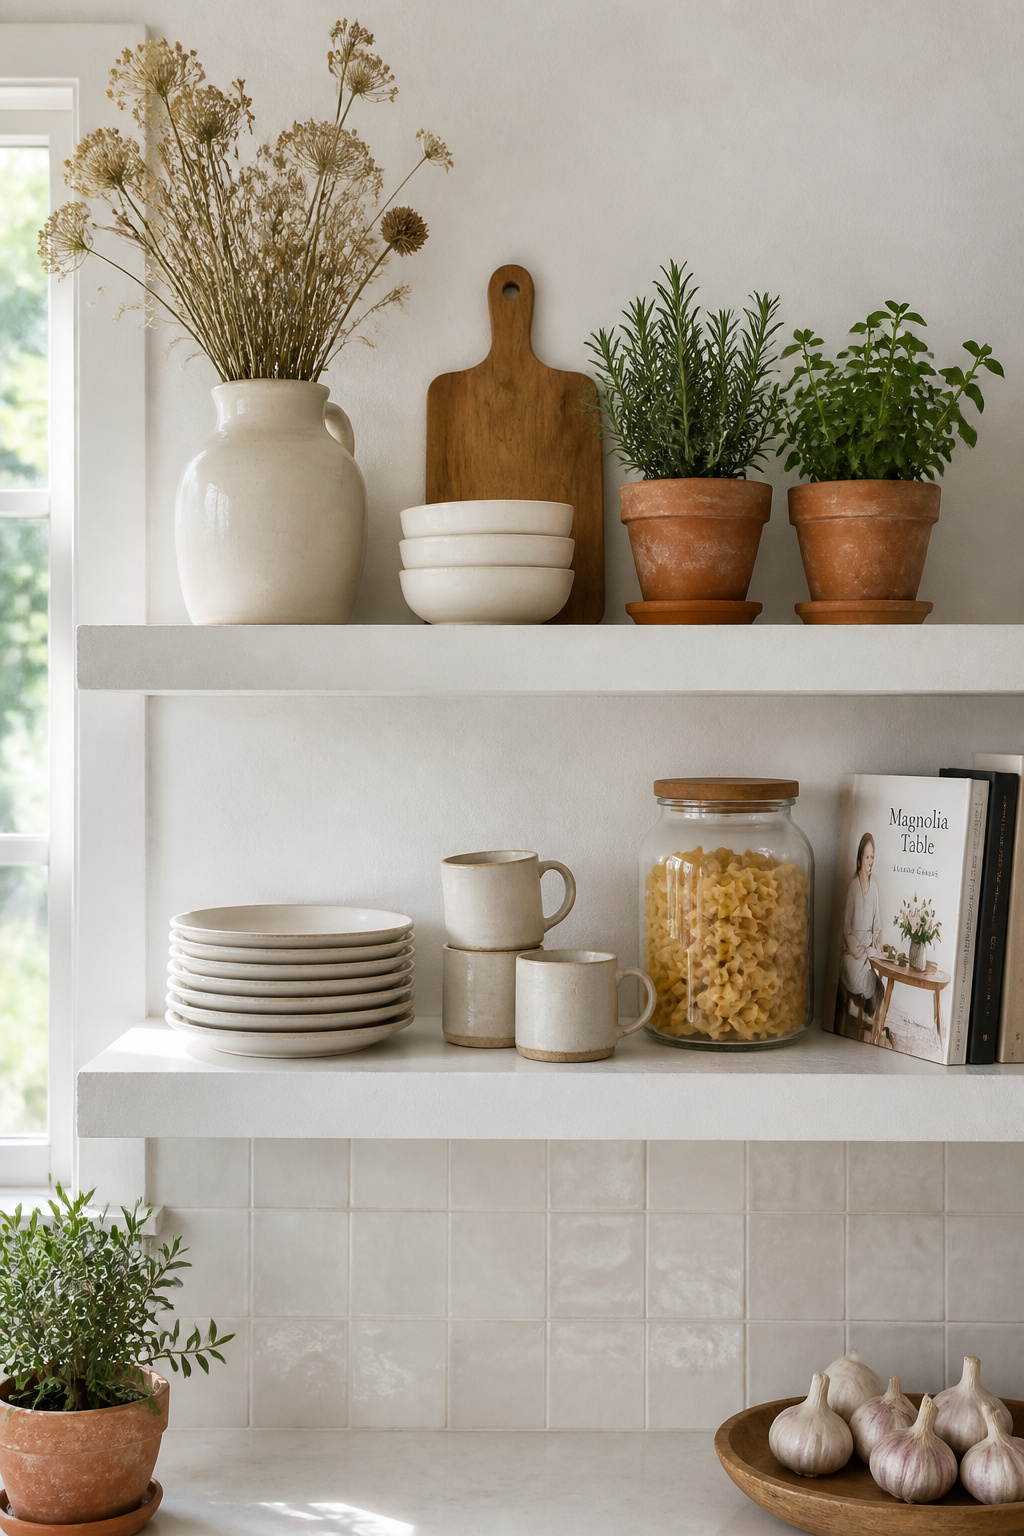
The rule of thirds means mentally dividing each shelf into three horizontal zones and placing a visual anchor in each. Items clustered in the center or pushed to one side create imbalance that reads as disorganized. Odd-number groupings — three mugs, five small bowls, seven glass jars — are more dynamic than pairs. Height variation is arguably the most important principle: mix tall items (a stacked plate set, a pitcher) with medium items (mugs, bowls) with short items (a small plant, an oil bottle, a candle). A shelf of identically-sized objects reads as storage, not decor.
Mixing materials gives shelves genuine richness. A ceramic bowl next to a glass jar next to a wooden cutting board creates texture contrast that draws the eye. Stick with a limited palette — 2-3 colors — and repeat each color at least twice across the shelf.
The thing most people forget, and the thing that makes the biggest difference: plants. Even one small potted plant — a trailing pothos with a tendril falling over the shelf edge, a small herb in terracotta — adds the living quality that distinguishes a home from a showroom. Without any plant or organic element, open shelves look static regardless of how carefully the dishware is arranged.
15. New Textiles as Kitchen Decor on a Budget: Curtains, Towels, and Seat Covers
Nothing shifts a kitchen’s mood faster than a coordinated textile refresh. A new set of café curtains, fresh dish towels in a new color, and replaced seat cushions on kitchen chairs can change the entire visible palette of a room without touching a cabinet or wall. This is kitchen decor on a budget at its most accessible — the full cost runs $40-80, and the whole swap takes an afternoon.
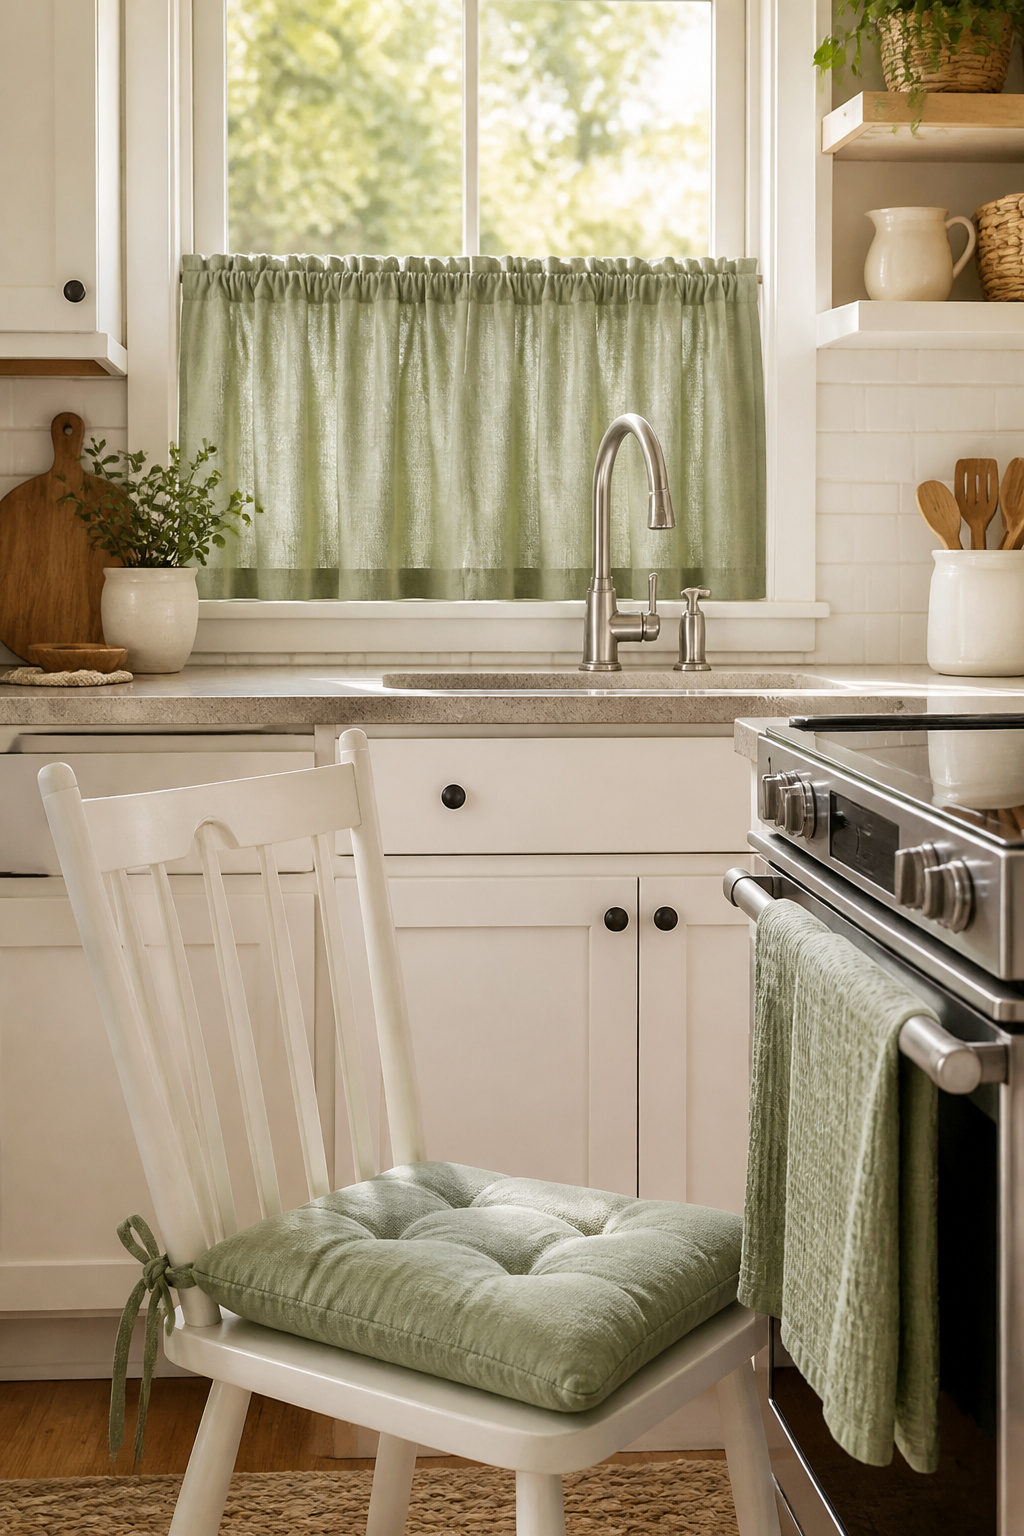
Café curtains — covering only the lower half of the window — are the most practical choice for kitchens. They provide eye-level privacy while letting natural light enter freely through the top half. Standard café curtain length is 24-36 inches. For a cleaner look that lets in maximum light, sill-length curtains at 54 inches work well where privacy isn’t a concern. Best fabrics: cotton-polyester blend for maximum washability and wrinkle resistance; linen blend for natural texture with practical durability. IKEA Hilja panels at $9.99 for two are the most budget-accessible starting point.
The coordinated approach: choose one anchor color and let it appear in at least three textile items. If sage green is the anchor, you want sage curtains, sage dish towels, and sage somewhere in the seat cushion — even as a stripe. Keep the other colors neutral so the anchor stands out without competing. Avoid perfectly matching everything — a tone-on-tone variation of the anchor color across different textiles looks more considered than a perfectly matchy set.
Where to Start With Kitchen Decor on a Budget
With 15 ideas in front of you, the practical question is: which one first?
If I were starting from zero, I’d sequence it in three tiers based on visible impact. First: the hardware swap (item 2) and the lighting update (item 5). Both are visible from the doorway, both require minimal skill, and both deliver an immediate feeling that the kitchen has been paid attention to. These two changes alone shift how a room feels to anyone entering it.
How to Sequence Your Projects
Second tier: the rug (item 6) and the textiles (item 15). Buy and place — no installation, no skill requirement, and you’re shifting the color palette of the whole room in an afternoon. Add the windowsill herb garden (item 7) here too if you have a south-facing window.
Third tier: the peel-and-stick backsplash (item 3) or lower cabinet painting (item 1) — both more committed in time but genuinely transformative. Save the countertop film (item 10) and fabric panels (item 9) for after your color palette is settled, since they look best when they’re clearly part of an intentional scheme.
For a full $200 kitchen decor on a budget refresh: $50 in hardware, $30-50 for a flatweave runner, $40-70 in coordinated textiles, $15-20 for a herb garden setup, and $15-30 for a gallery wall. That’s $150-190 for changes that affect the kitchen’s look, feel, and daily experience — none of which required a contractor, a permit, or anything more than an afternoon and a bit of intention. Pick one this weekend. The rest will follow.