The bathroom sink vanity does more work than any other fixture in the room. It sets the style, holds the storage, and establishes the tone the moment you walk in. In fourteen years of historic home renovation, I have pulled out more mismatched vanities than I care to count. Oak cabinets in Victorian row houses. Contemporary floating units in Craftsman bungalows. Generic stock boxes in rooms that deserved something far more considered.
Getting the vanity right is not complicated, but it requires more thought than ordering the largest unit that fits. You need to think about your home’s bones, your plumbing rough-in, and how you actually use the room every single morning. This guide covers seventeen distinct bathroom sink vanity approaches, from a classic pedestal-and-cabinet pairing to a DIY stock cabinet build that performs like a custom piece. Some are period-faithful; others are contemporary. All of them are grounded in how these things work in real bathrooms, not just how they photograph.
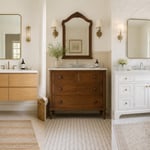
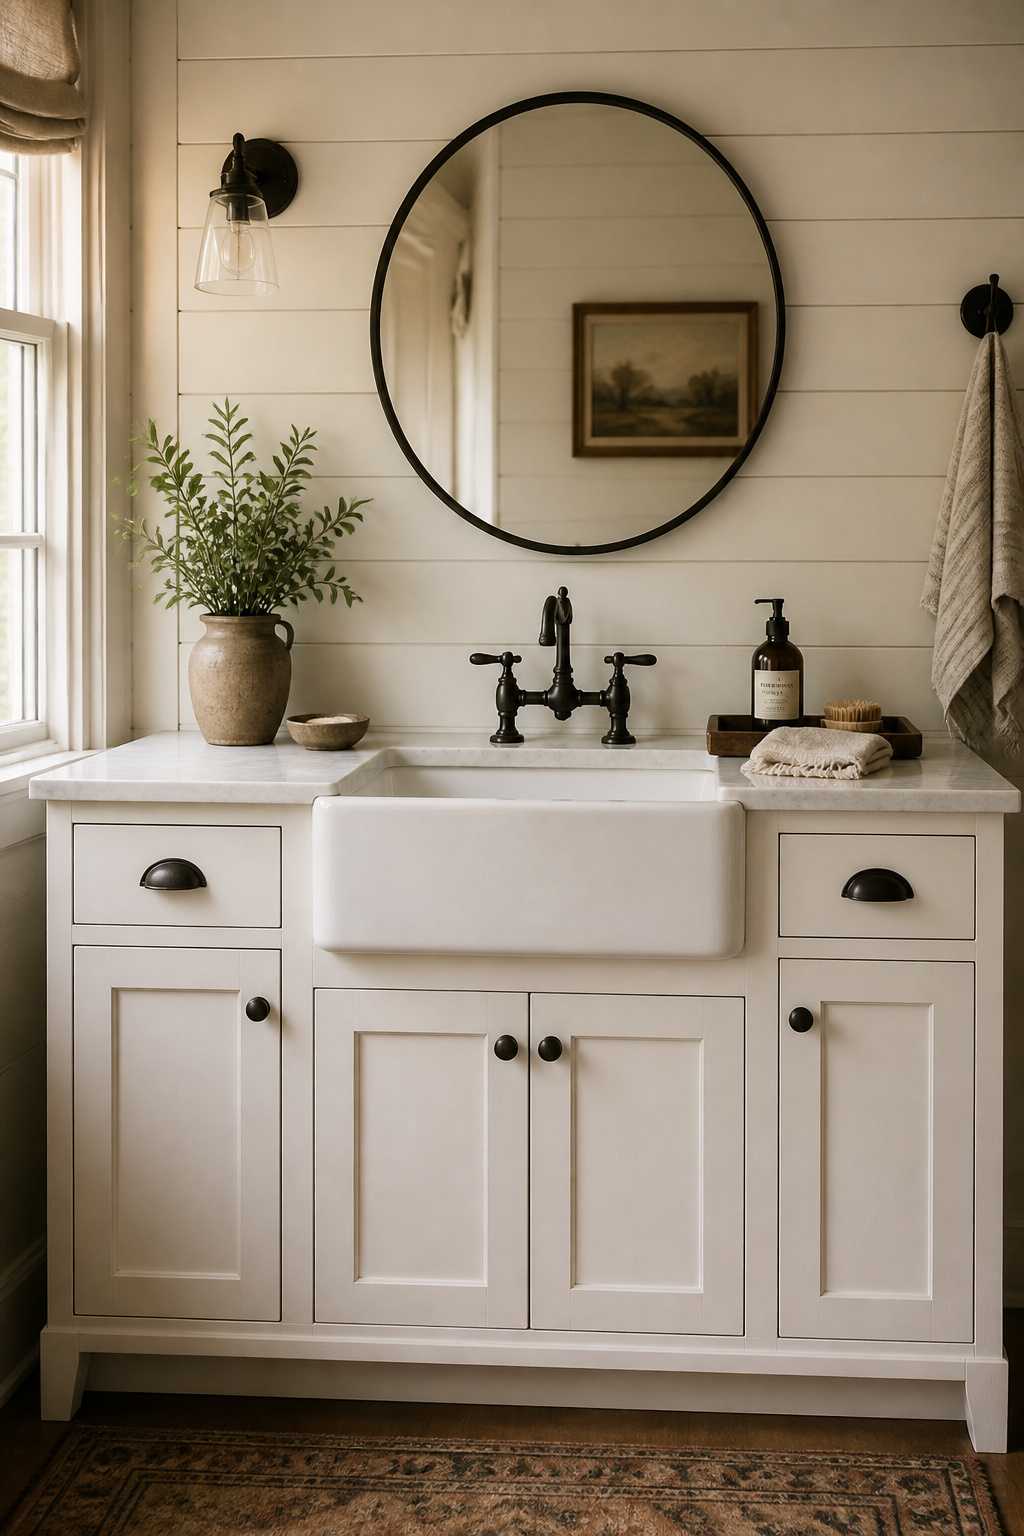
1. Freestanding Pedestal Sink With a Furniture-Style Vanity Cabinet Alongside
Pedestal sinks have been in continuous production since the 1880s for good reason. The columnar base and exposed basin carry an architectural grace that no full-cabinet vanity can replicate — they read like furniture, not plumbing. The problem, of course, is storage. A bare pedestal in a daily-use bathroom leaves you stacking bottles on the tank lid and hanging bags from the door hook. The solution is not to rip the pedestal out. Instead, pair it with a furniture-grade freestanding cabinet placed 4-6 inches to one side.
This bathroom sink vanity combination works because it acknowledges what the pedestal is: a sculptural fixture. Essentially, the companion cabinet supplements the pedestal rather than replacing it. In Victorian, Colonial Revival, and early Craftsman-era bathrooms, this pairing is particularly convincing. You get the grace of the pedestal and the practical storage without forcing a full vanity unit into a room that was not designed for one.
Size the companion cabinet carefully. In practice, its top surface should sit within 2 inches of the pedestal rim — typically 32-34 inches — so the visual line reads as intentional. A 15-18 inch wide unit positioned flush with the sink basin (not the base) is enough for towels, toiletries, and a drawer or two. For hardware, apply one metal finish across both the faucet and the cabinet pull. Unlacquered brass ages to a warm, lived-in tone that reads authentically period. Brushed nickel is the safer transitional choice if the room already has mixed metals.
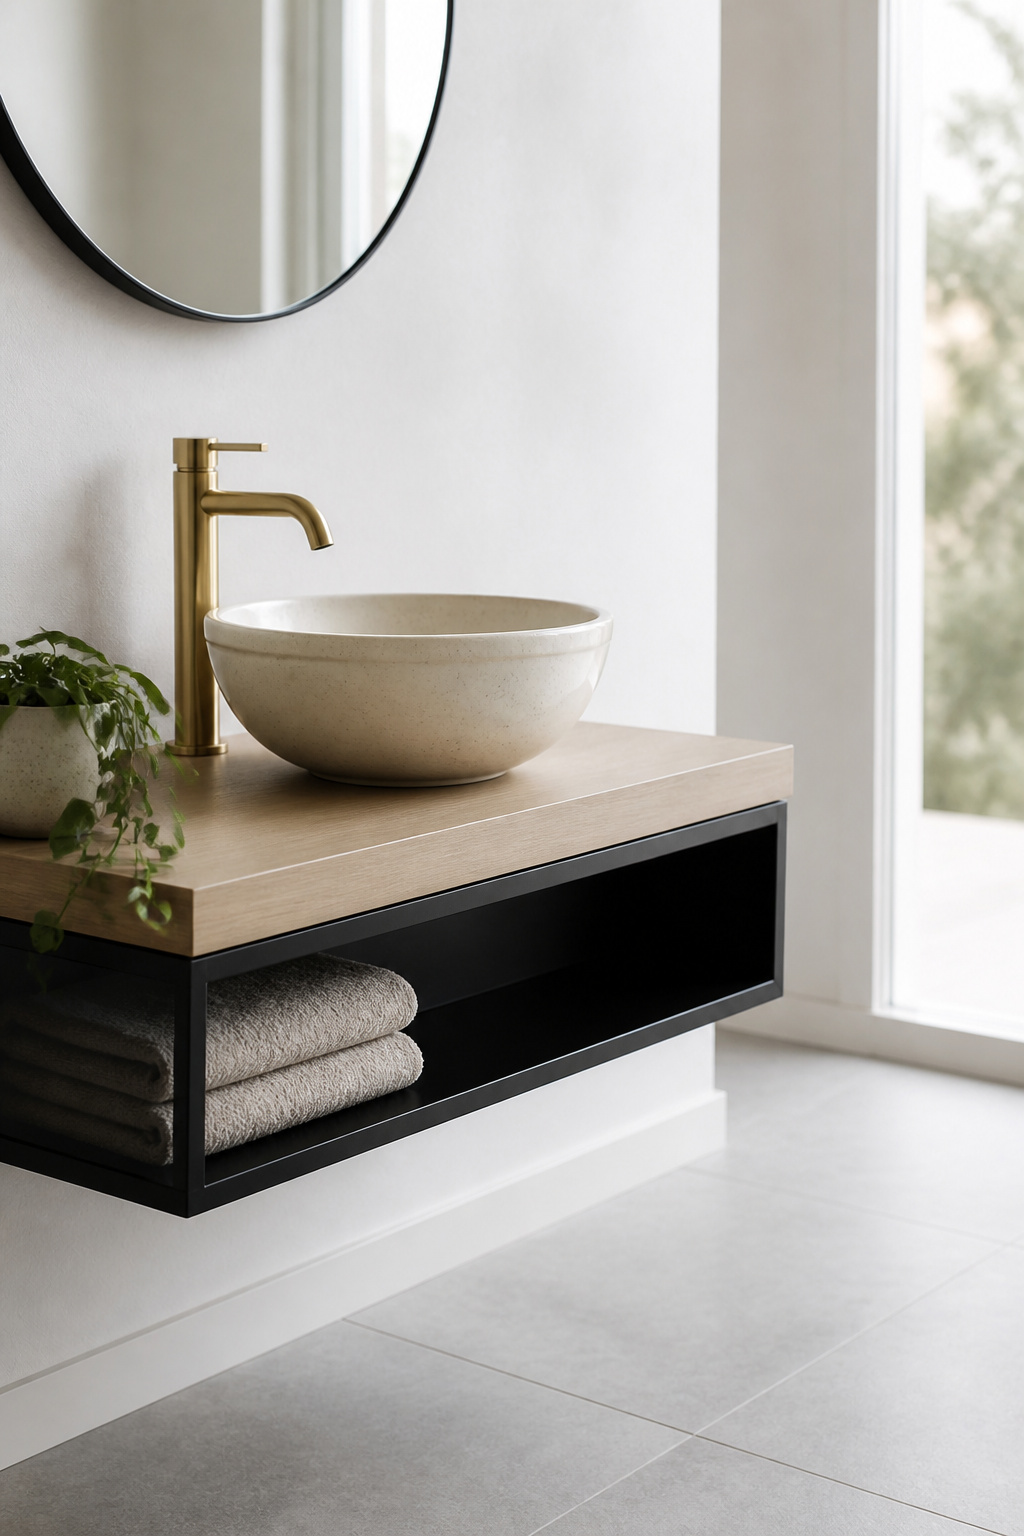
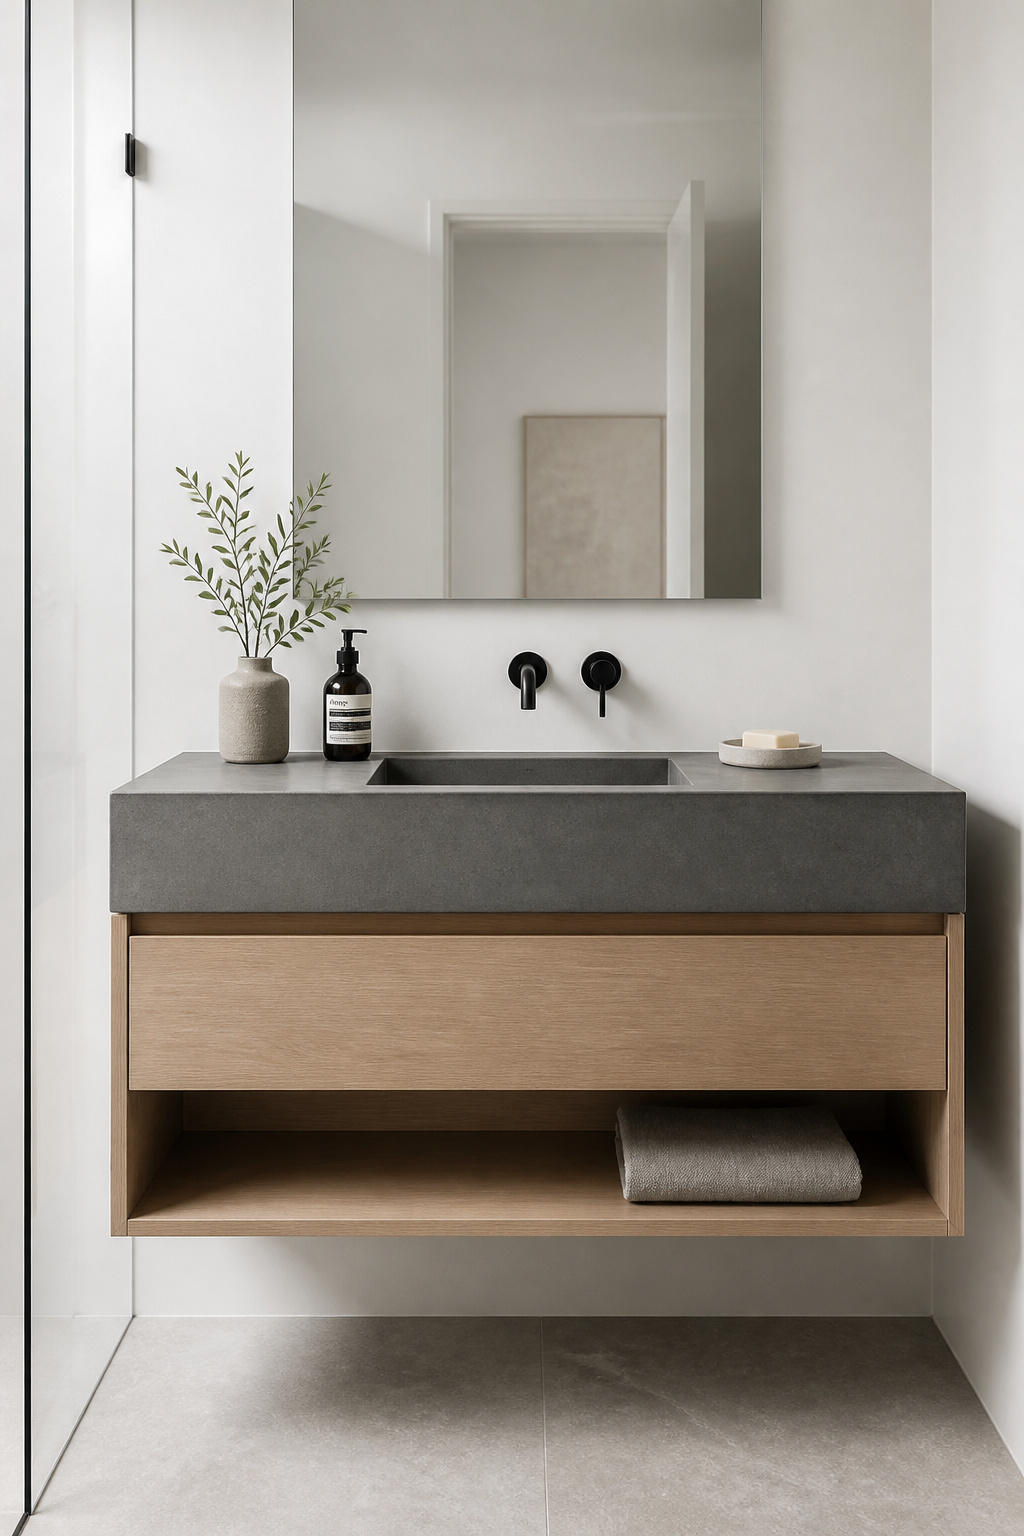
2. Floating Wall-Mounted Bathroom Sink Vanity for Small and Narrow Spaces
The single most effective move in a small bathroom is clearing the floor. A floating wall-mounted bathroom sink vanity lifts everything off the ground — the cabinet, the plumbing, the sight lines. The exposed floor beneath creates perceived square footage that is disproportionate to the actual clearance involved. Even 6 inches of open floor reads as significantly more space. For more configurations in tight rooms, the vanity ideas for tiny bathrooms guide covers options from 18 inches wide to full-wall runs.

In practice, the structural work is the part most DIYers underestimate. A floating vanity must anchor into wall studs. Standard stud spacing of 16 inches on center handles most units up to 48 inches wide. However, wider units need additional blocking installed before tiling. A properly installed unit can safely hold up to 220 lbs, provided the mounting hardware is rated for the combined load of cabinet, countertop, and contents.
On dimensions: standard vanity depth runs 21-22 inches. Narrow-profile floating models go as shallow as 14-16 inches. That 6-inch difference can mean the choice between a clear door swing and a blocked one. Below 18 inches of depth, most undermount sinks will not fit — so a vessel sink becomes the only viable choice. Also, set the height at 34-36 inches rather than the traditional 32-inch standard. The additional height improves daily ergonomics for most adults.
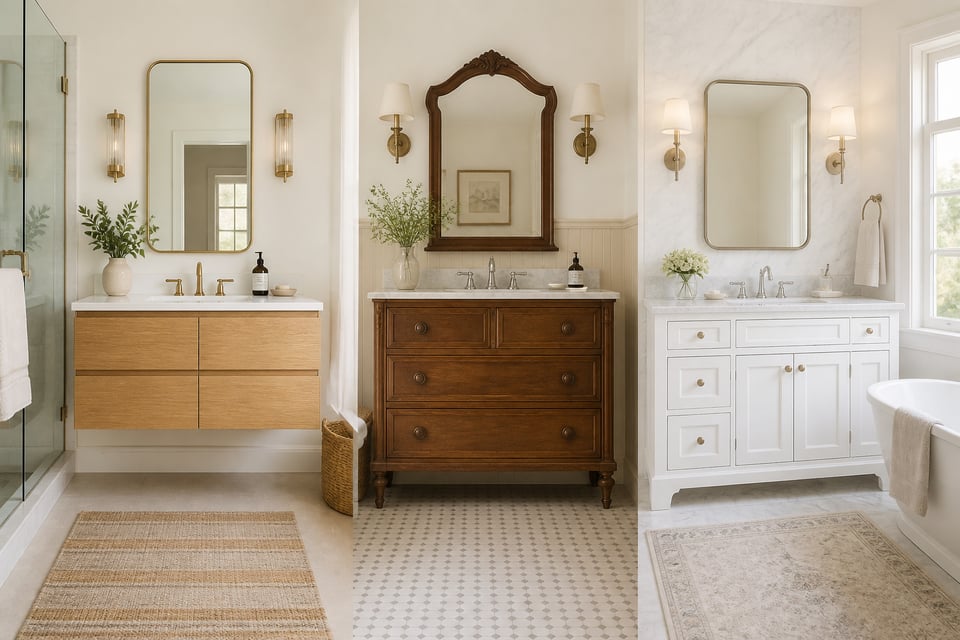
3. Antique Dresser Conversion Into a Sink Vanity
A factory-built vanity is manufactured to a formula. An antique dresser converted into a bathroom sink vanity, however, carries actual history — hand-cut dovetails, quartersawn oak, worn brass hardware that no reproduction can genuinely replicate. It reads as if it was always in the room. In historic homes, this distinction matters enormously.
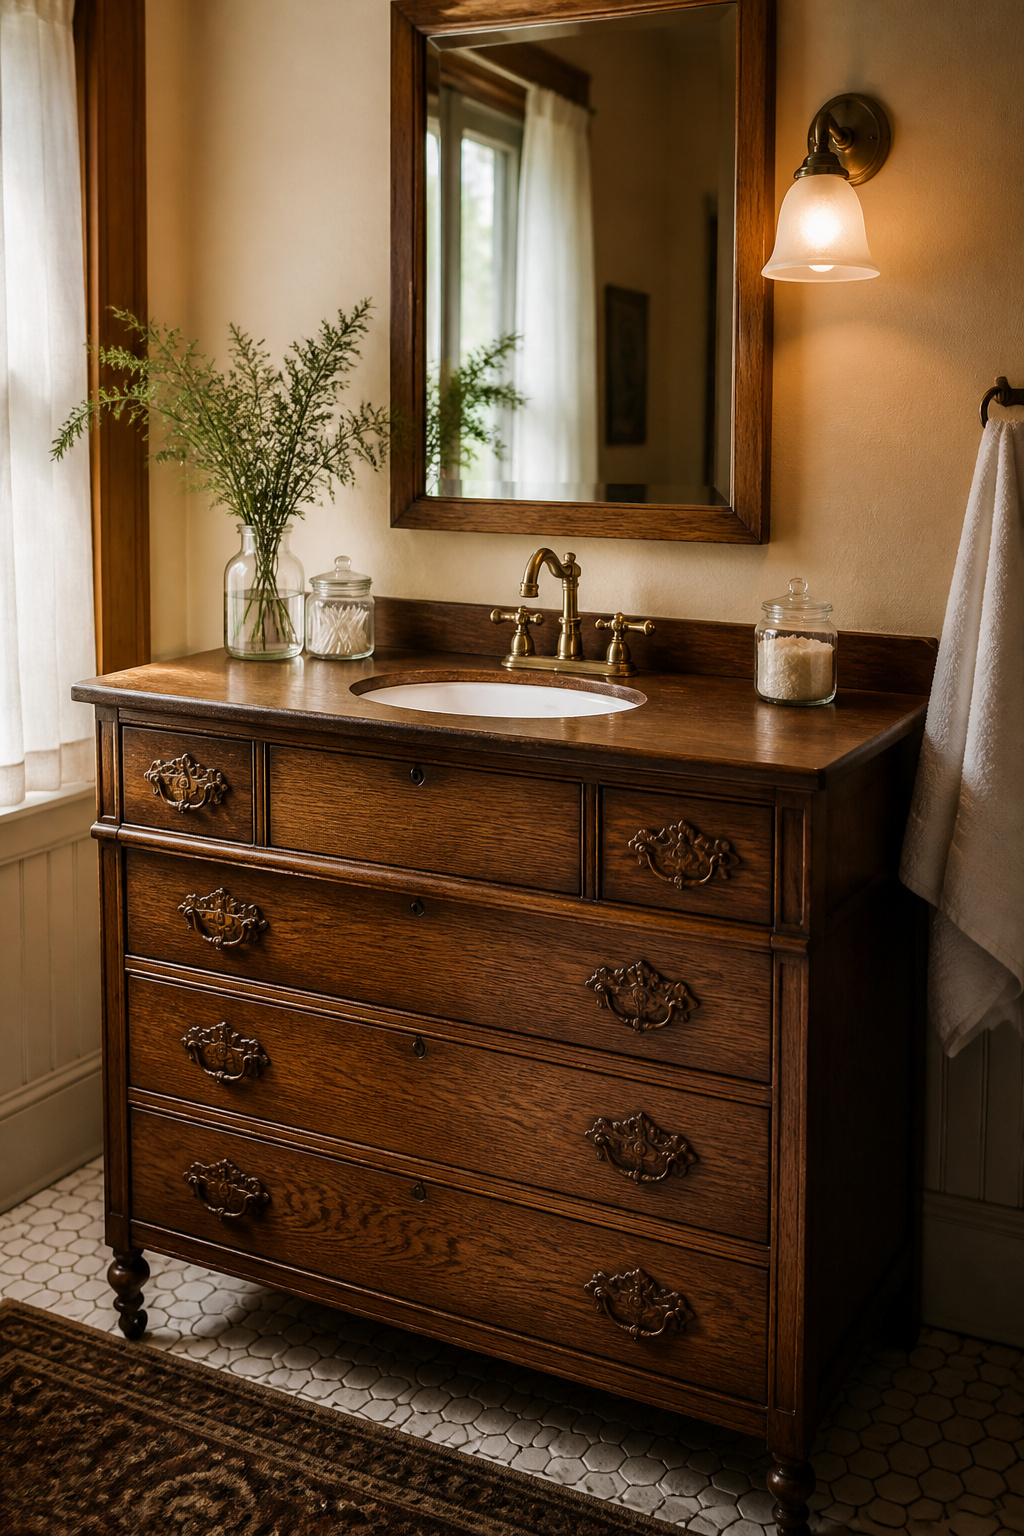
Typically, Victorian and Edwardian dressers run 18-20 inches deep — slightly shallower than the 21-22 inch vanity standard. That difference is workable. A shallow undermount sink or a vessel sink on top both accommodate the reduced depth without modifying the dresser. The top two drawers must be removed and rebuilt as false fronts. Salvage the drawer faces and screw them permanently in place. This creates clearance for the sink basin and drain rough-in. As a result, the lower drawers typically remain functional, giving you more usable storage than most manufactured vanities provide.
Waterproofing the top surface is the step people skip. Apply three coats of marine-grade polyurethane or spar urethane, sanding lightly between each coat. A more durable approach is Clear Penetrating Epoxy Sealer (CPES) followed by two coats of marine varnish. This bonds with the wood fibres rather than sitting on top of them. Pay particular attention to the sink mounting point. Use a generous silicone bead around the full perimeter, and plan to reseal that joint annually.
4. Double Vanity With Twin Undermount Sinks for a Shared Master Bath
Two people sharing one bathroom vanity is a daily negotiation. A double bathroom sink vanity ends that negotiation — but only if it is sized correctly. The 60-inch minimum is genuinely a minimum. At 60 inches with two 16-18 inch undermount sinks, you have roughly 12-14 inches of shared counter between the basins. That is tight for a morning routine. The bathroom vanity ideas for shared spaces guide goes deeper on double-vanity planning.
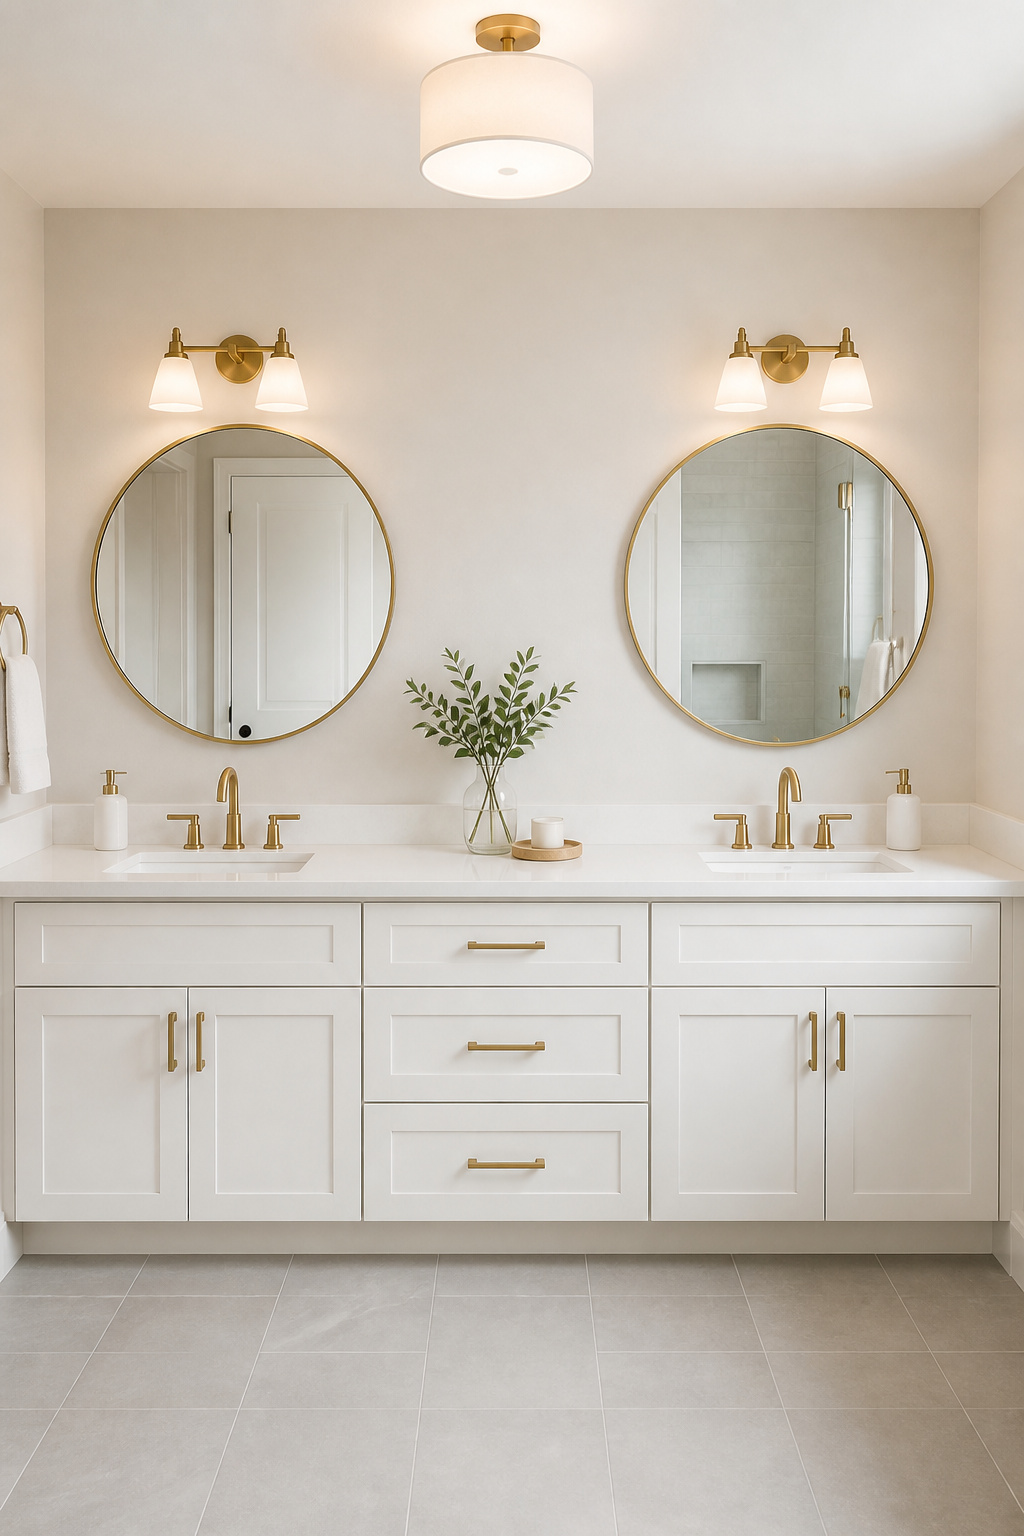
At 72 inches, the math changes considerably. The sinks sit with 16-20 inches of shared counter between them and 12-15 inches on each outer edge. That is enough room for a side-by-side routine without elbow-sharing. The additional cost over a 60-inch unit is modest relative to the daily improvement. Storage distribution also requires planning. Each user needs roughly equal undercabinet territory, with the dividing point near the centre between sinks. The drawer banks flanking the drain zones provide the most accessible storage. A centre tower between the two runs adds tall storage for towels without encroaching on either side.
Mirror planning changes too. A single mirror above a double vanity is inadequate for two users. Either two separate mirrors at matching heights, or one horizontal mirror running at least 60 inches wide, solves the problem cleanly.
5. Shaker-Style Bathroom Vanity With an Integrated Undermount Sink Cabinet
The Shaker door — five pieces of wood, a flat recessed centre panel, a simple perimeter rail — avoids the ornamental specificity that dates other styles. A Shaker bathroom vanity reads plausibly in a Victorian hall bath, a Craftsman-era bungalow, and a contemporary renovation. That renovation-neutrality is why it remains the top-selling bathroom cabinet style in the US, year after year.
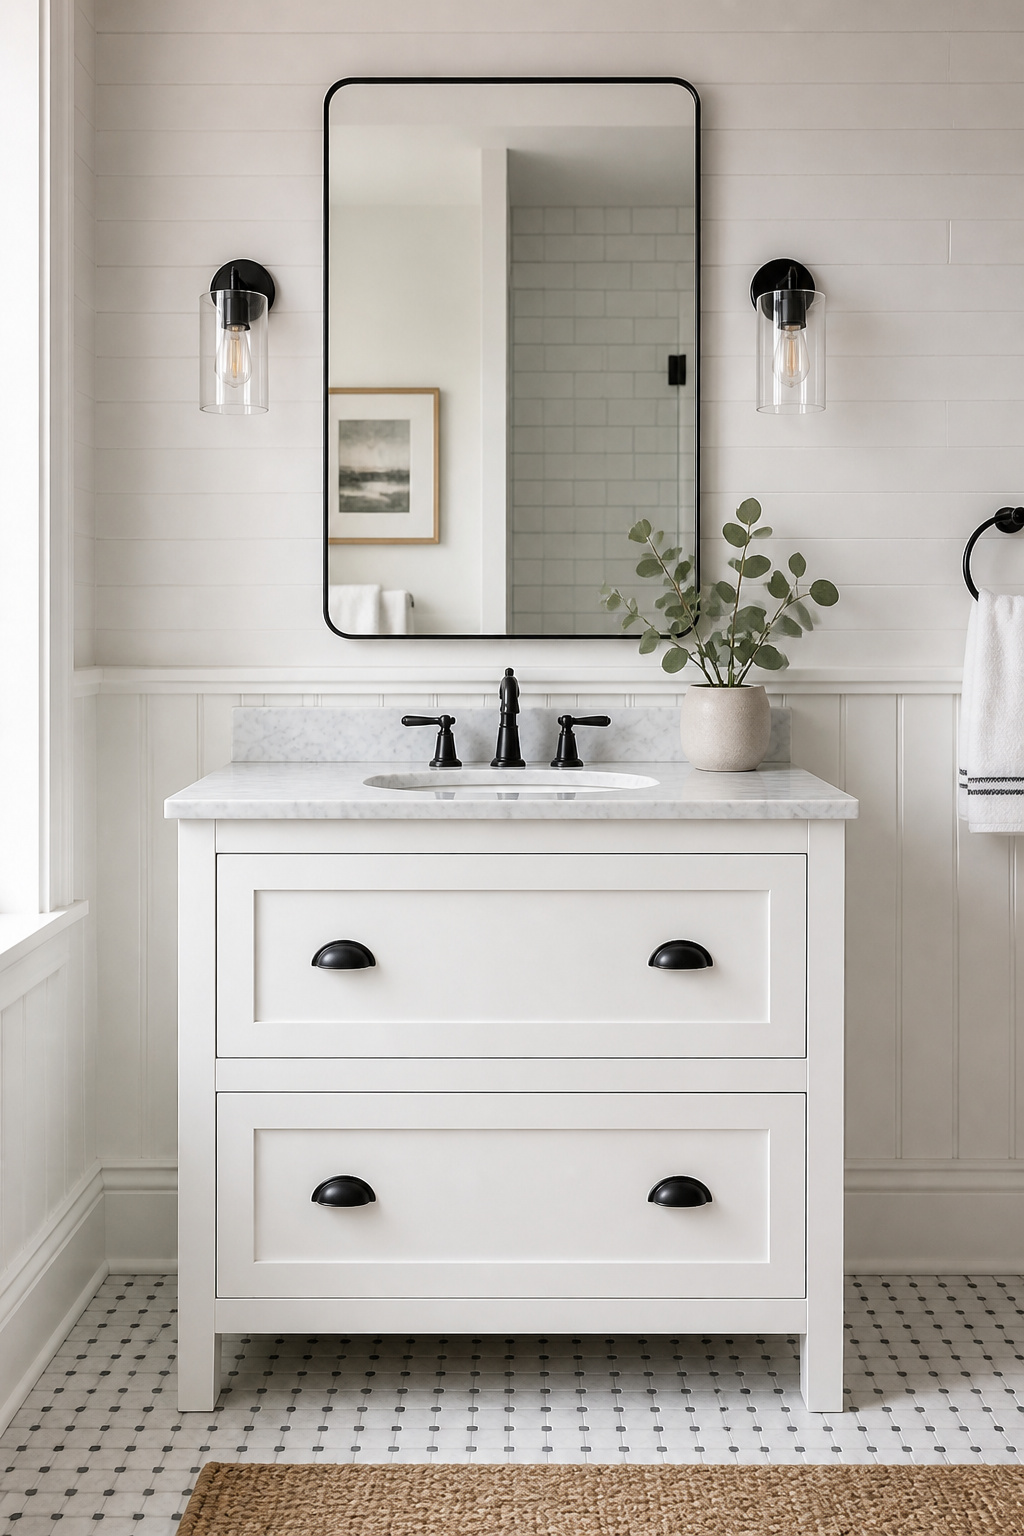
For a Shaker bathroom sink vanity, wood species matters more than the door style for long-term performance. White oak is the right choice for a solid-wood unpainted Shaker vanity. Its tighter grain structure includes tyloses — natural blockages within the wood’s vessels — that limit moisture penetration better than red oak’s open grain. However, hard maple at 1,450 Janka is the better choice for a painted vanity. Its fine, closed grain takes paint uniformly and gives a cleaner result in white, grey, or navy.
In practice, the most durable construction pairs solid hardwood door fronts with moisture-resistant plywood box construction. A fully solid-wood cabinet body actually performs worse in bathroom humidity, because solid wood moves more with seasonal humidity changes. Hardware should match the home’s era. Bin pulls in oil-rubbed bronze work for Craftsman settings. Brushed nickel bar pulls read transitional. Integrated routed pulls are appropriate in minimalist contemporary spaces, but not in period-authentic renovation work.
6. Reclaimed Wood Bathroom Sink Vanity for Authentic Rustic Character
Old-growth reclaimed lumber has a density that modern plantation wood cannot match. The annual rings are tighter, the grain more consistent, the surface character — checking, silver-grey patina, mortise holes from a previous life as a barn beam — entirely its own. No stain replicates it. In a historic home renovation context, using reclaimed wood sourced from the same era as the house creates a material authenticity that catalogue-finished cabinets cannot provide.
Sourcing a reclaimed wood bathroom sink vanity requires more effort than buying new. Architectural salvage dealers are the most reliable option, typically sorting material by species and grading for condition. Before buying any piece, check for active insect damage (fresh bore dust at exit holes) and surface cracks deeper than a quarter inch. Also look for unstable knots that can work loose over years of use. Oak and chestnut pieces from the 1880s-1920s are particularly good candidates — both are dense hardwoods that take waterproofing well.
Specifically, two sealing approaches exist. First: three to four coats of spar urethane, sanded lightly between coats. This allows the wood to move with humidity changes while providing a durable surface seal. Second, and more durable: CPES followed by two coats of marine varnish such as Epifanes. This gives a more natural appearance. However, the sink mounting point is the most critical area regardless of sealer. Use a generous silicone bead at the perimeter, and reseal that joint annually.
7. Vessel Sink on a Minimalist Open-Base Vanity
A vessel sink sits on the counter rather than within it — the entire basin is visible, making it a design element as much as a plumbing fixture. Paired with an open-base vanity (open shelf below, no doors), the combination removes visual weight from both top and bottom of the fixture. The result is a light, almost gallery-like quality that works well in spa bathrooms and contemporary spaces.
In practice, the material range for vessel bowls is substantial. Ceramic and vitreous china are the most durable and easiest to maintain. Natural stone — travertine, onyx — adds an organic quality but requires sealing every 6-12 months. Hammered copper develops a living patina and is naturally antimicrobial; it needs occasional waxing to maintain its finish. Hand-thrown stoneware gives the most distinctive result. However, look for pieces fired to cone 10 for the density and water impermeability a bathroom demands.
Counter height planning is essential for a vessel sink bathroom sink vanity. A standard undermount vanity sits at 32-34 inches. Add a 5-6 inch vessel on top, and the rim lands at 37-40 inches — too high for comfortable daily use. Instead, lower the cabinet base to 28-30 inches so the total stack lands at 34-36 inches. The faucet must also change: a vessel sink needs a tall deck faucet (8-12 inches above the deck) so the spout clears the vessel rim. A standard faucet sits below the bowl edge and is unusable.
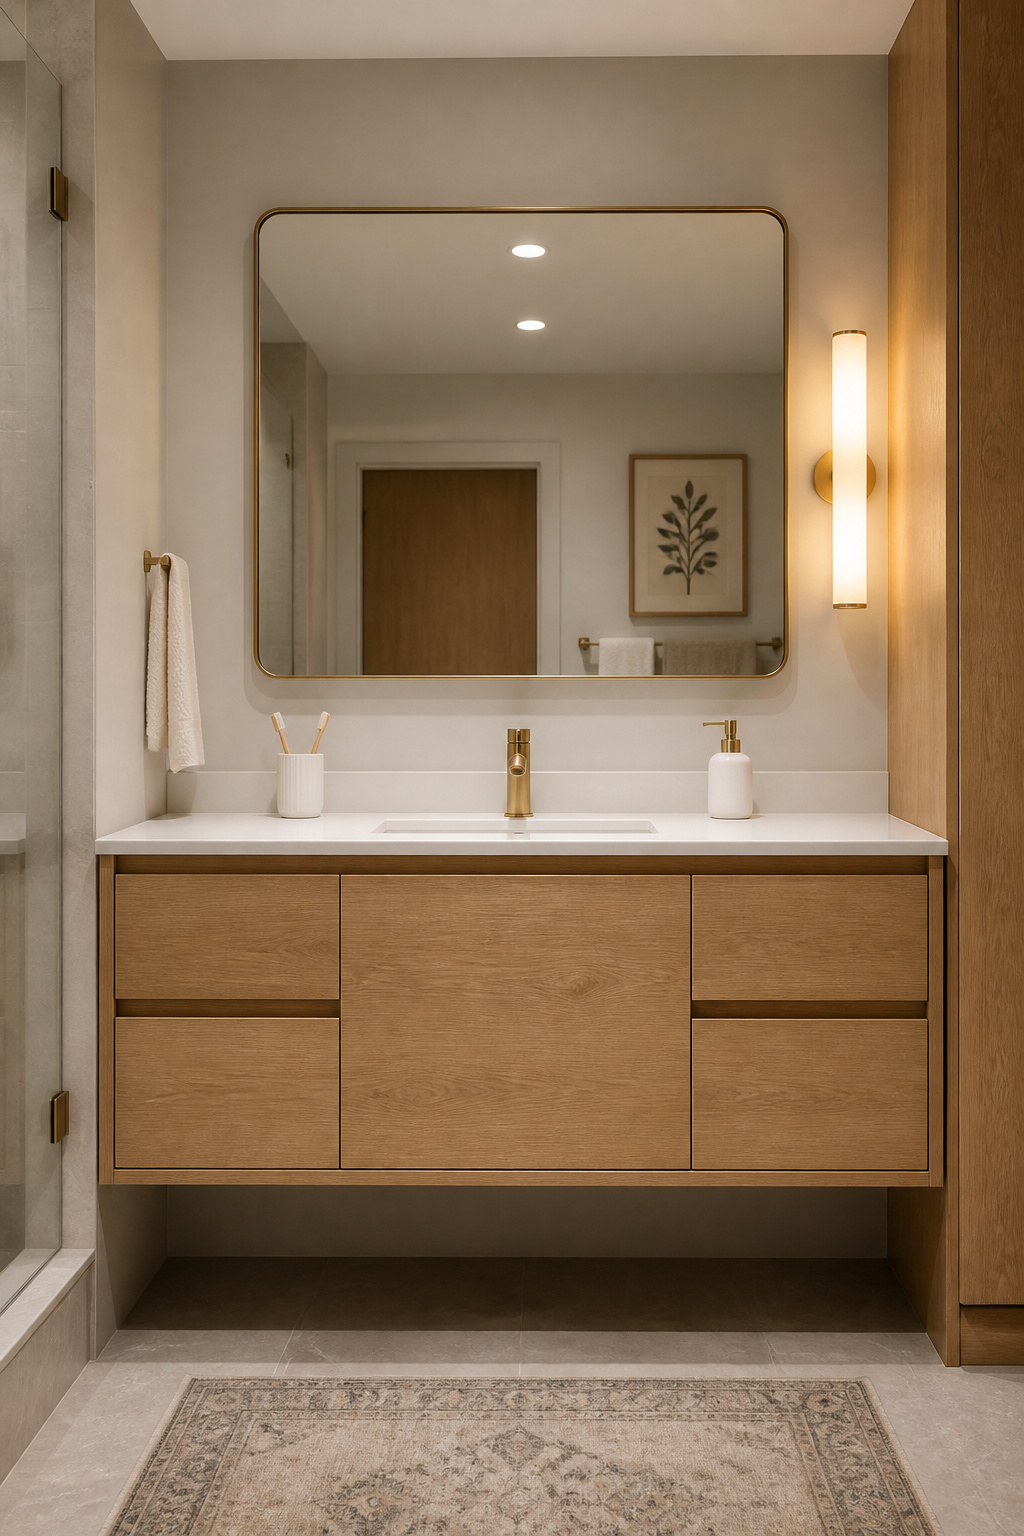
8. Mid-Century Modern Vanity With a Rectangular Integrated Sink
A mid-century modern bathroom sink vanity has been imitated so many times that the authentic version and the knockoff occupy the same retail shelf. Three signatures define the authentic piece: flat-front doors with zero ornamental detail; legs that lift the cabinet off the floor; and hardware that is recessed, minimal, or integrated. The knockoff version combines tapered legs with raised-panel or Shaker doors, which is a stylistic contradiction — raised panels belong to a different tradition entirely.
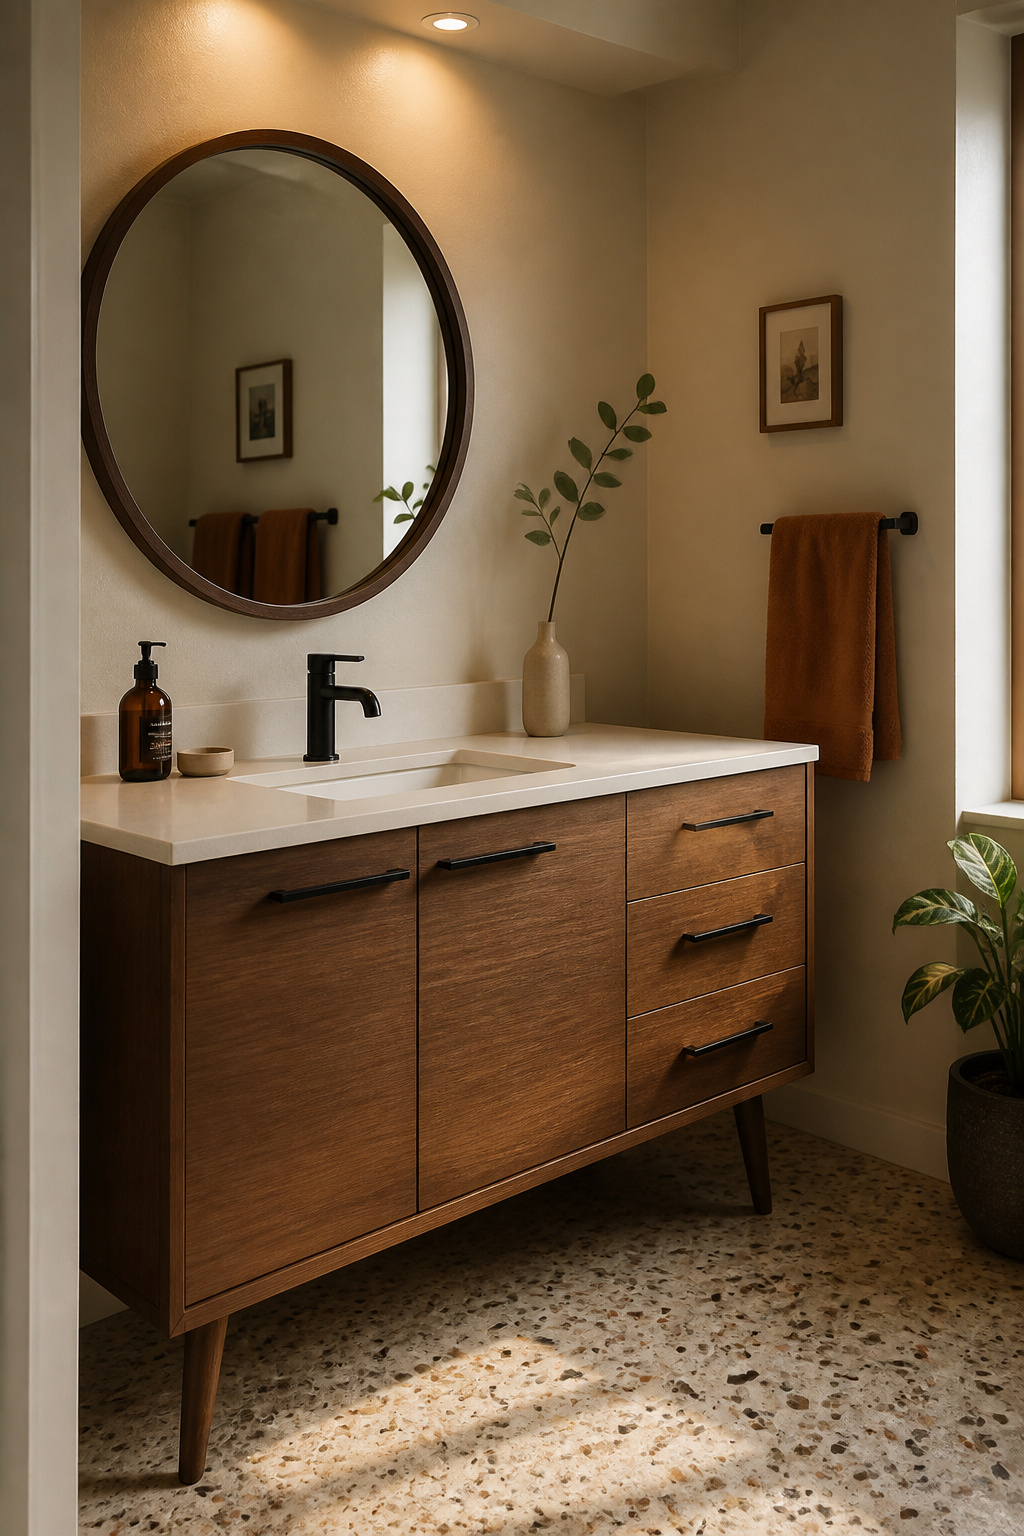
For example, walnut is the quintessential MCM wood. Its deep, rich grain in warm brown tones is immediately evocative of the era. Contemporary walnut vanities should use solid fronts with a plywood box rather than solid wood throughout — solid walnut boxes move too much in bathroom humidity. Teak is the Scandinavian alternative. Its natural oil content resists moisture without heavy chemical sealing, making it better suited to the wet zone than walnut. White oak with a warm-toned stain is the more accessible option at a lower price point.
Specifically, legs should be solid wood — walnut or oak stained to match the cabinet. Hollow metal tube legs in a woodgrain vinyl wrap are the most reliable indicator of a cheap imitation. For hardware, choose simple bar pulls in matte black or satin brass, 3-4 inches in length. Polished chrome reads too contemporary. Round mirrors in walnut or brass frames (24-30 inches diameter) complete the vignette better than rectangular mirrors with any kind of profile.
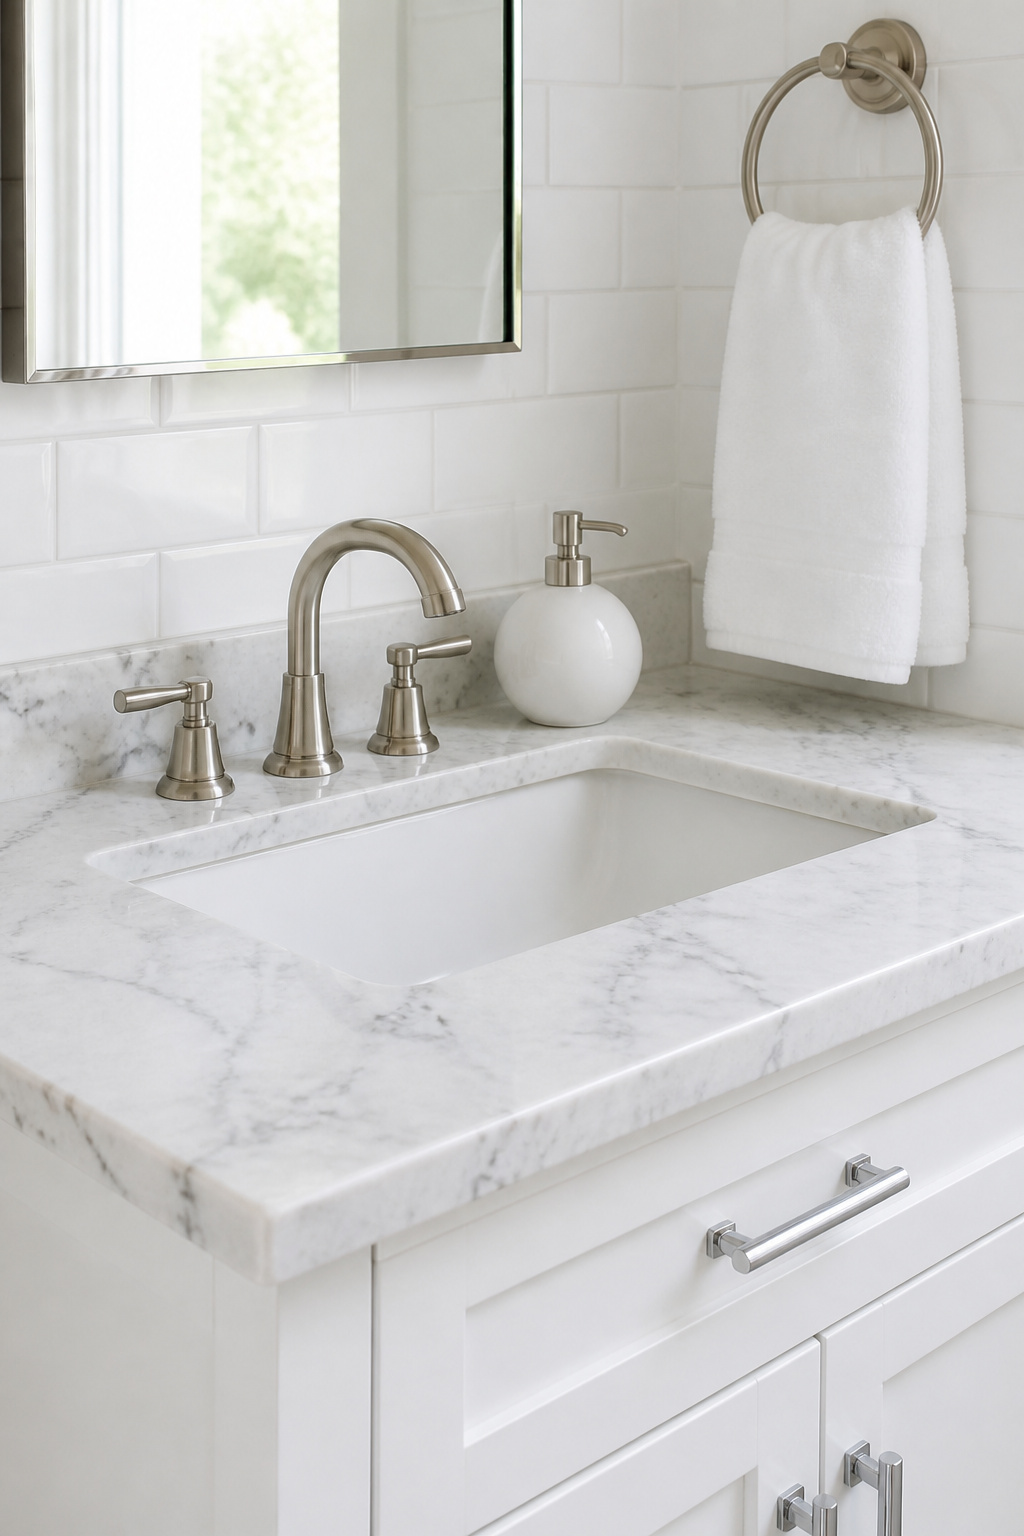
9. Marble-Top Bathroom Sink Vanity for a Timeless Renovation Upgrade
A prefab Carrara marble vanity top placed on a mid-range stock cabinet performs a kind of material alchemy: the $400 cabinet disappears, and the marble does the work. White Carrara’s soft grey veining has been appropriate in bathrooms since the Renaissance. Moreover, it pairs with virtually every wall tile, paint colour, and hardware finish in the neutral-to-warm range. It is the single most impactful upgrade available to a budget bathroom sink vanity.
For more context on planning a meaningful bathroom renovation, the bathroom renovation inspiration guide covers sequencing and material decisions for a full-room approach.
The varieties sort by price and maintenance. Carrara runs $60-100 per square foot installed and is the most widely available as a prefab top. It needs sealing on installation and resealing every 6-12 months. Calacatta is the prestige choice at $150-180 per square foot — bolder, more dramatic white with thicker veining, typically custom-cut only. Vermont Danby is a domestic marble that is harder, denser, and less prone to etching than Carrara. So for a daily-use master bath, Vermont Danby is the more practical choice.
Sealing prevents staining but not etching. Acids in toothpaste, citrus cleaners, and some cosmetics chemically react with marble’s calcium carbonate and leave permanent dull patches. Use pH-neutral cleaners only, dry the counter after each use, and keep acidic products off the surface. Those three habits extend the surface far longer than sealing frequency alone.
10. Corner Vanity to Claim an Awkward Bathroom Layout
A corner bathroom sink vanity solves a genuine problem in older homes: plumbing rough-in positioned in a corner. This was standard in Victorian and pre-war bathrooms, where placing the sink in the corner maximised central floor area for a freestanding tub. If the rough-in is already there, rerouting it costs $400-2,200 in plumber fees. A corner vanity, however, avoids that cost entirely.
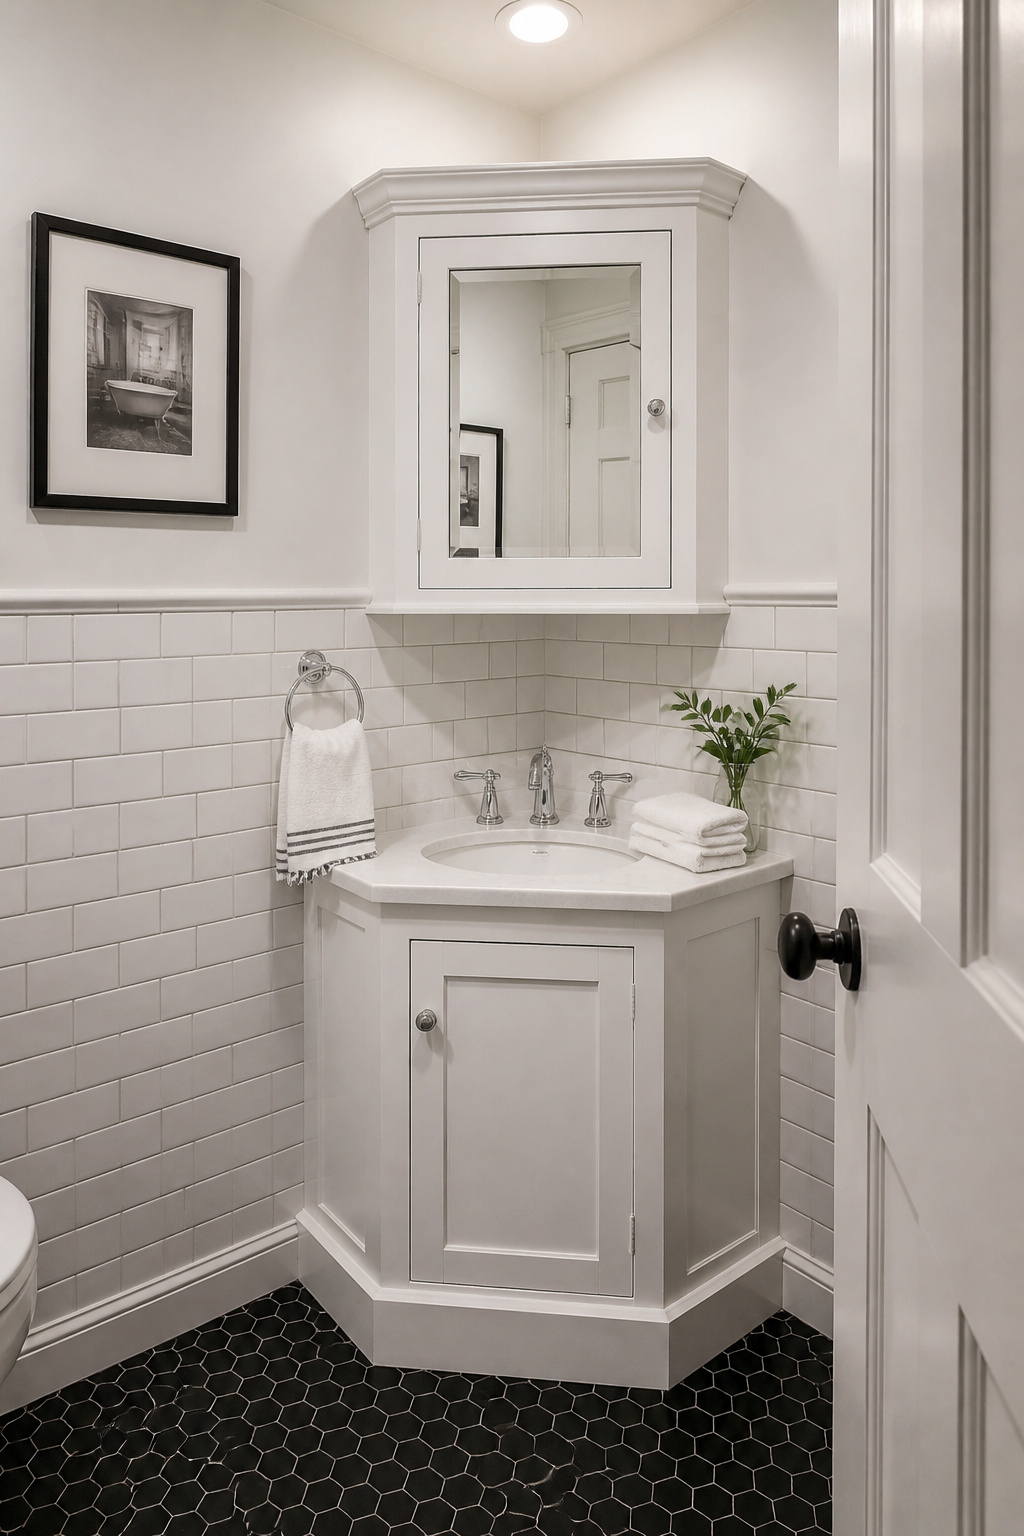
In very small bathrooms under 35 square feet, a corner placement opens the wall runs for towel bars, shelving, and door clearance. Typically, a standard wall-hugging unit would block all of these. Most corner vanities specify dimensions as the measurement per wall face. A “24-inch corner vanity” typically means 24 inches along each wall, with the diagonal front face approximately 17-18 inches wide. The sink dominates the footprint, leaving minimal counter space. As a result, a mirror cabinet above typically compensates for this storage limitation.
Plumbing rough-in position is the detail that catches most buyers out. Corner vanities are configured for one side — left or right. Confirm which side your rough-in sits on before ordering. The two configurations are not always interchangeable without additional plumbing work. Also note: angled front options give slightly more storage than curved front models, while curved fronts read as more period-appropriate in traditional settings.
11. Farmhouse-Style Bathroom Sink Vanity With Apron-Front Details
The apron front — the exposed panel on the cabinet face below the sink bowl — is the defining signature of the farmhouse bathroom sink vanity. It separates this style from a standard cabinet dressed with rustic hardware. Originally a functional feature of deep farmhouse kitchen sinks, it let the user stand closer to the basin. In a bathroom, however, the apron front reads as architectural: it interrupts the uniformity of standard cabinetry and gives the vanity a furniture quality.
Face-frame construction — a solid wood frame attached to the front of the cabinet box — is more authentically traditional than frameless European construction. The slight reveal around drawer and door edges gives the piece a furniture quality that frameless boxes lack. Antique white and cream paint finishes read as more period-appropriate than bright white in older homes. This is especially true where the original woodwork has warm undertones.
Bridge faucets are the most authentic hardware pairing — two handles on a shared deck plate connected by an arch. For cabinet pulls, cup pulls in oil-rubbed bronze are the period-appropriate choice. They reinforce the furniture quality of a face-frame cabinet in a way that bar pulls do not. One practical note: the apron front changes the sink bowl dimensions that fit the cabinet cutout. Confirm sink compatibility before ordering.
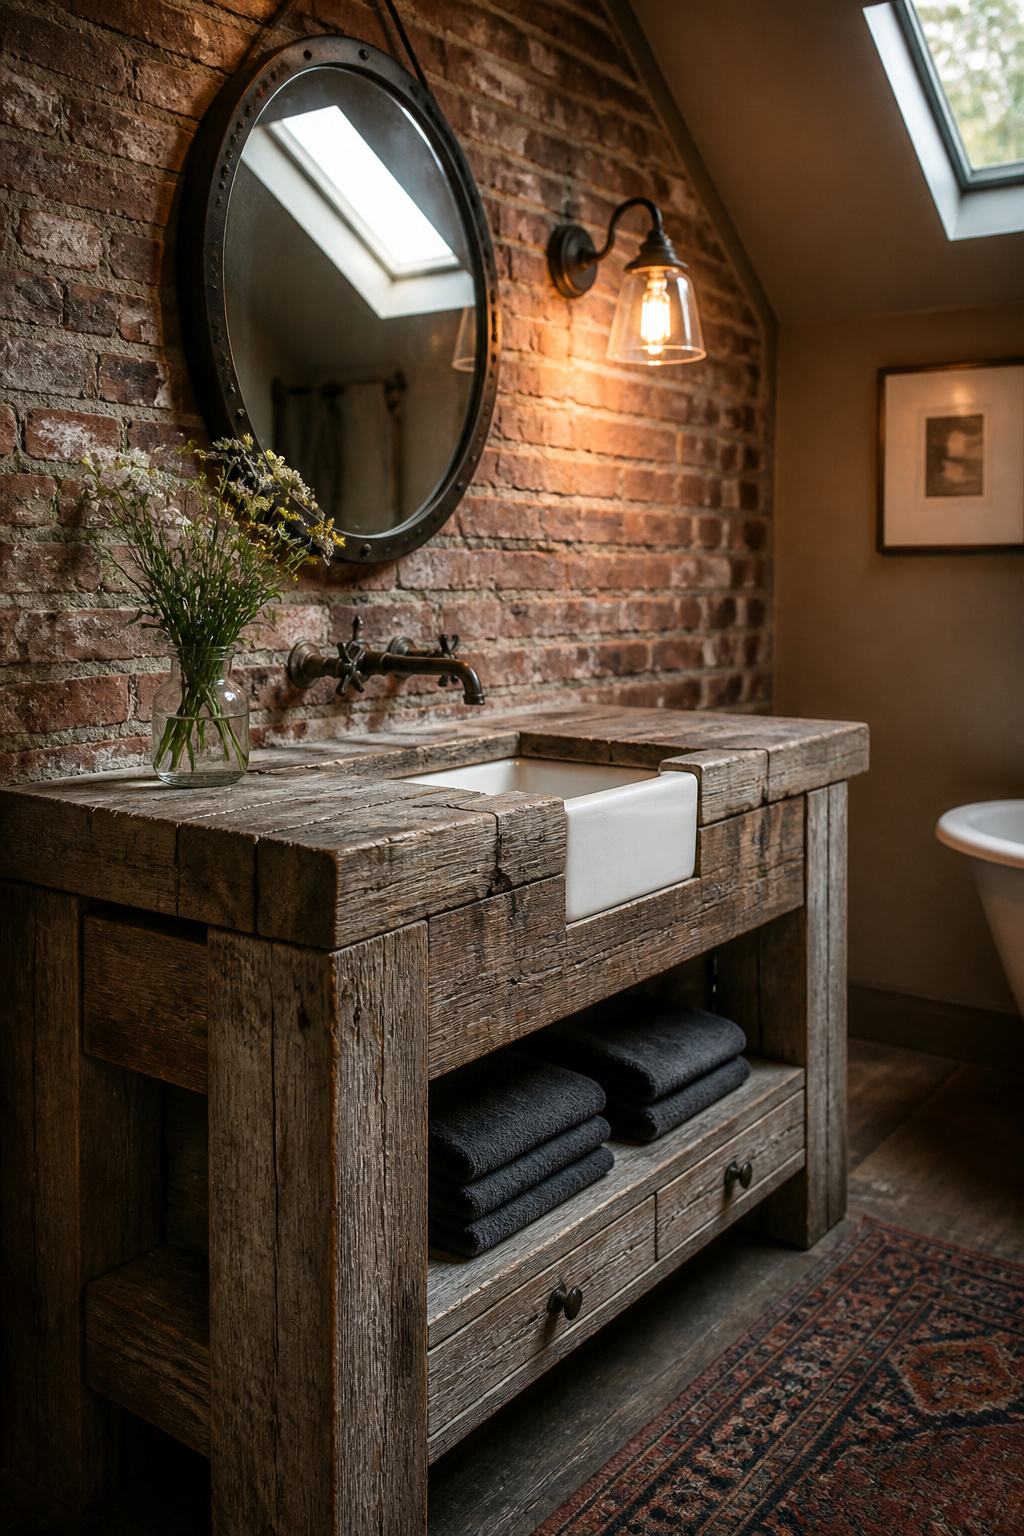
12. Industrial Pipe-and-Wood Vanity With a Trough Sink
An industrial pipe-and-wood bathroom sink vanity works in specific contexts: converted commercial buildings, urban lofts, houses with brick construction and warehouse-scale windows. In those settings, exposed structural elements — pipe, raw wood, concrete — reference the building’s history of use rather than covering it up. Without that contextual anchor, however, the same elements read as a trend application in the wrong room.
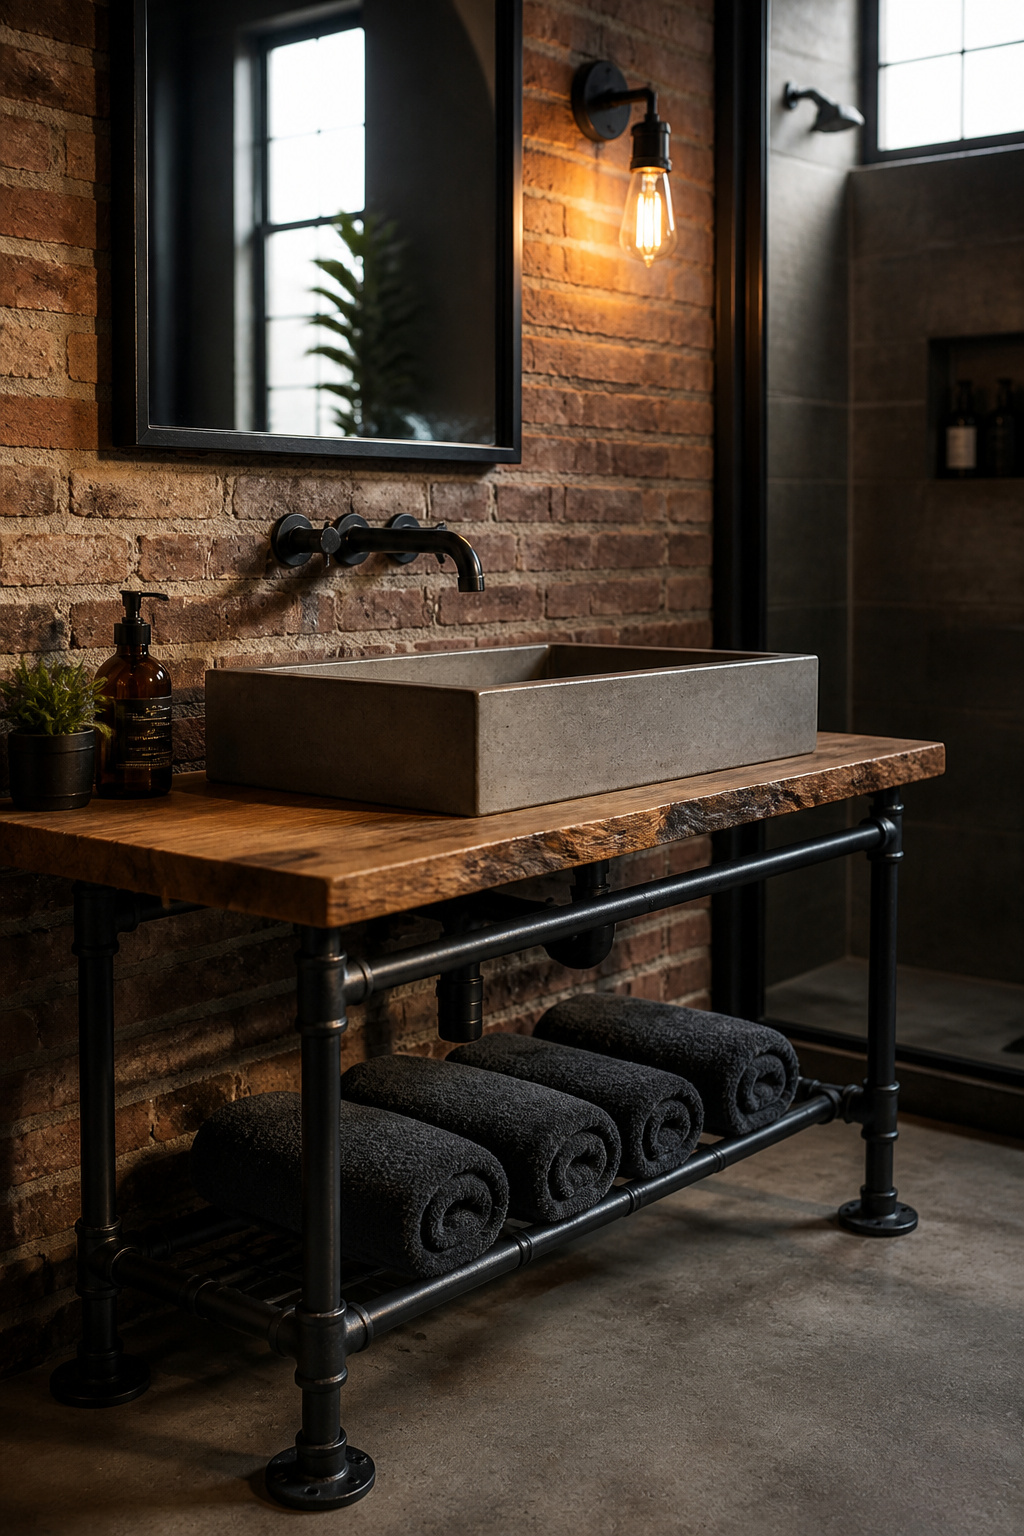
Black iron pipe frames assemble from standard threaded fittings available at plumbing supply stores. Clear-seal the pipe after assembly — Rust-Oleum matte black prevents surface rust transfer and reads as more deliberate than bare pipe. For a wood shelf supporting a lightweight ceramic trough, 1/2-inch pipe is sufficient. However, when the load increases to stone or concrete — a 36-inch concrete trough runs 55-70 lbs — use 3/4-inch or 1-inch pipe. Also, anchor the frame into wall studs rather than leaving it freestanding.
Wood shelving below the trough sits in the splash zone. Therefore, seal every surface — top, bottom, sides, and end grain — with at least three coats of spar urethane. End grain wicks moisture regardless of how well the faces are sealed. Cap it with epoxy rather than surface sealer alone.
13. Built-In Vanity Nook With Integrated Sink and Storage
A built-in bathroom sink vanity is the highest-value investment in a bathroom renovation. It eliminates dead zones around a freestanding unit, maximises storage along every linear inch of wall, and creates a finish that separates the room from any catalogue renovation. The trade-off is planning complexity — built-ins require coordination between framing, plumbing, and electrical before a single cabinet goes in.

Sequence matters here more than in almost any other renovation. Plumbing rough-in must be set before framing changes. Electrical for lighting and outlet positions must be roughed in before the drywall closes. Cabinet installation comes last, after all rough work is complete and walls are painted. Getting this wrong means opening finished walls — an expensive correction. For a thorough look at the full range of bathroom cabinet approaches, bathroom cabinet designs that actually work covers built-in and semi-custom options in detail.
Cost range: a custom cabinetmaker-built floating vanity in figured walnut with integrated lighting runs $6,000-12,000 before countertop or plumbing. A semi-custom approach — stock cabinet boxes with custom fronts and a quality stone countertop — achieves a similar result for $2,500-4,500. For the finish details that signal quality: panel-ready door fronts with full overlay for a flush appearance; a stone countertop with a waterfall edge; and an LED strip inside the mirror frame. The last item is inexpensive but dramatically improves both the perceived quality and the daily light.
14. Modern Floating Bathroom Vanity With Soft-Close Drawers
The modern floating bathroom vanity has become the default choice for gut-renovation bathrooms. That is both a measure of how well the format works and a reason to be intentional about material quality. When the silhouette is ubiquitous, differentiation comes from what the cabinet is made of and how it is finished, not from the format alone.
The practical case for floating remains strong. The exposed floor creates perceived space. The clean wall behind is easier to waterproof correctly with cement board. Daily cleaning is simpler — a mop passes under without obstruction. Drawer configuration is where most manufactured units fall short. The plumbing occupies the space directly beneath the sink — typically a 12-18 inch zone — covered with a false front. A well-configured 36-inch floating bathroom sink vanity should offer two deep drawers (12 inches or deeper) plus one or two shallow drawers at the top for daily-access items.
Soft-close hardware makes a genuine difference in daily feel. Blum Tandembox and Hettich ArciTech are the professional-grade choices, both carrying lifetime guarantees. On finish: matte lacquer requires professional spray application for a seamless result. Brush-applied latex paint on bathroom cabinetry will show marks and fail in humidity. For the substrate, avoid MDF entirely. MDF swells irreversibly when exposed to bathroom moisture. Instead, specify plywood or solid wood core construction.
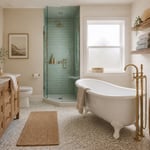
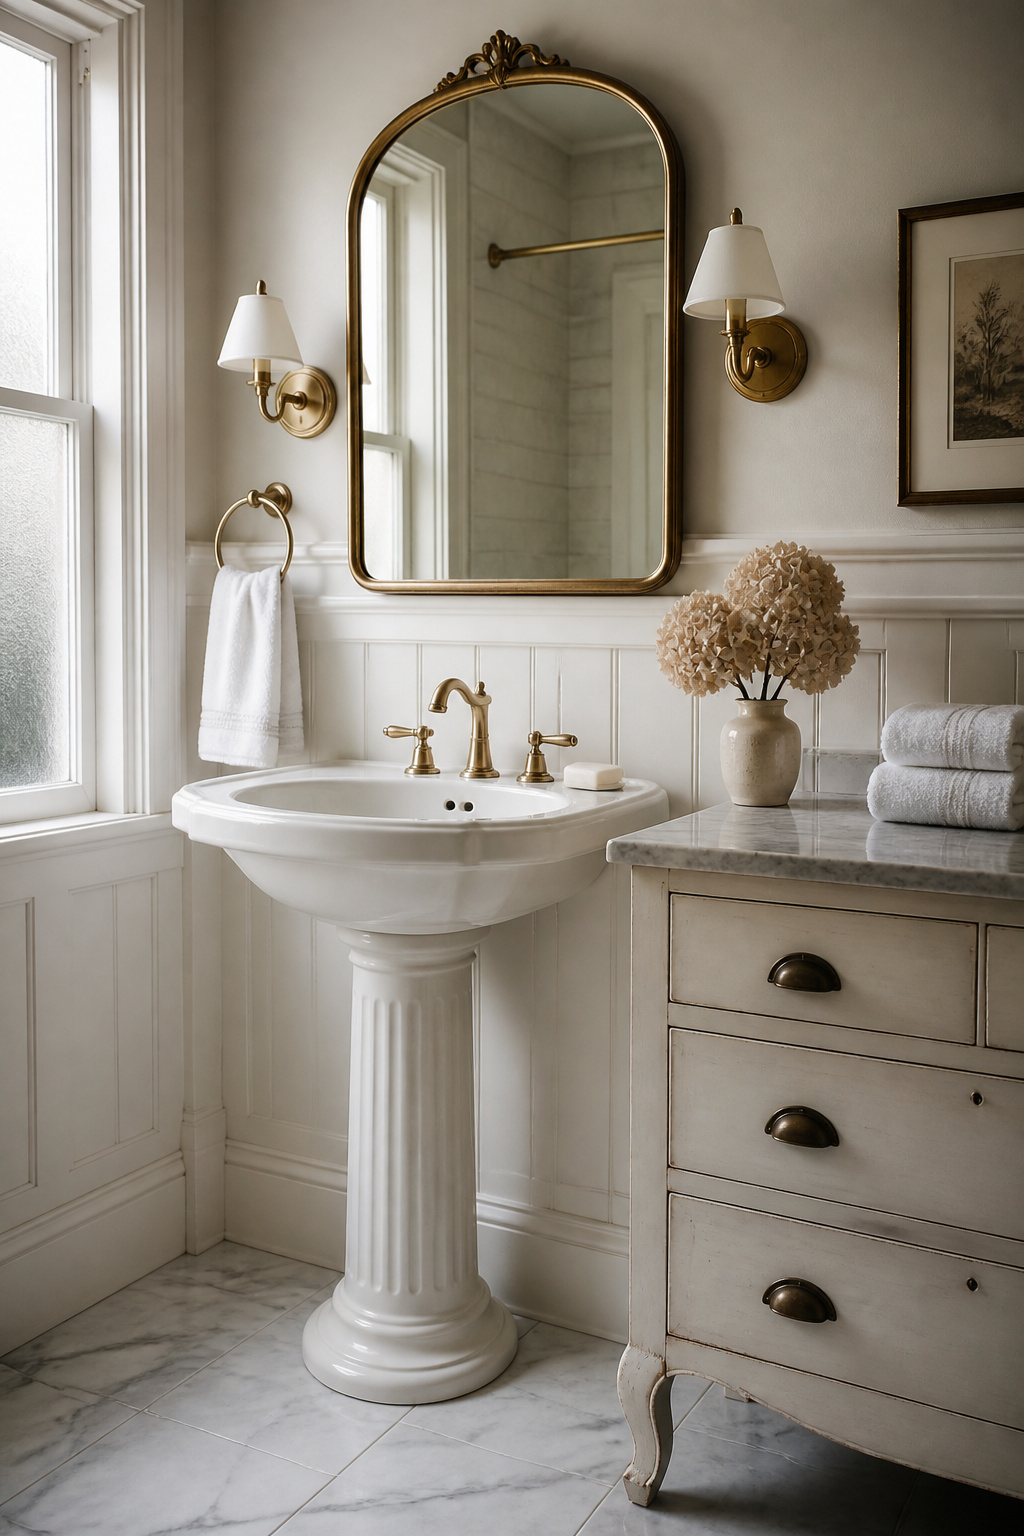
15. Victorian-Inspired Vanity Cabinet With a Pedestal Sink
Victorian bathroom design is one of the most fully documented historic styles, which makes period-authentic restoration achievable. The bathrooms that survive from the 1870s through the 1890s share a clear set of signatures. First, ornate porcelain pedestal sinks with fluted bases. Second, wall tile in white subway or penny-round format with contrasting cove base tile. Third, claw-foot tubs and brass cross-handle faucets. Getting these right is a matter of research, not guesswork.
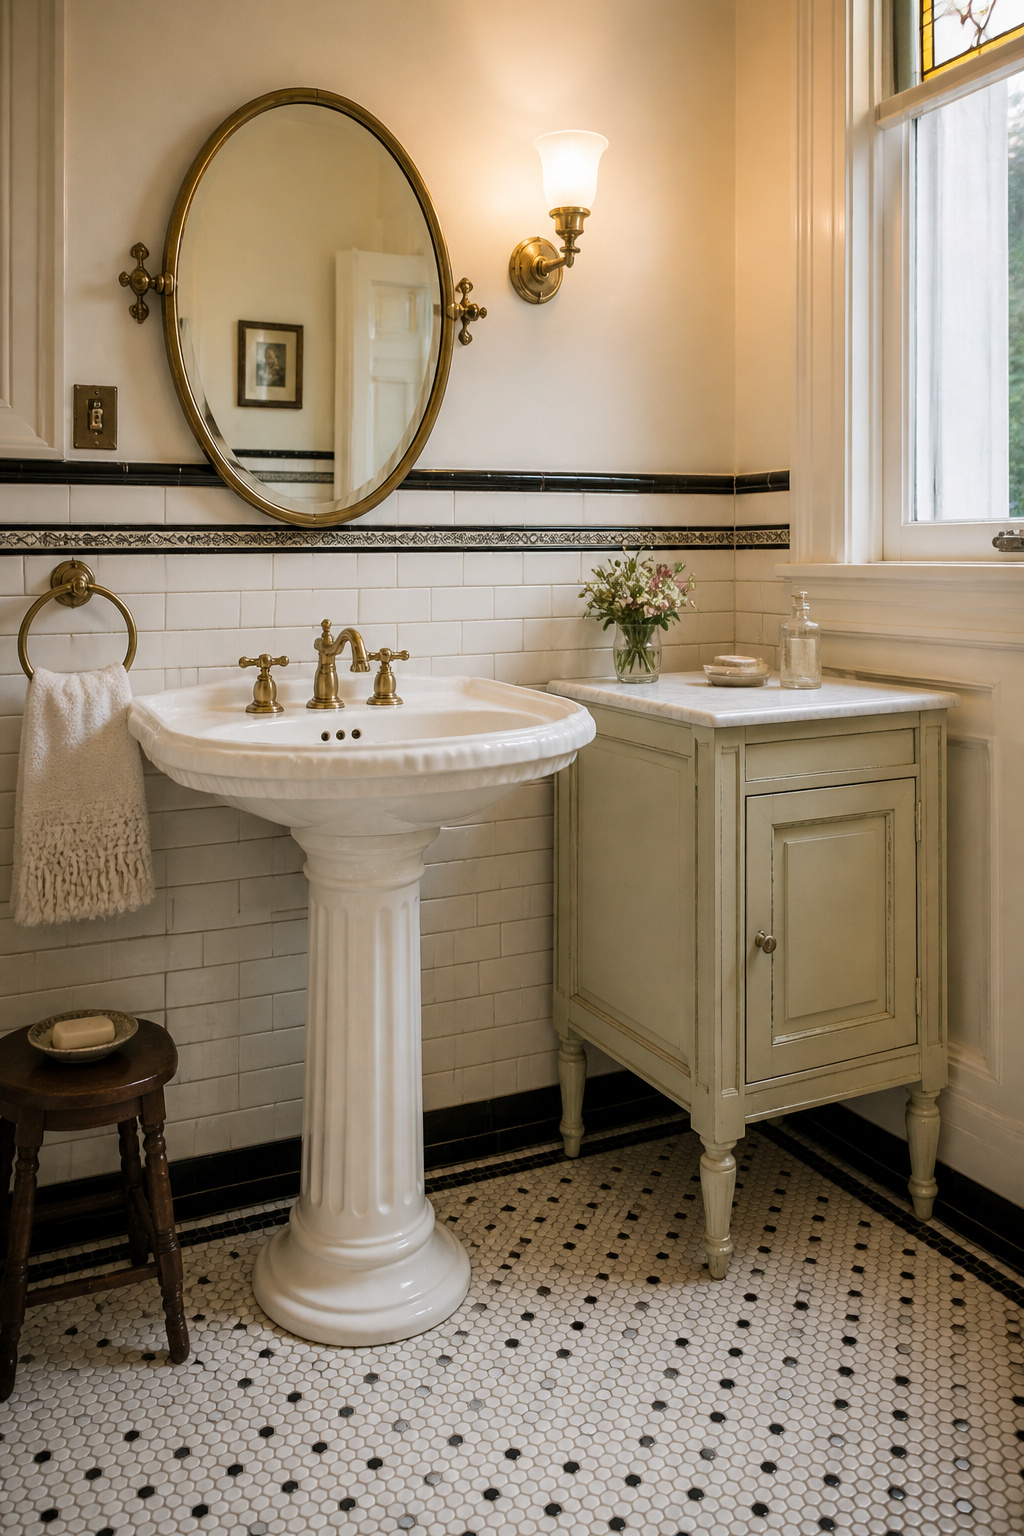
The bathroom sink vanity as a storage cabinet is actually a post-Victorian addition. Authentic Victorian bathrooms used the pedestal alone, paired with a small wall-hung medicine cabinet above. So period-appropriate storage means a companion furniture piece — not an integrated sink cabinet. The bathroom interior design ideas guide covers historic authentication alongside practical renovation realities.
Reproduction pedestal sinks from Vintage Tub & Bath, Historic Houseparts, and Rejuvenation offer period-accurate vitreous china profiles at $400-900. Distinguish quality reproductions by weight — denser clay bodies are heavier. Also, check for glaze consistency into recesses. A companion vanity cabinet for a Victorian bathroom should have turned legs and beaded inset door panels — not Shaker recessed panels, which are a different tradition entirely. Painted cream or white finish with bin pulls in polished or unlacquered brass is the correct hardware choice.
16. Concrete Sink Vanity for a Minimalist Bathroom
A concrete bathroom sink vanity delivers a surface texture that polished materials cannot. The natural variation in tone, aggregate distribution, and matte finish means no two slabs are alike. This is the opposite of quartz’s engineered consistency. In a minimalist bathroom, where the surface quality of each material carries the room’s entire visual weight, that distinction is significant.
A pigmented concrete top with an integral cast basin eliminates the sink mounting joint entirely. This is both the most structurally sound and aesthetically clean option. GFRC (glass fibre reinforced concrete) reduces the weight to 4-8 lbs per square foot, compared to full-weight precast concrete at 18-25 lbs per square foot. For a 36-by-22-inch precast top, that means 12-15 lbs (GFRC) vs 70-80 lbs (full weight). So the cabinet and floor structure must be confirmed as adequate for the full-weight option, particularly in upper-story bathrooms.
Sealing is non-negotiable from day one. Two approaches exist: a penetrating sealer (maintains the natural matte appearance, requires reapplication every 1-2 years) or a topcoat sealer (harder surface, longer-lasting, but changes the character of the concrete). A penetrating sealer followed by a topcoat wax — Buddy Rhodes’ Cheng Pro Formula or a comparable product — gives the best balance of protection and natural appearance. Re-wax every 3-6 months.
17. Budget Bathroom Sink Vanity Makeover Using Stock Cabinets
The most underused fact in bathroom renovation is that a kitchen base cabinet and a bathroom vanity cabinet are the same piece of furniture. The only functional differences are height and toe kick finish. So a stock kitchen base cabinet — particularly IKEA’s SEKTION line or Home Depot’s Hampton Bay base units — can become a budget bathroom sink vanity at 30-50% of a comparable manufactured vanity’s cost.
The IKEA SEKTION 24-36 inch base cabinet paired with an Odensvik integrated sink-and-countertop (under $150) produces a complete assembly that rivals manufactured vanities at three times the price. Home Depot’s unfinished Hampton base cabinets allow custom paint and hardware that disguise the stock origin entirely. Modifications are required before installation. First, cut drain and supply line openings with a hole saw. Next, replace the standard 1/8-inch hardboard cabinet back with 1/4-inch plywood sealed on all surfaces. The hardboard will delaminate within 2-3 years in bathroom humidity. Finally, apply silicone around all plumbing penetrations.
Countertop choice determines how the build reads. A butcher block top with a vessel sink keeps the total assembly under $300 for a 36-inch run. Prefab Carrara marble tops in standard widths cost $80-200 at home centres. They provide far more visual authority than the cabinet beneath them merits. The marble option is the one that raises the most eyebrows at the reveal.
Choosing the Right Bathroom Sink Vanity for Your Home
Before any style decisions, confirm two things. First, your plumbing rough-in dimensions — drain location from the back wall and from the side wall. Second, your supply line positions. These physical facts constrain the bathroom sink vanity choice more than any design preference. A vanity that requires rerouting the drain is not a bad choice — but knowing that upfront is better than discovering it during installation.
The style that will look right long-term is the one that references your home’s architecture. A farmhouse apron-front in a 1920s bungalow. A pedestal-and-cabinet pairing in a Victorian row house. A Shaker cabinet in a Craftsman-era bathroom. A floating minimal unit in a mid-century modern. These pairings work because they respect the building’s language rather than overwriting it. When in doubt, a well-made Shaker cabinet in white oak or painted maple is the most renovation-neutral bathroom sink vanity option available — it does not draw attention to itself in any architectural era.
Finally, do not choose a vanity that is too small for the wall run. A 36-inch unit on a 60-inch wall leaves dead space that will bother you every morning. Fill the available wall run as fully as plumbing clearances and door swing allow. You use the bathroom sink vanity more than any other fixture in the house — it is worth getting the size right.