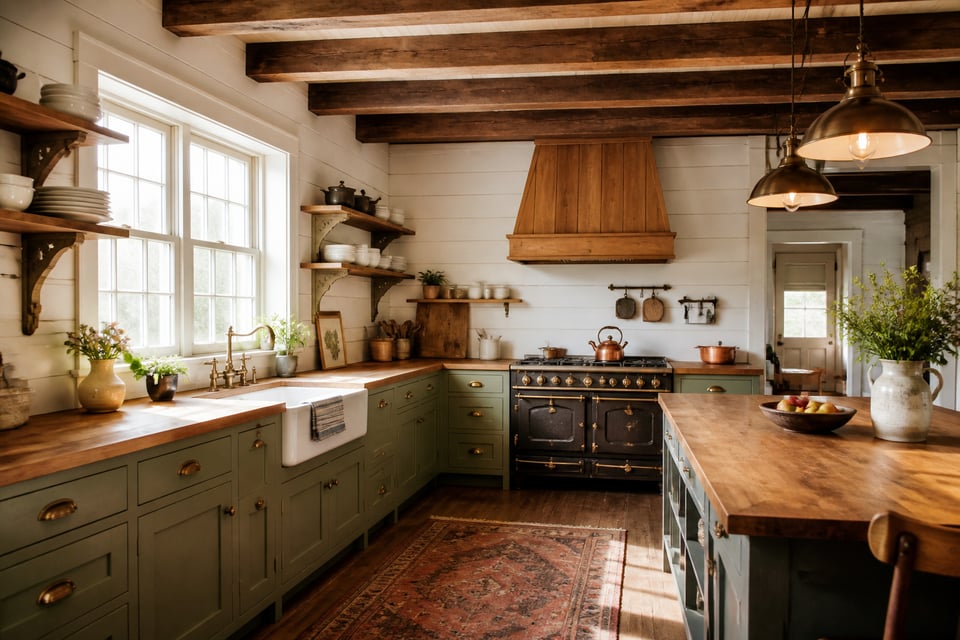
There’s a persistent myth about farmhouse kitchen remodels: that they require gutting everything and spending six figures. The real farmhouse kitchen — from an actual working 19th-century farm — was built from salvaged materials, practical trades, and careful restraint. Nothing was installed for looks alone. The apron sink was deep because you needed to wash vegetables and cast iron in the same basin. The shiplap went up because it was the cheapest way to sheathe a wall that stayed dry. The ceiling beams were exposed because hiding structural timber cost money no one had.
That design honesty is what makes farmhouse kitchens feel different from other styles. You can add it to almost any kitchen — old or new, large or small — because the elements are individually achievable. You don’t need a full remodel to install a farmhouse sink or swap upper cabinet doors for open shelving. Work through these ideas one renovation budget at a time and end up somewhere genuinely good.
These 15 farmhouse kitchen remodel ideas run from least to most involved. Some cost $300. Some require a contractor. All are specific enough to act on.
1. Shiplap Walls: The Signature Move of Any Farmhouse Kitchen Remodel
Shiplap wasn’t invented for interior design. It was invented for exterior walls — the overlapping rabbet joint profile shed water away from barn siding more effectively than butted boards. It ended up on interior walls because when farmers built outbuildings and utility rooms, they used whatever they had. The look traveled indoors and stayed.
The most cost-effective approach is a single accent wall. A 40 to 60 sq ft accent installation gives you the full visual effect at a fraction of the cost of shiplapping an entire kitchen. For a single wall, budget $2 to $7 per square foot for pine (the most common and historically appropriate species). Cedar or poplar cost $3 to $6 per linear foot if moisture resistance is a priority.
Here’s the one thing that derails shiplap kitchen projects: standard MDF shiplap in a kitchen environment looks identical to real wood on the shelf, but MDF is essentially a sponge. In a kitchen with normal steam and splash exposure, the edges will swell and delaminate within one to three heating seasons. For walls adjacent to sinks or cooking surfaces, use PVC or vinyl shiplap instead. It’s completely waterproof, handles kitchen humidity without moving, and takes paint exactly like wood. For drier accent walls, real pine works fine with a proper semi-gloss paint seal.
Install shiplap with a 1/8″ gap between boards using coins as spacers. This isn’t just for authenticity. It allows for seasonal wood movement and prevents the boards from buckling when humidity changes between summer and winter.
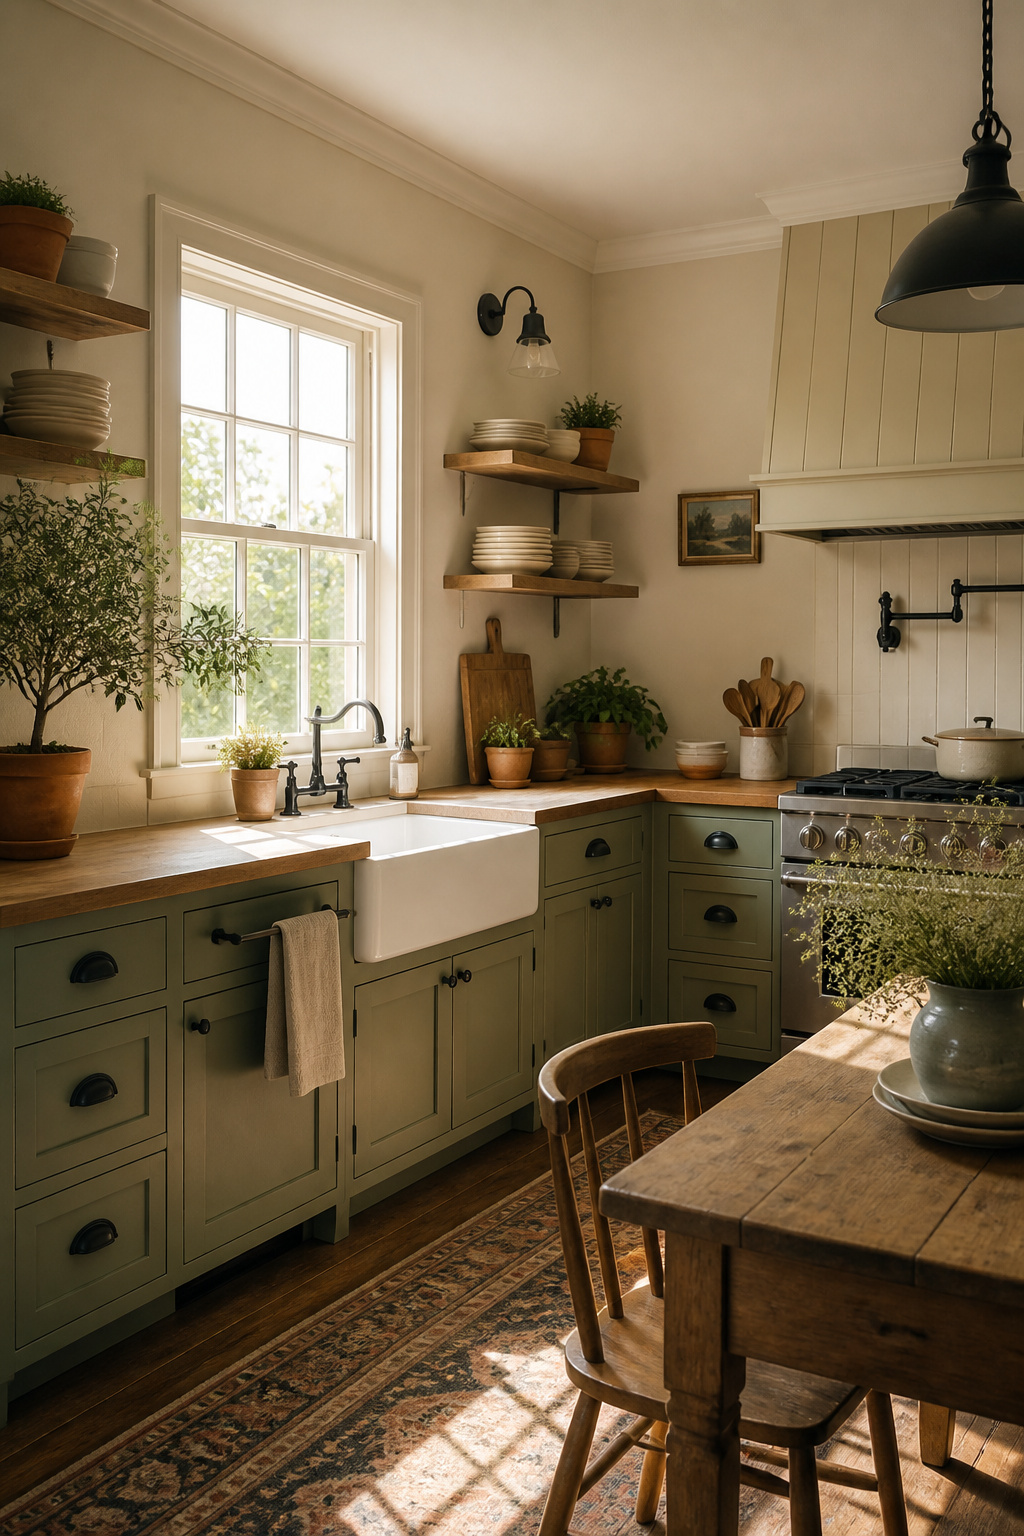
2. An Apron-Front Sink That Anchors the Whole Kitchen
The deep single-basin apron-front design existed before running water arrived. Water was carried in, not turned on — washing vegetables, cleaning cast iron, and bathing children all happened in the same sink. A shallow basin was a daily inconvenience. The exposed apron face was a consequence of fitting a large basin into a cabinet opening without a standard face frame in the way.
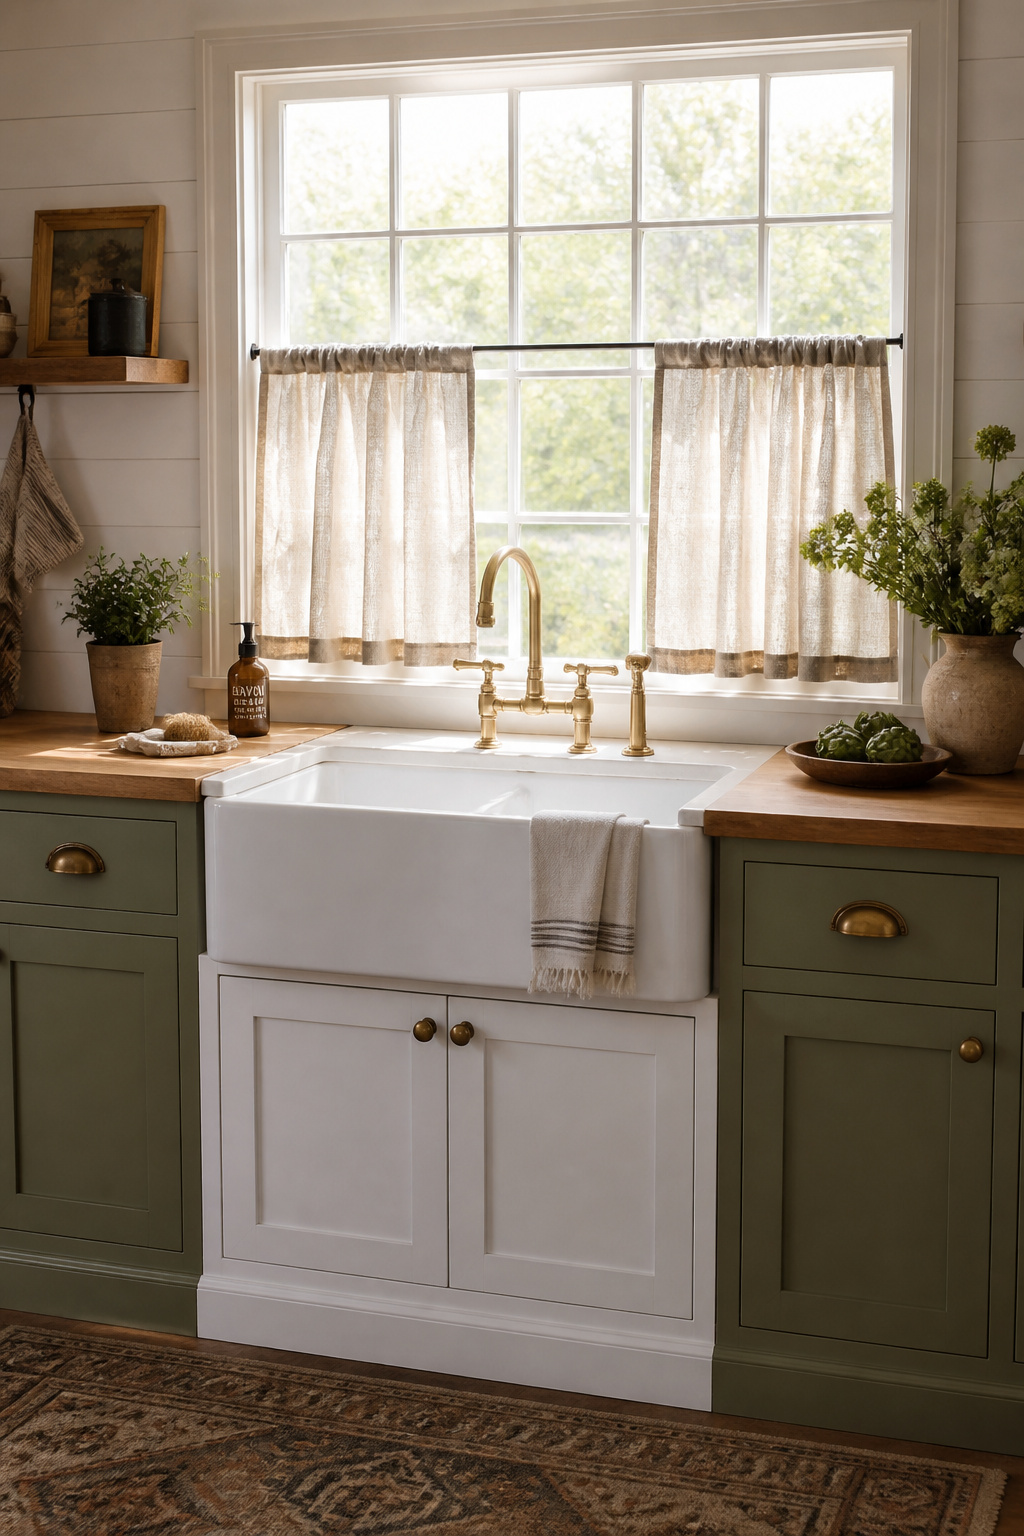
The modern revival makes complete practical sense. The extra basin depth is genuinely useful. The exposed front eliminates the hip-bruising lower cabinet edge most sinks force you to lean over. Nothing else in a kitchen communicates farmhouse character as immediately. Installing an apron sink is one of the single most impactful upgrades in a farmhouse kitchen remodel.
Material choice matters. Fireclay, fired at extreme temperatures, is the most durable option. It’s more scratch and chip-resistant than cast iron, and significantly easier to maintain. It typically weighs 80 to 120 lbs and is the premium choice. Cast iron with enamel coating is similarly durable, but the enamel can chip under impact, exposing rust-prone iron beneath. Fireclay has largely displaced it as the preferred period-appropriate material. Stainless steel apron sinks are the most affordable option and entirely appropriate for a farmhouse renovation, though the look is more contemporary than strictly period-accurate.
The retrofit question: a true apron-front sink requires modifying the base cabinet. You remove the face frame and add support rails to transfer the weight properly. Most experienced DIYers can handle this. If a full modification isn’t in the budget, self-rimming retrofit farmhouse sinks drop into standard base cabinets with minimal modification. They deliver most of the visual effect without the structural change.
One dimension to check before ordering: cabinet depth. Older base cabinets are frequently only 22″ deep, making installation of a standard 33″ sink impossible. Measure before purchasing, not after.
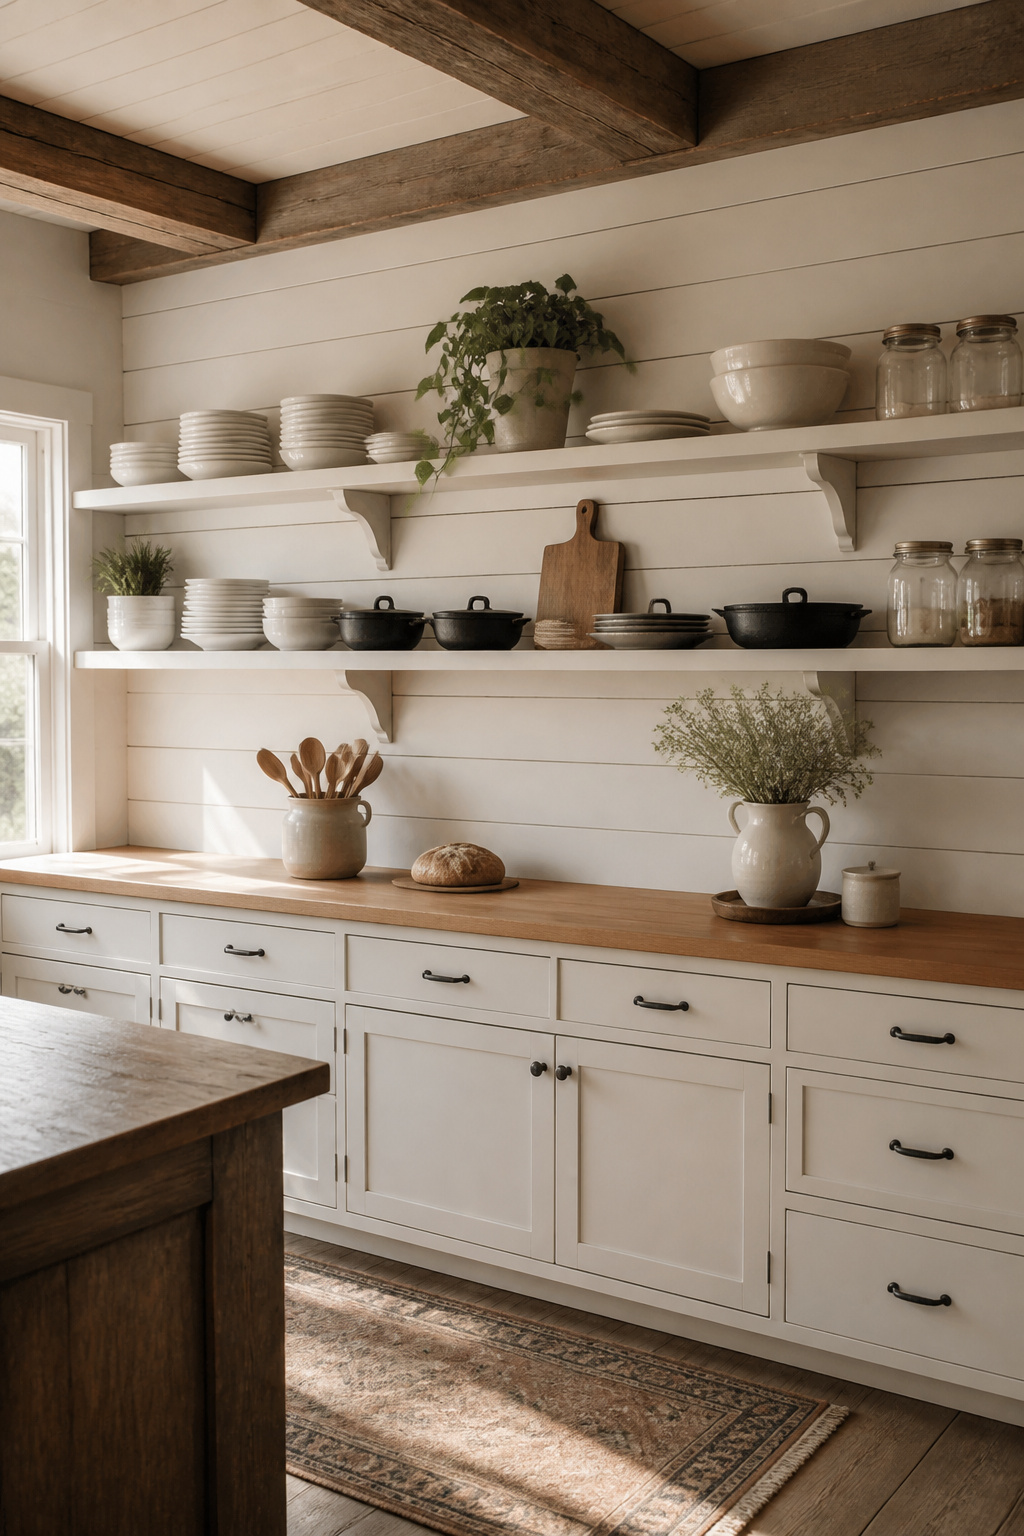
3. Open Shelving That Replaces Upper Cabinets (And Looks Better)
The wall-to-wall upper cabinet grid is a post-war invention driven by standardized production. Original farmhouse kitchens stored things in open dressers, hutches, pie safes, and freestanding pantries — not in uniform rows of 12-inch-deep box cabinets. Replacing some or all upper cabinets with open shelving is one of the most visible farmhouse kitchen renovation changes available.
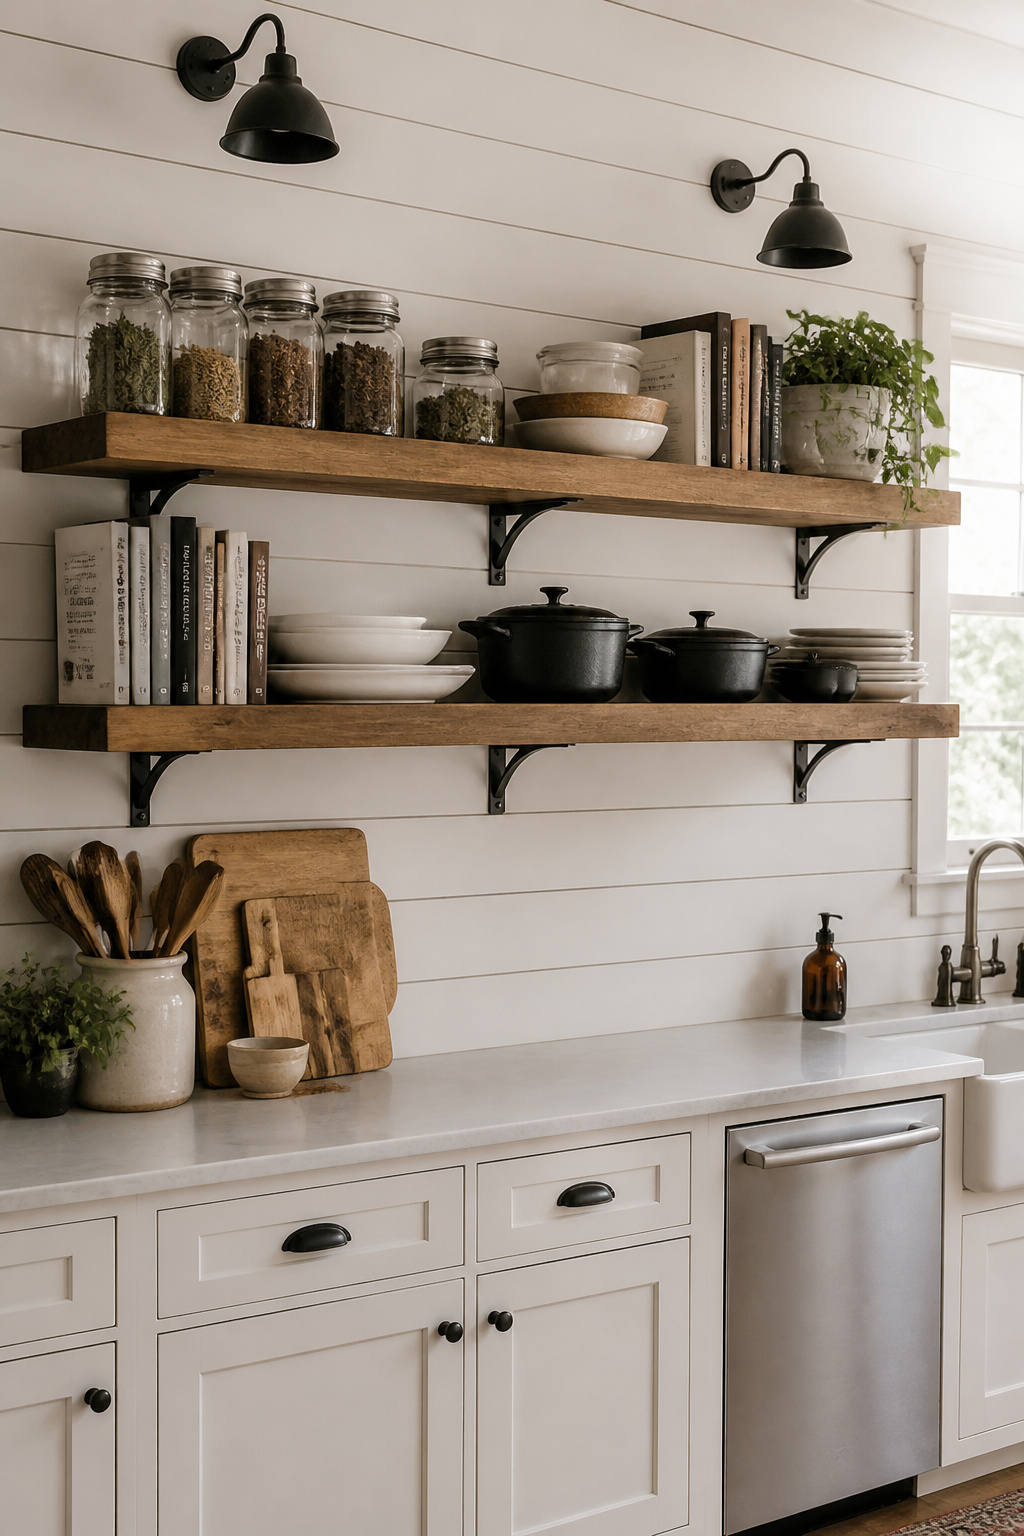
The room opens up vertically and the walls feel taller. The displayed items — white stacked dishes, a few cast-iron pieces, some mason jars — communicate the farmhouse aesthetic without decoration.
Bracket choice determines whether the result reads as period-appropriate. Simple steel L-brackets, pipe supports, and wooden corbels are the most historically accurate options. Ornate scrollwork brackets look Victorian rather than farmhouse. Keep the hardware understated and functional. For shelf depth, 12 inches is the kitchen standard, and the bracket’s horizontal arm should match or run an inch shorter than the shelf depth.
White oak is the most popular species right now — the grain is clean and the color sits between blond and warm without reading as orange. Pine is more affordable, more rustic, and more period-accurate for a working farmhouse kitchen. Walnut adds richness but can look luxurious rather than agricultural in some contexts.
One practical note: install into studs, not just drywall. Kitchen shelves carry real weight from dishes, cast iron, and pantry items. Use a stud finder, pre-drill, and drive wood screws through at least 1.5″ of solid stud material.
4. Butcher Block Countertops for Warmth and Lived-In Character
Butcher block predates quartz and granite in commercial kitchens by a century. Wood is gentler on knife edges than stone, can be sanded and refinished if damaged, and only improves in character with use. The scratches, oil treatment, and natural wear of a butcher block surface create patina rather than degradation. That’s the farmhouse principle: honest materials made more interesting by honest use.
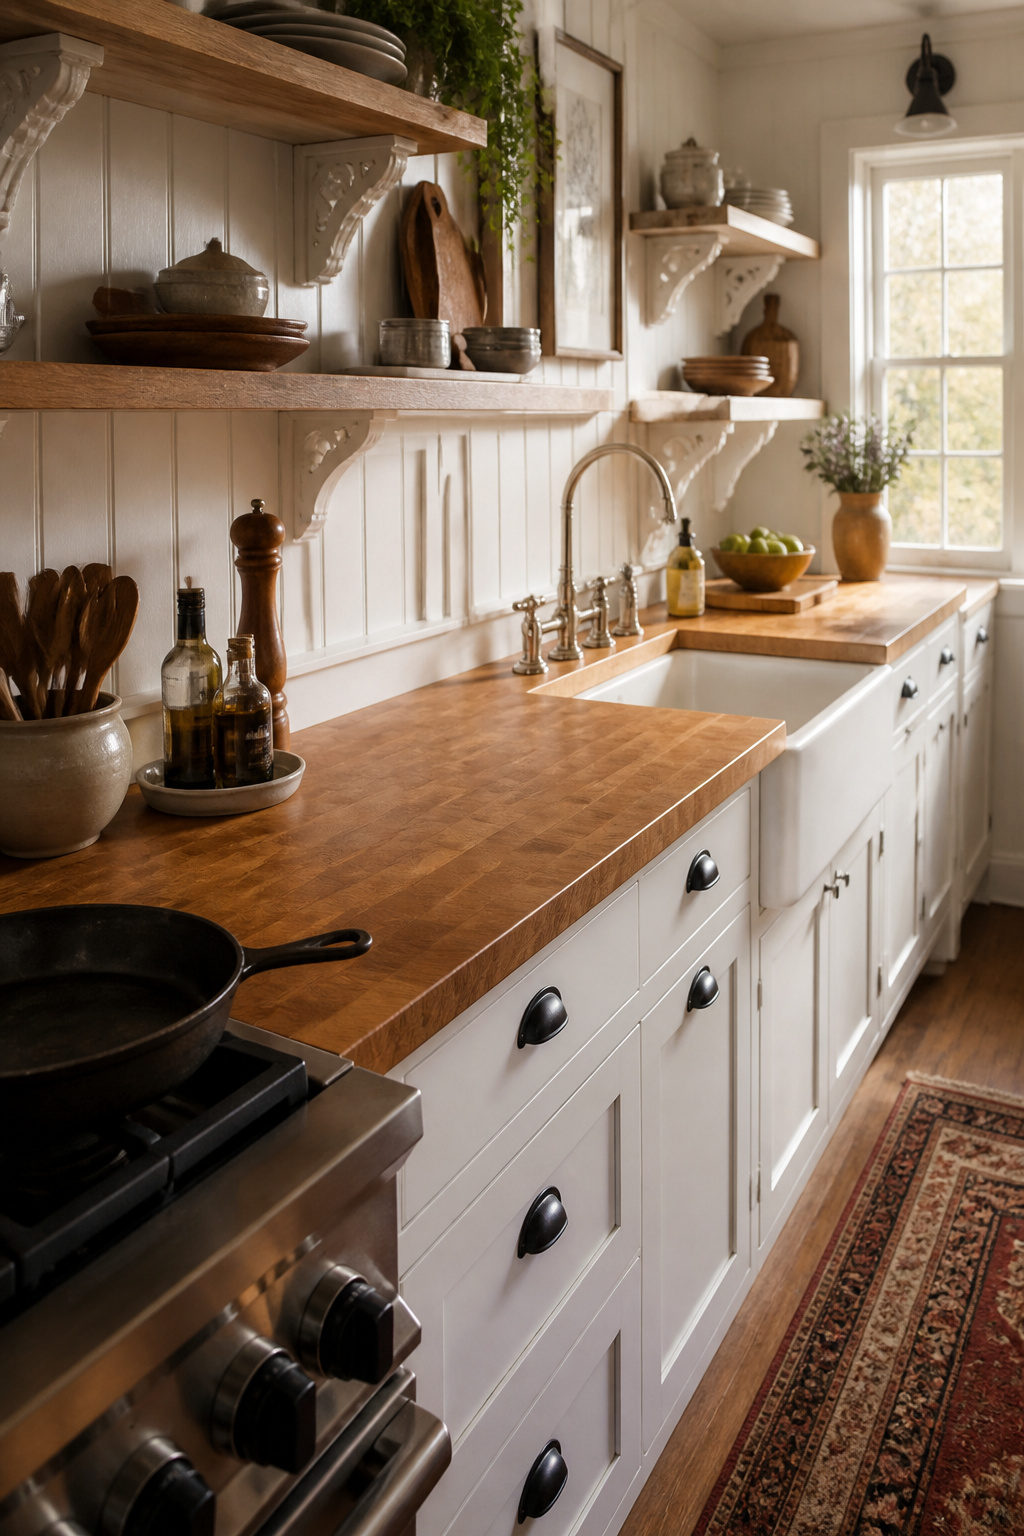
Species choice determines durability and maintenance frequency. Hard maple (Janka 1,450) is the hardest and most impact-resistant option — the professional kitchen standard. It resists denting from dropped pots and daily prep work better than anything else here. Black walnut (Janka 1,010) is softer and more prone to surface marks, but develops a distinctive rich patina that maple can’t match. Use it for an island surface rather than the main prep area. Teak (Janka 1,150) is the standout choice for moisture resistance. Its natural silica and internal oils reduce oiling to every three to six months.
For kitchen countertop color choices, butcher block’s natural warm tone pairs with almost any cabinet color and anchors the room in a way stone can’t quite replicate.
Maintenance is simpler than most people expect. Start with food-safe mineral oil applied monthly for the first year, then as needed when the surface looks dry. A 15-minute oiling session twice a year is sufficient for a well-maintained surface. The one non-negotiable: caulk any seams adjacent to the sink with flexible silicone. Standing water at unsealed seams causes delamination — the one form of butcher block damage that can’t be sanded out.
5. Farmhouse Kitchen Renovation With Vintage-Inspired Cabinet Hardware
Hardware is the jewelry of cabinetry. Builder-grade shaker cabinets in a neutral color can look indistinguishable from custom millwork when fitted with the right period hardware. The reverse is also true — architect-quality cabinetry can look anonymous with the wrong pulls.
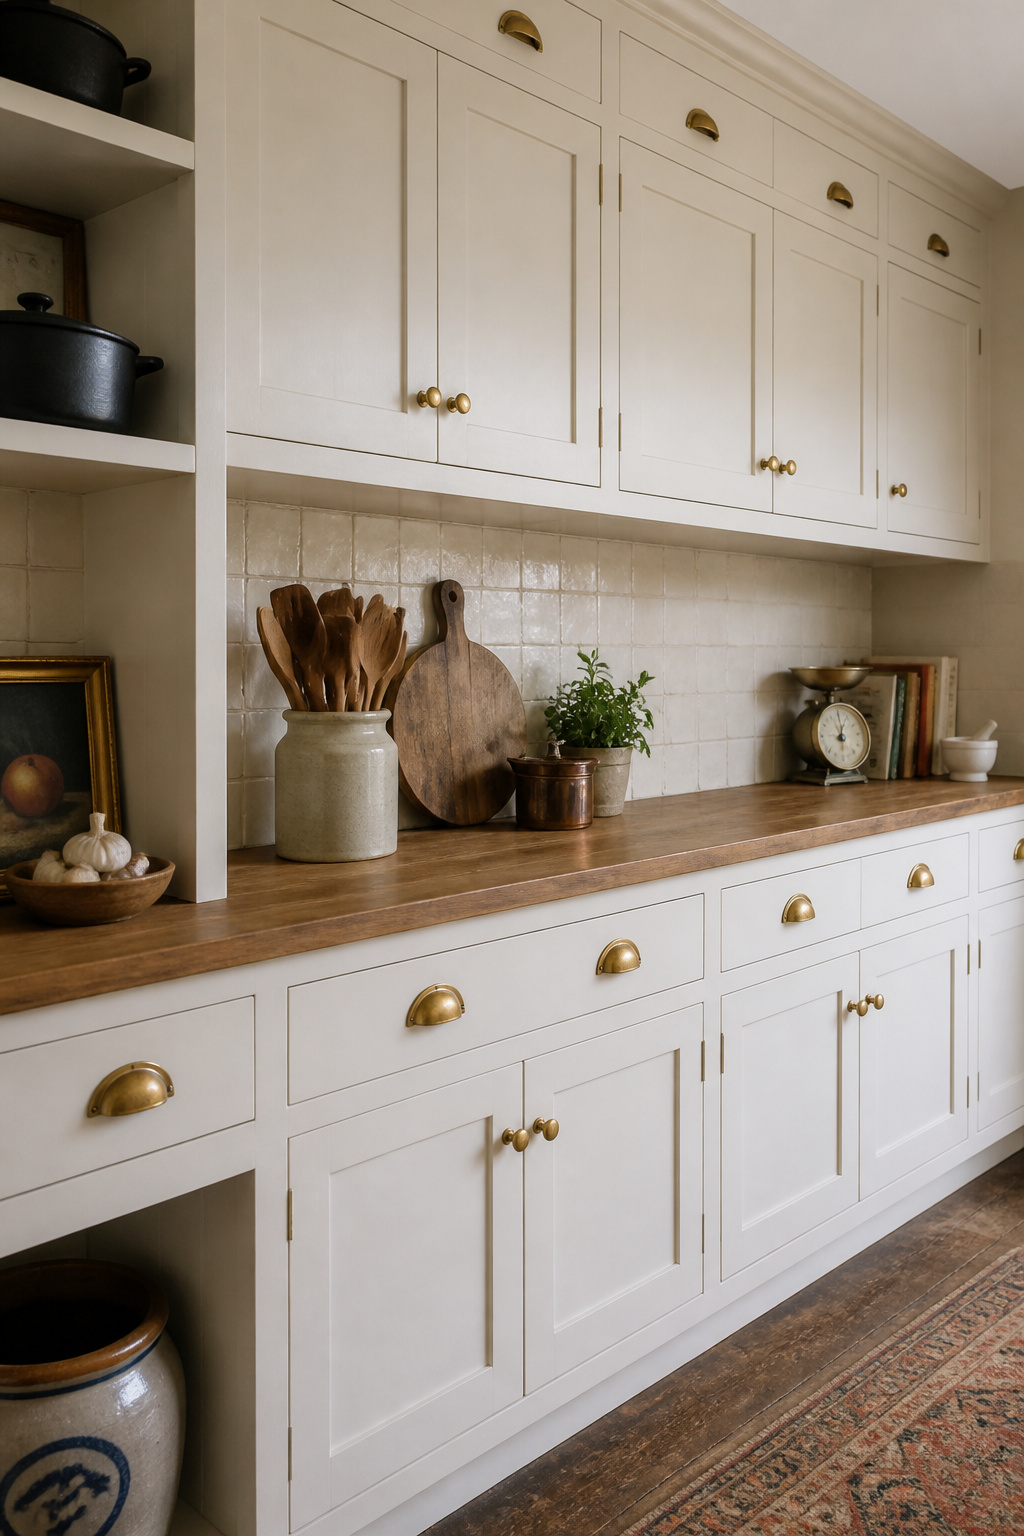
The scale matters as much as the finish. A 1.25″ knob on a wide shaker door looks tentative. A 4 to 5″ cup pull or bin pull reads as confident and period-accurate. Cup pulls and bin pulls — the half-moon bail pull used on everything from Hoosier kitchen cabinets to built-in farmhouse dressers — are among the most historically accurate choices. Modern bar pulls are a mid-century design. They’re not wrong in a farmhouse kitchen, but they don’t carry the same period authenticity.
For finish, matte black iron traces directly to the cast iron stoves, utensil hooks, and door hardware of the farmhouse era. It’s the most working-kitchen-authentic choice. Antique brass adds warmth and pairs well with butcher block and copper fixtures. Choose brushed or hand-applied patina versions rather than shiny lacquered brass, which reads as a different era entirely. Aged nickel bridges the period-accuracy and contemporary-appliance compatibility problem. It reads as early 20th century while sitting comfortably next to stainless steel.
House of Antique Hardware and Forge Hardware Studio specialize in reproductions cast from genuine Victorian and Craftsman-era originals. Signature Hardware and Cosmas offer brushed antique brass and matte black lines at more accessible price points.
One practical note before ordering: measure your existing cabinet boring. Standard US pull boring is 3″ or 3.75″ center-to-center. Order hardware that matches your existing hole spacing, or plan to fill and re-bore. Easy to forget until 40 pulls arrive and none of them fit.
6. Beadboard Panels on the Lower Cabinets and Backsplash
Beadboard dates to the 1800s, and its use in American kitchens wasn’t decorative — it was practical. The vertical tongue-and-groove profile protected walls against moisture and impact in kitchens and utility rooms. The bead between each plank disguised the joint and added structural rigidity. It ended up in farmhouse kitchens because it was available, cheap, and worked.

As a backsplash, it remains one of the fastest and most affordable farmhouse updates available. A $30 to $50 panel purchase covers most standard kitchen backsplash sections. Installation requires only basic tools and beginner DIY skills. The visual change is immediate — flat drywall becomes a characterized surface that reads as genuine period detail.
Material choice determines whether it survives the kitchen environment. This is not a decision to get wrong. Standard MDF beadboard will fail as a kitchen backsplash within one to three years. Repeated steam and splash exposure causes the edges to swell, delaminate, and eventually mold. For any backsplash application or wall adjacent to moisture, PVC beadboard is the correct material. It’s completely waterproof, handles kitchen humidity without moving, and takes paint identically to wood.
Paint finish also matters. Semi-gloss or gloss enamel is required for kitchen beadboard. It creates a hard, non-porous surface that resists grease and wipes clean with a damp cloth. Standard flat or eggshell paint soaks up grease and becomes impossible to clean within months. And before installation, paint all four sides of each panel — including the back — to seal the material entirely. One unpainted edge touching a damp surface will wick moisture into the rest of the board.
For color, classic farmhouse beadboard reads in bright white (SW Alabaster, BM Simply White), warm cream, or the same color as the lower cabinets for a paneled effect. If you’re referencing contemporary kitchen backsplash ideas for tile options, beadboard is the counter-argument: lower cost, warmer character, faster installation.
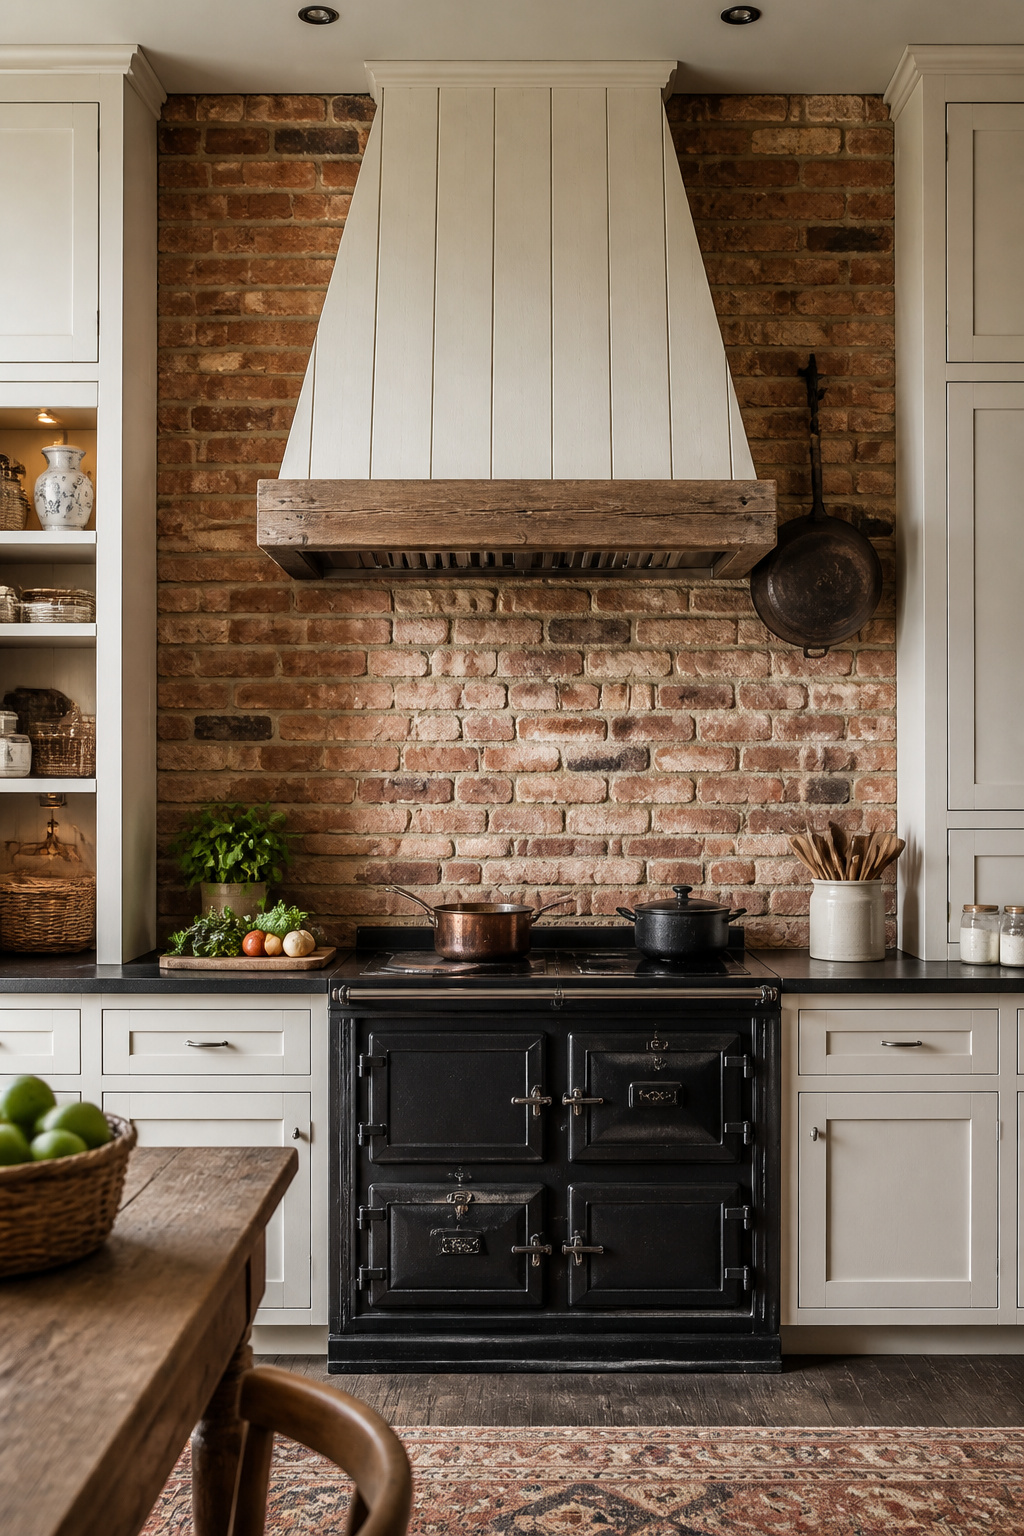
7. Exposed Ceiling Beams That Add Structural Authenticity
Original farmhouse ceilings were exposed structural timbers — 6×8 or 8×10 hewn beams spanning the room’s width, often still showing adze marks from hand shaping. The exposure was a consequence of working-class construction. Finishing a ceiling with plaster cost money; leaving the beams exposed cost nothing. That honest approach became the aesthetic — and it’s one of the most dramatic things you can add to a farmhouse kitchen remodel.
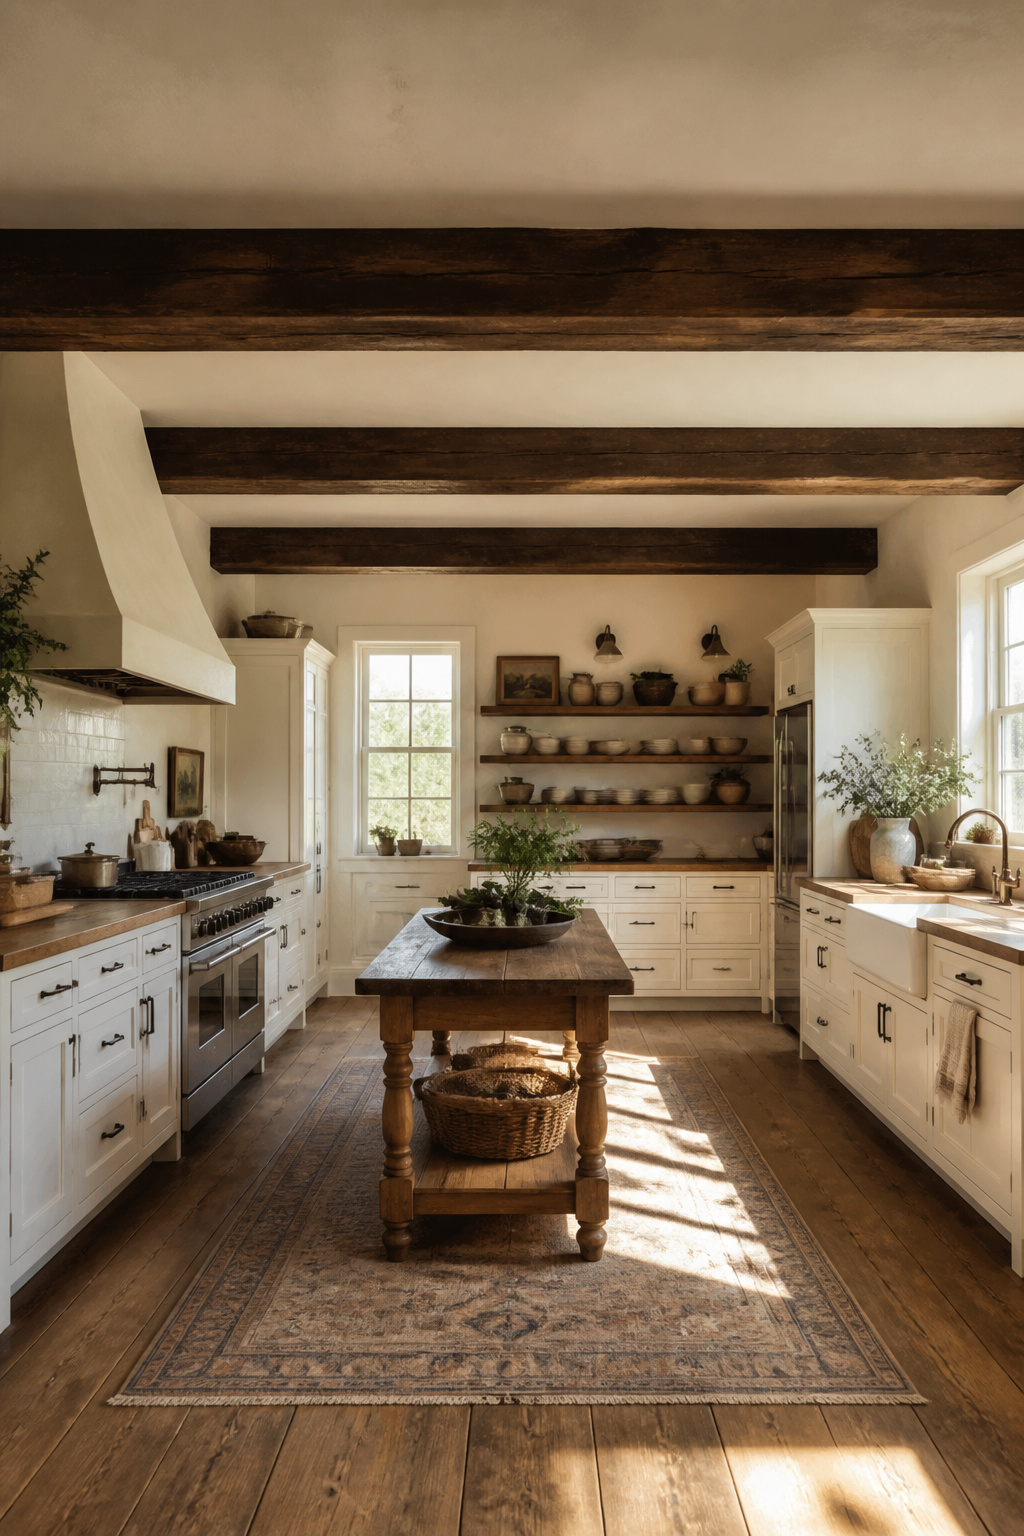
A convincing modern recreation requires getting the sizing right. The most common mistake is undersizing — installing 3″ or 4″ decorative beams that float against the ceiling looking like trim rather than structure. In a kitchen with 9-foot ceilings, beams should be at least 6 inches wide and 6 inches tall to read as structural. Space them 4 to 8 feet apart depending on room width. A 12×14 kitchen needs 2 to 3 beams; a 20×24 space needs 4 to 6.
Faux polyurethane beams (Barron Designs, Timberthane) are the practical choice for most renovations. They weigh 2 to 5 lbs per linear foot versus 10 to 30 lbs for real structural timber. They install without engineering or structural support and come in over 1,400 sizing and finish combinations. Total project cost for a kitchen installation averages $3,000, ranging from $1,200 to $5,000. Real reclaimed timber in desirable species like walnut can cost $60+ per linear foot. A full kitchen ceiling becomes an $8,000–$15,000+ project before labor.
The visual result of high-quality faux beams is genuinely convincing at normal viewing distance. Match the beam’s color and apparent aging to the room’s other wood elements. Dark walnut-stained beams look odd against blonde oak floors. Weathered grey beams are the most versatile choice and work with almost any farmhouse palette.
8. Freestanding Furniture Pieces That Break the Built-In Mold
Historic farmhouse kitchens weren’t designed as a coordinated unit. They accumulated over decades — a dresser from one generation, a built-in pantry added later, a freestanding table that served as the primary prep surface. Nothing was planned to match. The result was a kitchen that looked assembled rather than specced. That accumulated, layered quality is precisely what makes farmhouse kitchens feel different from showroom reconstructions.
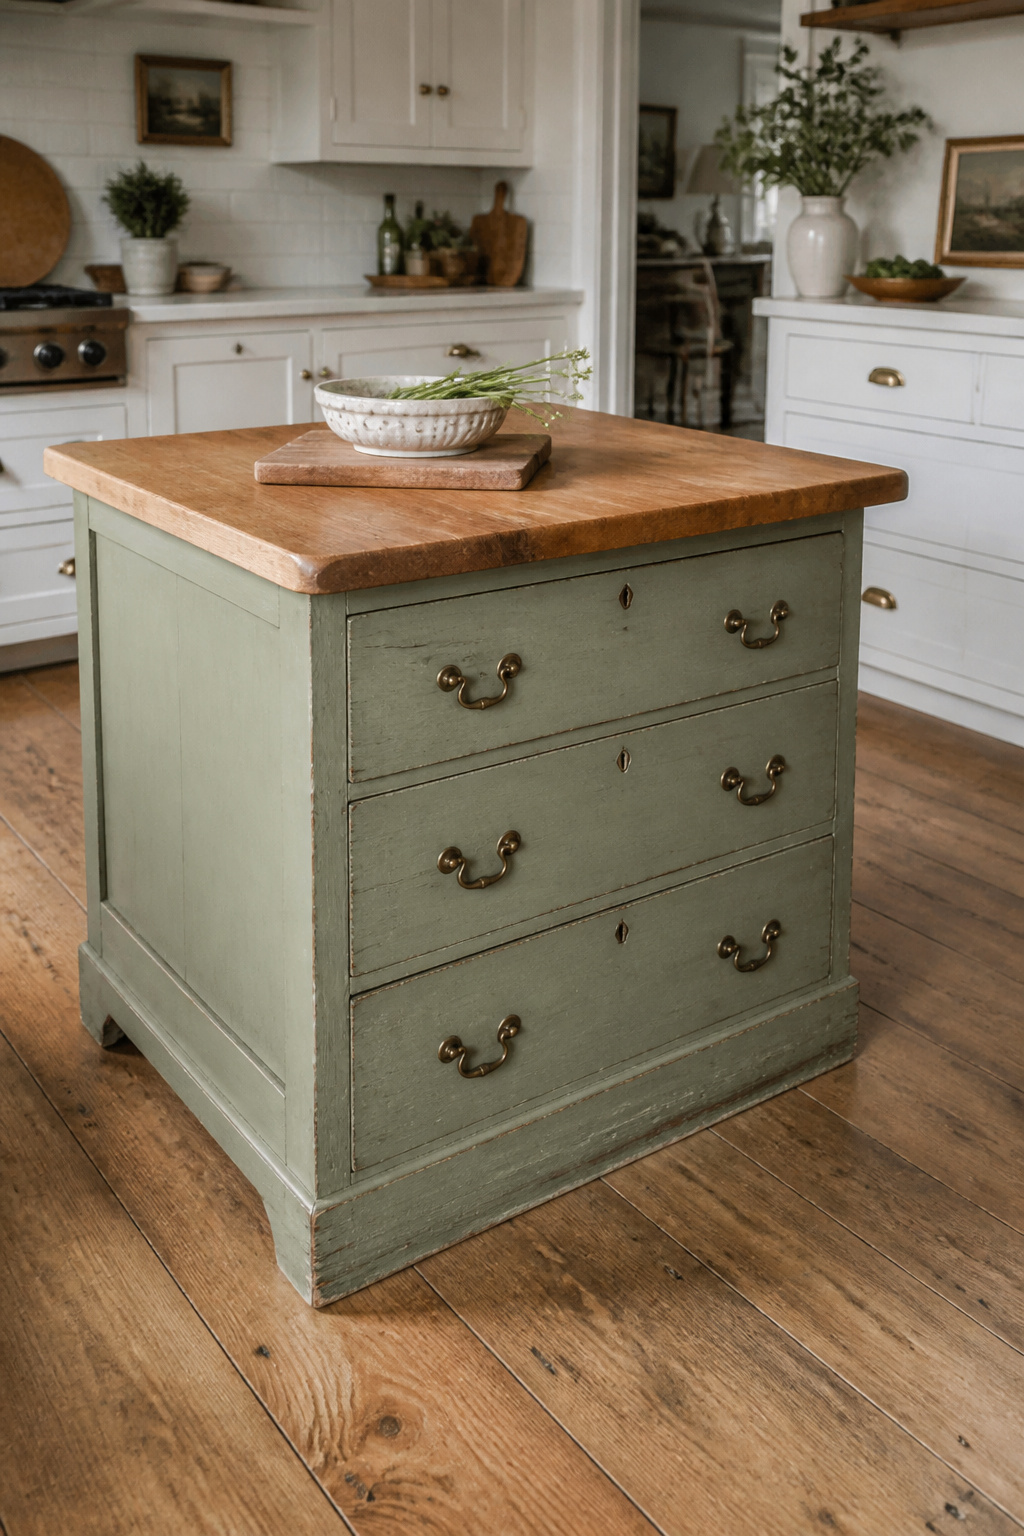
One freestanding piece in an otherwise built-in kitchen does this work immediately. An antique dresser converted to a kitchen island, a vintage hutch for display storage, a Hoosier cabinet resurrected as a pantry — any of these signals kitchen history. It works even if the rest of the room was installed last year.
As a starting point for modern kitchen island designs, it’s worth knowing that the standard island height is 36″ — matching standard countertop height. When shopping for a dresser or other vintage piece to convert, look for items in the 34 to 36″ range. Older farmhouse dressers often measure 17 to 20″ deep rather than the modern kitchen standard of 21 to 22″. That’s actually an advantage — a slightly shallower island leaves more floor clearance in a tight kitchen.
Before buying: measure depth against your floor plan clearance, check that all drawers and doors still function, and test the structural soundness of the joints. Loose joints can be re-glued. Warped or missing drawer rails are harder to address. Add a butcher block or sealed wood top to create a proper working surface. Then update the hardware — cup pulls or black iron bail pulls tie the converted piece to the rest of the kitchen’s hardware story.
9. A Farmhouse Kitchen Update With an Earthy, Muted Color Palette
The all-white farmhouse kitchen is a late-2000s interpretation that became a Pinterest phenomenon and then a cliché. It has remarkably little basis in historical accuracy.
Pre-WWII American farmhouse kitchens used milk paint in whatever tones were available from natural pigments: warm cream, sage green, barn red, deep slate blue, soft ochre. The colors were earthy and slightly desaturated because that’s what you got from mineral and plant-based colorants before synthetic pigments became widely available. The “farmhouse white” that defined a decade of kitchen renovation is historically a sanitation-era hospital white, not an agricultural one.
A more period-accurate approach uses layered tones across walls, cabinets, and trim. Sherwin-Williams Alabaster (SW 7008) is the correct kind of white for this — warm, slightly creamy, with yellow undertones that read as aged rather than bleached. For cabinet colors that communicate genuine farmhouse character: Sherwin-Williams Dovetail (SW 7018) — a warm grey-brown — photographs as authentically period. Benjamin Moore Hale Navy (HC-154) works as a deep accent for an island or lower cabinets. Farrow & Ball Lichen (No. 19) reads as historically accurate sage green. For a deeper exploration of farmhouse kitchen color palettes, those specific paint codes are a useful starting point.
The three-tier system: walls in the mid-tone (warm cream or muted sage), lower cabinets in a deeper related tone, and trim in a clean warm white. Keep wall and cabinet tones in the same color family. Mixing warm walls with cool-grey cabinets creates visual tension rather than contrast. The ceiling is often overlooked. Try a 50% tint of the wall color up there — the room feels enveloping rather than sharply cut off at the top.
10. Subway Tile Backsplash in a Grout Color That Does the Work
Subway tile was designed for the 1904 New York City subway system — 3″×6″ glazed white ceramic, chosen for durability, easy cleaning, and the ability to reflect light in dark underground spaces. It migrated into butcher shops, hospitals, and domestic kitchens within years of its introduction. The same properties that worked 40 feet underground worked anywhere cleanliness was a daily concern.
That’s the farmhouse connection: subway tile isn’t primarily a decorative choice. It’s a utilitarian one. Farmhouse kitchens adopted it for exactly the same reason they adopted everything else — it worked. The 3″×6″ brick pattern remains the most period-accurate choice. Larger format subway tiles (4″×8″ and 6″×12″) are modern interpretations. If historical accuracy matters to your farmhouse kitchen remodel, stick to the original size.
The grout color is where this tile becomes interesting. Matching white grout creates a clean surface that lets other elements — hardware, open shelving, the range hood — take visual priority. Contrasting dark grout (charcoal, near-black) makes each tile a graphic unit and connects visually to matte black hardware. It also requires more frequent cleaning. The most period-accurate choice is a warm greige or buff grout. Early subway tile installations used grey or buff grout that aged to a warm tone over time. It’s a more forgiving and historically honest option than either extreme.
For texture, handmade or hand-glazed subway tiles add subtle color variation and slight surface imperfection that mass-produced flat tiles can’t replicate. The cost premium is real — $15 to $40+ per square foot versus $3 to $8 for standard. But the effect is significantly more character-rich, particularly when combined with kitchen tile ideas for backsplashes that incorporate texture as a primary design element.
11. A Sliding Barn Door for the Pantry That Earns Its Style Points
A barn door that solves a real problem is a good addition to any farmhouse kitchen redesign. A barn door that’s purely decorative tends to look like a Pinterest prop within a year.

The genuine practical case: sliding barn doors eliminate the door swing radius. This matters in tight kitchen layouts where a standard 32″ hinged door conflicts with counter space, appliances, or the main traffic path. On pantry openings, utility closets, and laundry rooms adjacent to the kitchen, the sliding mechanism reclaims usable floor space with every use. That’s a farmhouse argument — the design serves a function.
Hardware quality is the single factor that separates a satisfying installation from one that wobbles or droops after a year. Rustica Hardware builds heavy-gauge welded steel track systems with weight ratings to 350 lbs. Hardware kits run $200 to $400+ but the quality is evident in how the door moves. Calhome offers more accessible pricing with high customer satisfaction for light-duty pantry applications. In both cases, look for track weight ratings of at least 1.5x your door’s actual weight. Also check for anti-jump floor guides and powder-coated or stainless steel hardware to resist kitchen humidity.
Reclaimed wood is the most period-authentic door material — actual salvaged barn wood with genuine weathering, nail holes, and color variation. It requires the heaviest-duty track hardware to handle the weight. New knotty pine stained and distressed can approximate the look at lower cost. Metal panel inserts in wood frames are a contemporary-farmhouse hybrid that cleans more easily than solid wood.
One measurement to take before anything else: wall clearance. A 36″ barn door needs 36″ of unobstructed wall to park when open. In a kitchen with windows, outlets, upper cabinets, or appliances flanking the doorway, this is frequently not available. Measure before ordering, not after.
12. Cast-Iron and Copper Fixtures for Period-Accurate Character
Style imitation produces kitchens that look like a farmhouse theme park. Material authenticity produces kitchens that feel genuinely historic. The difference is visible and tactile — and no amount of coordinated farmhouse-themed decor from a big box store bridges it. Cast iron and copper are the two materials that most authentically place a kitchen in the farmhouse era, and they remain the cornerstone of any honest farmhouse kitchen renovation.
Both were standard in 19th and early 20th century farm kitchens — not as design choices but as functional ones. One genuine cast-iron Dutch oven on open shelving communicates more period authenticity than three coordinated sets of farmhouse-themed accessories.
Hanging cast iron cookware is practical before it’s decorative. Moisture is cast iron’s enemy. Wall hooks, a ceiling pot rack, or a rail beneath open shelving are better storage than cabinet drawers. The pans stay dry, ventilated, and accessible. Lodge is the most widely available authentic American cast-iron brand with over a century of manufacturing history. Griswold and Wagner vintage pieces from estate sales add genuine age to a collection.
Copper develops patina over time, and that patina is the point. Polished copper looks counterfeit next to copper allowed to age selectively. The difference shows: bright where it’s handled, deeper and greener where it isn’t. For range hoods, handcrafted copper enclosures from WorldCoppersmith, SINDA Copper, or MyRustica range from $1,500 to $6,000+ depending on size. Basic maintenance is simple: a soft cloth and mild dish soap weekly keeps the active surfaces clean while the patina develops naturally on less-touched areas.
13. Farmhouse Kitchen Redesign With Reclaimed Brick Accents
Reclaimed brick has a quality that no manufactured panel can fully replicate: the patina of centuries of firing, use, and weathering. The color variation, texture, and surface markings on actual fired brick from a 19th-century building come from materials and processes that no longer exist. When you use thin brick veneer cut from that source material, you’re installing something genuinely irreproducible.
Thin brick veneer (Historical Bricks, Chief Bricks, Brick My Walls) is cut from actual salvaged brick to 3/4″ to 1″ thickness, approximately 3 to 4 lbs per square foot. That’s light enough to apply directly over prepared drywall or cement board with thin-set mortar. Apply thin-set to the prepared wall surface, press the veneer pieces with staggered joints, grout after curing, then seal with a breathable matte masonry sealer. Total material cost runs $12 to $25 per square foot for genuine thin brick. Manufactured polymer brick panels cost $3 to $8, but they replicate the look with significantly less success at close range.
Placement matters. The best kitchen applications are the wall behind the range (above a non-combustible surface), an accent wall on a non-splash surface, or a fireplace surround in a kitchen-adjacent space. Avoid the wall directly behind the sink. Constant splash exposure saturates grout with moisture and food residue that becomes permanent without aggressive maintenance.
The sealing step is not optional in a kitchen environment. Apply a breathable matte masonry sealer before grouting and again after installation. The breathable designation matters — it allows moisture vapor to pass through while blocking liquid water and grease penetration. Spot-clean with mild soap and water, and re-seal every three to five years in high-use areas. Brick that’s left unsealed absorbs cooking grease and residue that becomes permanent over time.
14. Layered Lighting That Actually Makes the Kitchen Work
Original farmhouse kitchens were built with large south-facing windows specifically to reduce dependence on candle and oil lamp use. Maximizing daylight was an economic decision, not a design one. The result was kitchens that felt bright and connected to the outdoors in a way most modern kitchen renovations fail to recreate. Good lighting is the most underestimated part of any farmhouse kitchen remodel, and the layer most homeowners skip is also the most impactful.
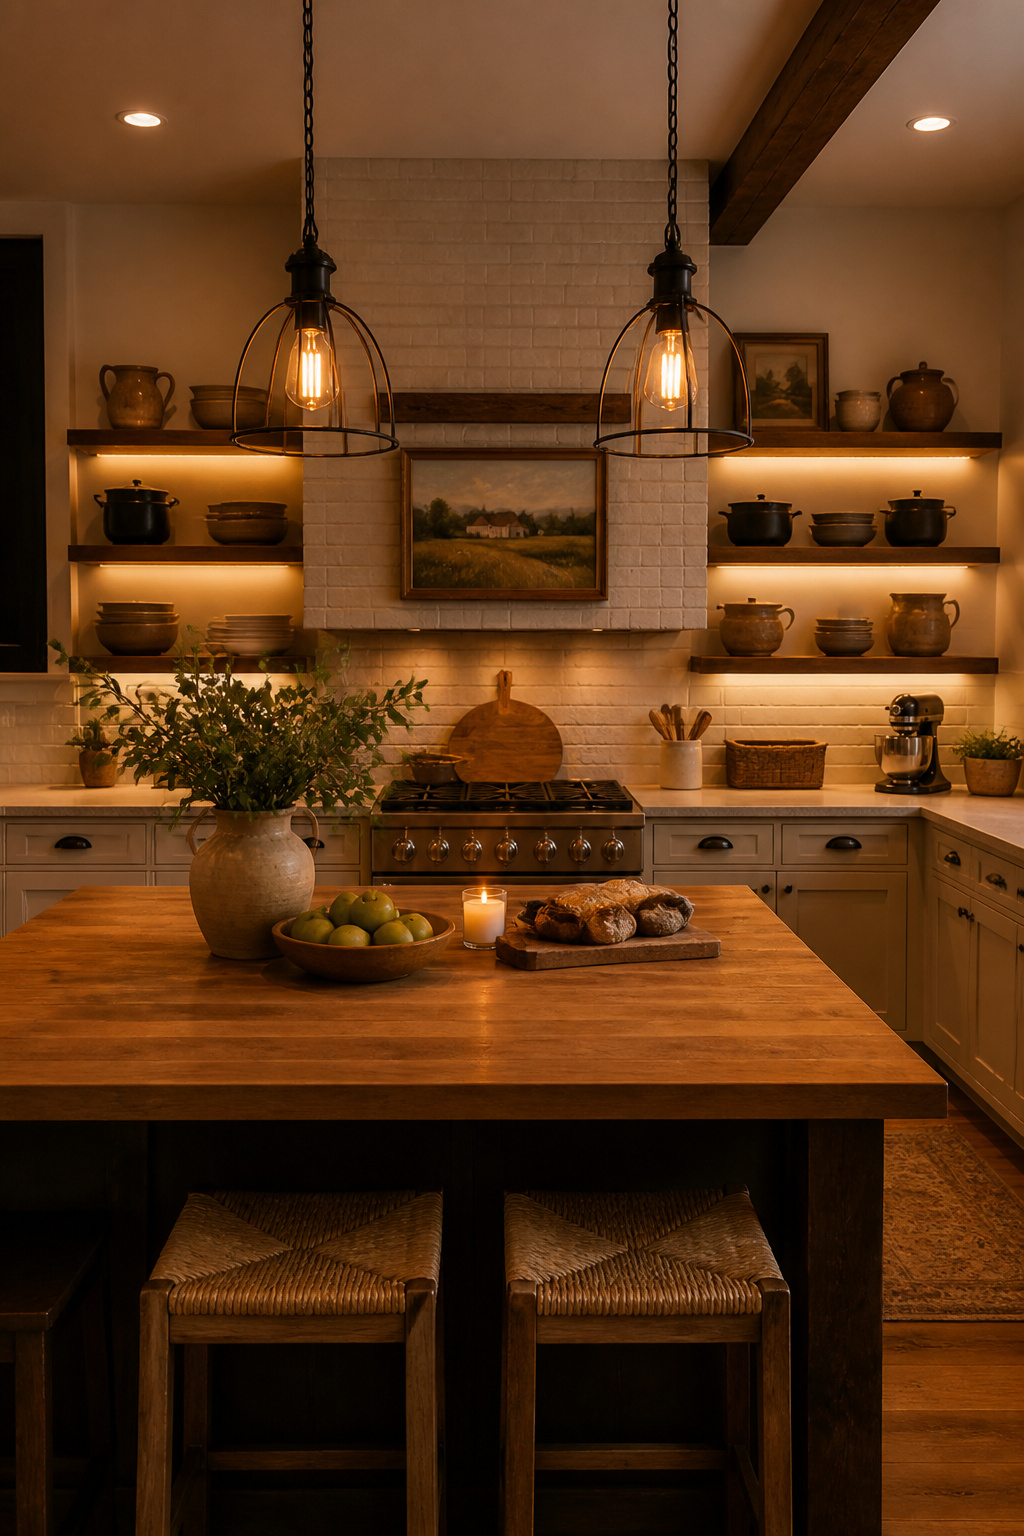
If adding windows isn’t feasible in your remodel, light-colored walls significantly amplify available natural light. A kitchen in Sherwin-Williams Alabaster reflects measurably more light than the same room in dark grey. But the more powerful solution is three-layer lighting: ambient overhead (recessed or a central fixture), task lighting (under-cabinet strips and pendants), and accent (inside glass cabinets or toe-kick strips). The combination creates depth, warmth, and functional illumination that no single overhead source produces alone.
For pendant lights over the island, the rules are straightforward. Hang them 30 to 36 inches above the counter surface. Size each pendant at roughly 1/3 the island’s width — so a 36″ wide island takes 10-12″ pendants. For a farmhouse kitchen, cage-style pendants with Edison LED filament bulbs at 2200K to 2700K color temperature are the right aesthetic choice. They cast a warm pool of light, reinforce the period character, and use a fraction of the energy of incandescent equivalents. For more detailed guidance on placement ratios and farmhouse-appropriate fixtures, the kitchen lighting over island ideas framework is a useful reference.
Under-cabinet LED strips are the layer most farmhouse kitchen renovations miss. They eliminate the shadow cast by upper cabinets when using overhead lighting alone — the shadow that makes counter-level prep work harder than it needs to be. Install 2700K to 3000K strips for a warm tone that matches your ambient lighting. Plug-in systems are DIY-installable in an afternoon. Plan for hardwired versions during the rough-in phase if you’re doing a full remodel.
15. Remodeling Your Farmhouse Kitchen With a Statement Range Hood
In original farmhouse kitchens, the chimney breast above the hearth was the structural and visual center of the room. Everything else oriented around it. The modern range hood enclosure carries this same symbolic weight. It occupies the vertical center of the cooking wall and sets the kitchen’s character from that single surface.
A custom range hood enclosure is one of the few renovations where the effort-to-impact ratio is exceptionally favorable. A well-built wood enclosure with a quality insert costs $700 to $2,800 for materials and professional labor. The result looks architecturally integrated in a way that a $1,500 production stainless range hood never will.
Material choice determines the era and intensity of farmhouse character. Painted tongue-and-groove pine or flat-panel shaker wood is the most accessible approach and the easiest to DIY. Match it to the cabinet color and profile for a built-in result, or contrast it slightly for a collected look. Plaster finish creates a smooth, European country-farmhouse quality. A plasterer can trowel a smooth or textured finish over a wood frame in a day, and the result is as architecturally convincing as any custom millwork. Reclaimed brick veneer over a wood frame is the most dramatic option and pairs naturally with a cast-iron stove, brick accent wall, or exposed beam ceiling.
The ventilation spec is the detail most homeowners overlook until after installation. The formula: 100 CFM per linear foot of cooking surface for wall-mounted hoods. A standard 30″ range needs a minimum of 250 CFM. The professional recommendation is 600 CFM for adequate capture at normal cooking temperatures. The hood should be at least 6″ wider than the range. Insert sizing: the range hood insert goes into the enclosure 2″ smaller than the cabinet opening. Size the ductwork at rough-in stage, not after the enclosure is built. Six-inch round duct handles up to 600 CFM; 8″ duct is required for 600 to 1200 CFM. Installing a beautiful custom hood with an undersized insert because the ductwork was already in is a common and unnecessary compromise.
Putting Your Farmhouse Kitchen Remodel Together Without the Chaos
The farmhouse aesthetic is unusually forgiving about sequence. Its defining elements — shiplap, a farmhouse sink, open shelving, butcher block, period hardware, a custom range hood — are each independently achievable. Approach this as a rolling renovation rather than a single project. Add the hardware now. Replace the upper cabinet doors with open shelving next spring. Install the apron sink when the plumbing budget opens up. The kitchen will look intentional rather than half-finished at every stage.
If you’re planning a full remodel rather than incremental updates, the sequence matters practically. The correct sequence: planning and permits, demolition, structural changes, then rough-in plumbing and electrical. After that: insulation, drywall and priming, flooring, cabinet installation, countertops, appliances and fixtures, backsplash and wall treatments, final details. Cabinets go in before flooring — installing the floor first and then dragging cabinet boxes across it is a reliable way to damage both. Decorative wall treatments like shiplap and beadboard happen after drywall and priming but before final paint. The kitchen remodeling ideas for historic homes framework covers this sequencing in depth if you’re working in a pre-war structure with considerations beyond standard renovation.
The decision between a surface refresh and a full gut renovation is worth making deliberately. A surface refresh — new paint, hardware, open shelving where cabinet doors were, updated lighting, a new backsplash — can genuinely change a kitchen for $2,000 to $5,000. No plumbing, electrical, or structural work required. A full gut renovation is warranted when the layout is wrong, plumbing needs relocation, wiring is undersized, or structural issues need attention. Not simply because you want a different look. Most of what reads as farmhouse character can be achieved without moving a single pipe.
Start with the element that will have the most impact for your specific farmhouse kitchen remodel. In most cases, that’s paint and hardware. In some, it’s the apron sink. In a few, it’s the range hood. Pick the one that will make you notice the improvement every morning and go from there.