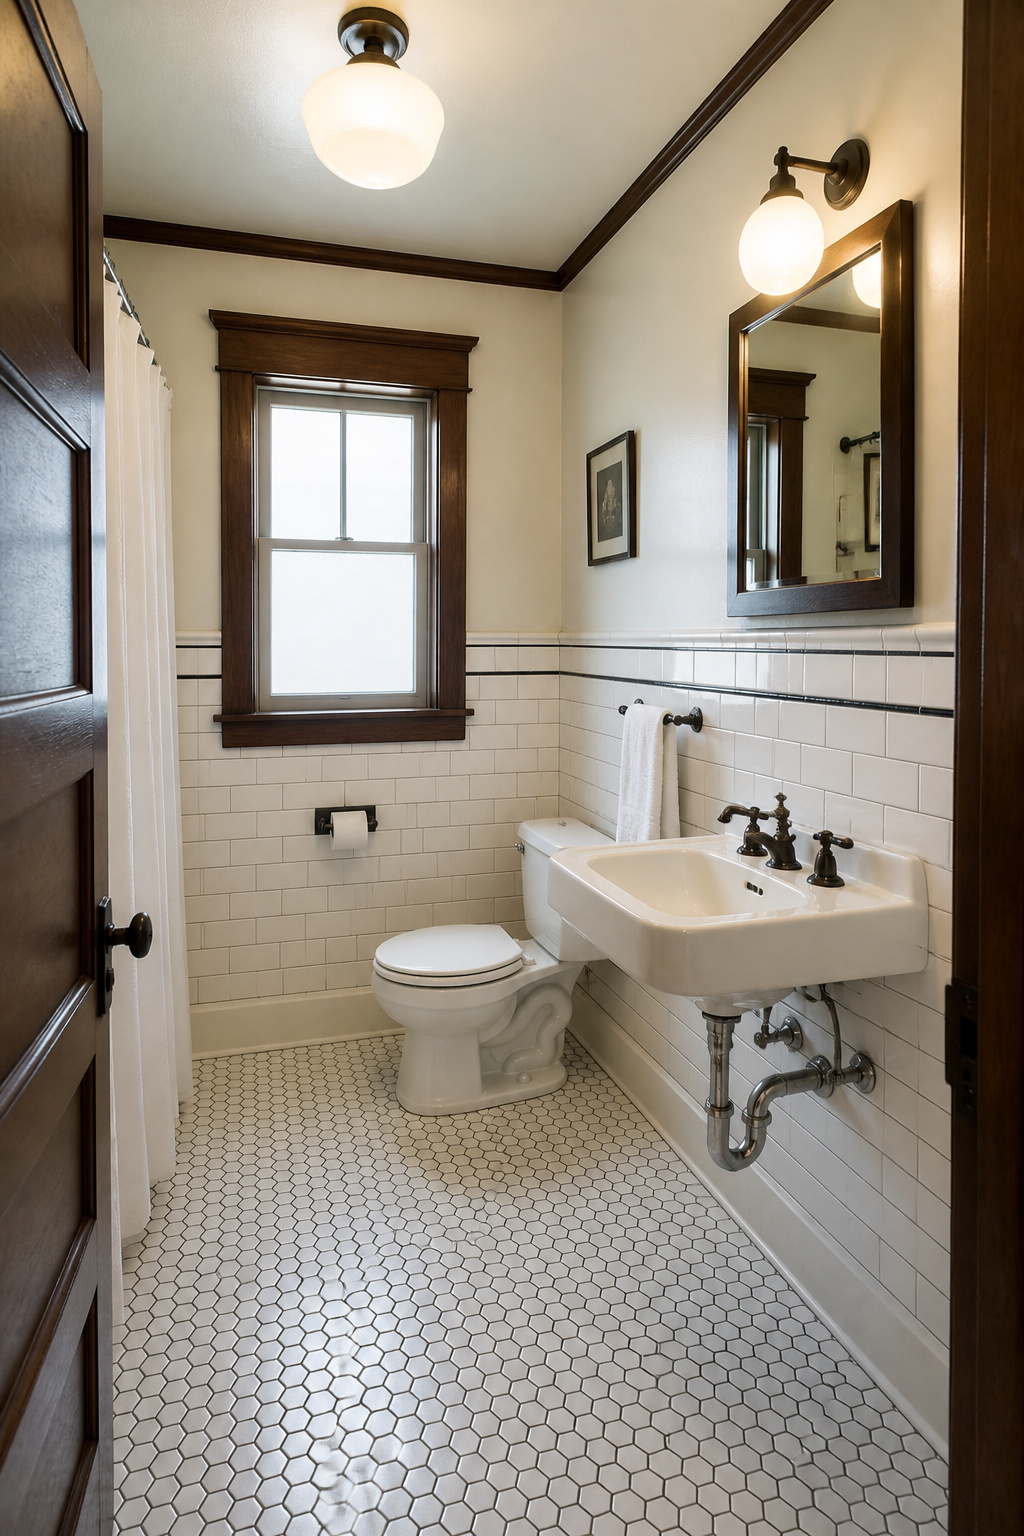
The first small bathroom I renovated was a 40-square-foot powder room tucked behind the kitchen stairs of a 1908 Craftsman bungalow in Portland. No window. A pull-chain toilet from a different era. A pedestal sink so narrow I could span it with one hand. Nothing about it should have worked. But after a layout reconfiguration, a swap to a floating vanity, and a tile strategy I’d first seen in a historic house museum in Pasadena, it became the room the owners showed every guest first.
That’s what I come back to when people tell me their small bathroom is hopeless. Fourteen years of renovating historic homes have convinced me that a small bathroom remodel isn’t a compromise — it’s a test of whether you understand proportion, sequence, and the difference between what looks good in a photo and what transforms a space you live in every day. These 15 ideas cover both: the structural moves that change how a bathroom functions, and the finishing decisions that change how it feels.
1. Reconfiguring the Layout: The Small Bathroom Remodel Decision That Changes Everything
Before you pick a single tile or fixture, stand in your bathroom and trace the path from the door to the toilet to the vanity to the shower. If that path requires sideways movement, strategic body turns, or an uncomfortable closeness to the wall, the layout is the problem — and no amount of cosmetic renovation will solve it.
Layout reconfiguration is the most expensive lever in a small bathroom remodel, but also the most powerful. Moving plumbing in a 5×7 or 5×8 bathroom typically costs $1,500–$2,500 for toilet relocation alone, with full re-routes running $1,740–$4,100. Plumbers charge $45–$200 per hour, and a complete small bathroom re-route takes 8–16 hours. That number surprises most people. But consider the alternative: spending $12,000 on beautiful tile and fixtures in a layout that still forces you to turn sideways to reach the shower.
The most impactful swaps are simpler than they look. Rotating a vanity 90 degrees — from one wall to an adjacent wall — rarely requires plumbing changes at all, just supply line extensions. Repositioning the door from a standard swing to a pocket door costs $1,550–$2,950 in a retrofit and reclaims roughly 10 square feet of floor space that the swing arc was claiming for nothing.
The real cost avoidance strategy: move the vanity, keep the toilet and shower where they are. Most of the discomfort in a small bathroom comes from the vanity blocking the traffic path — not from the toilet location.
For any work involving toilet or drain relocation, hire a licensed plumber. A poorly relocated drain creates waterproofing failures that cost far more to fix than the original labour bill.
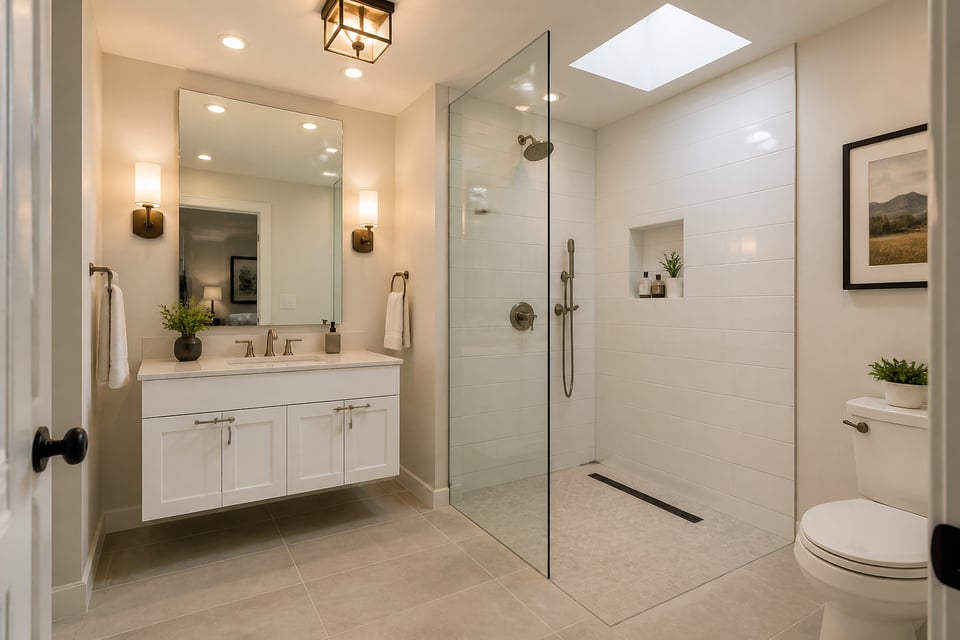
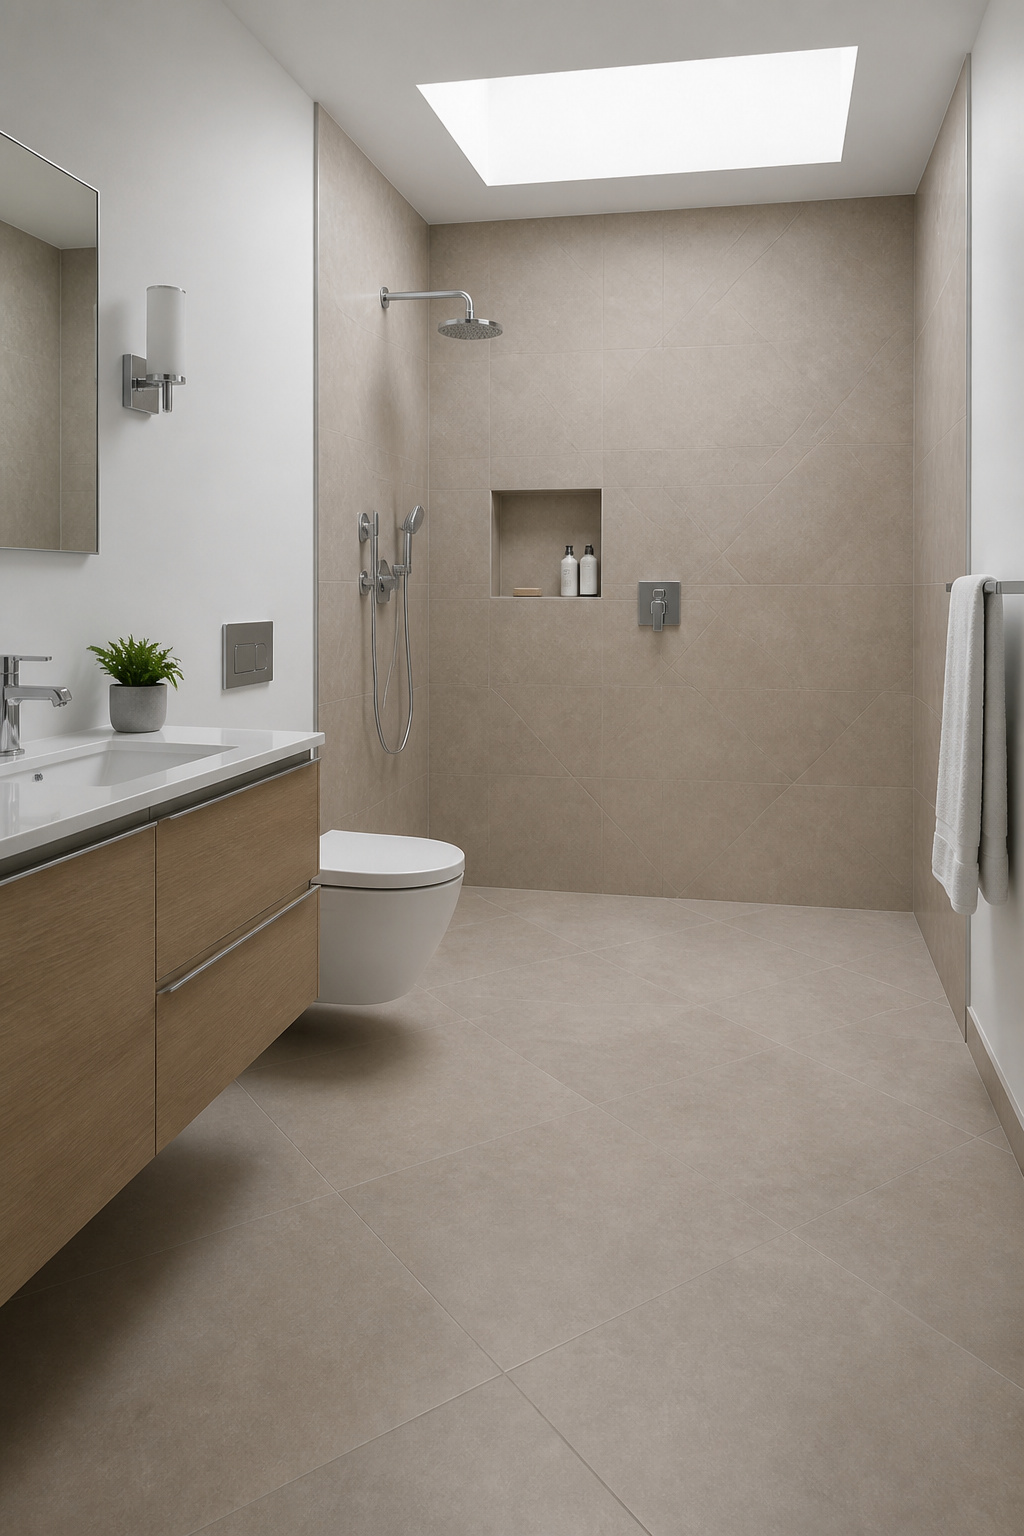
2. Walk-In Shower Instead of a Tub: A Small Bathroom Renovation Worth Every Dollar
A standard alcove bathtub claims 13 square feet of your bathroom floor. A 36×36 inch walk-in shower needs 9 square feet. That’s 4 square feet recovered in a room where 4 square feet can change the entire experience — in a 5×7 bathroom (35 total square feet), it’s a 10% gain in usable space.
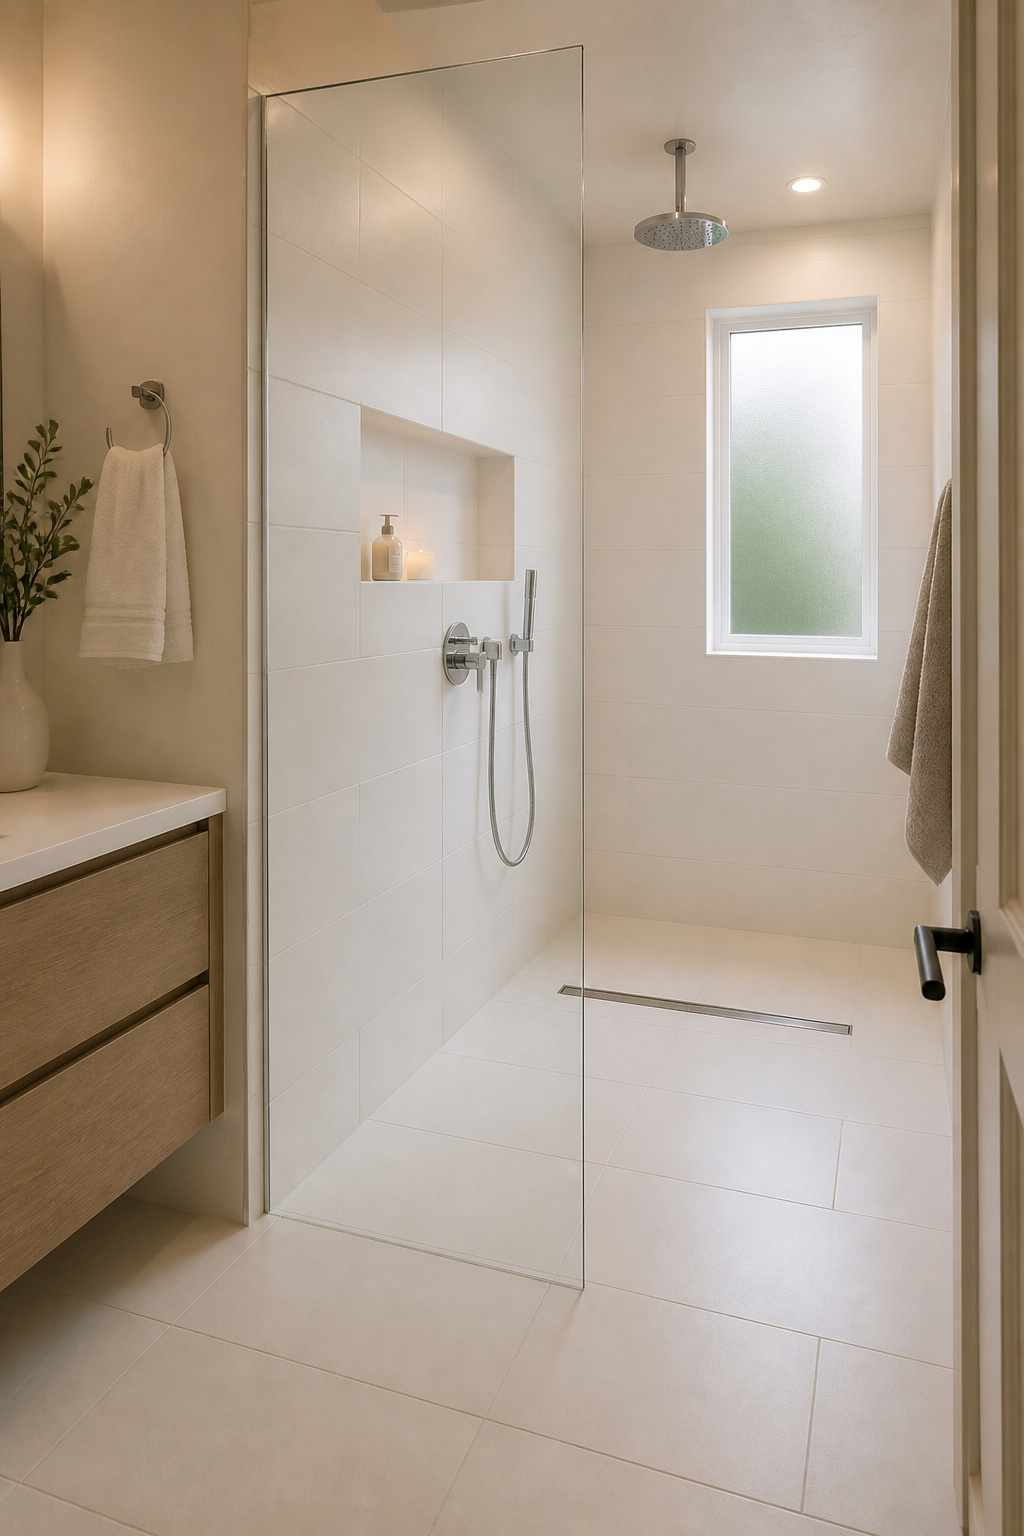
The visual impact is larger than the number suggests. When you remove the tub and install a curbless shower with a linear drain, the floor plane runs continuously from the bathroom entrance to the back wall. The eye travels without interruption. The room reads as longer and more open — not a trick, but a genuine consequence of how we perceive unbroken horizontal surfaces.
Curbless showers require a linear drain rather than a centre drain, adding $200–$600 to the plumbing cost. But the visual return makes it the right choice when openness is the goal. Low-threshold showers — a half-inch step — are the practical middle ground when budget is tighter. Most tile setters can execute them without specialty waterproofing expertise, and the step is low enough not to interrupt the visual flow meaningfully.
Glass enclosures matter here. A frameless glass panel reads as transparency — the eye passes through it to the tiled back wall, effectively doubling the perceived shower depth. A shower curtain, by contrast, reads as a wall. In a small bathroom, the curtain creates a visual barrier where there isn’t a physical one. For more ideas on configuration and glass options, these shower design ideas for small bathrooms cover the full range before you commit.
The resale question: if the home has a tub in a second bathroom, converting the primary to a walk-in shower is frequently neutral-to-positive for resale. In urban and luxury markets, a well-designed walk-in shower consistently outperforms a builder-grade tub in buyer preference. Removing the only tub in a family home is where resale risk is real.
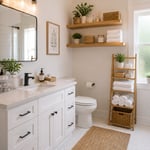
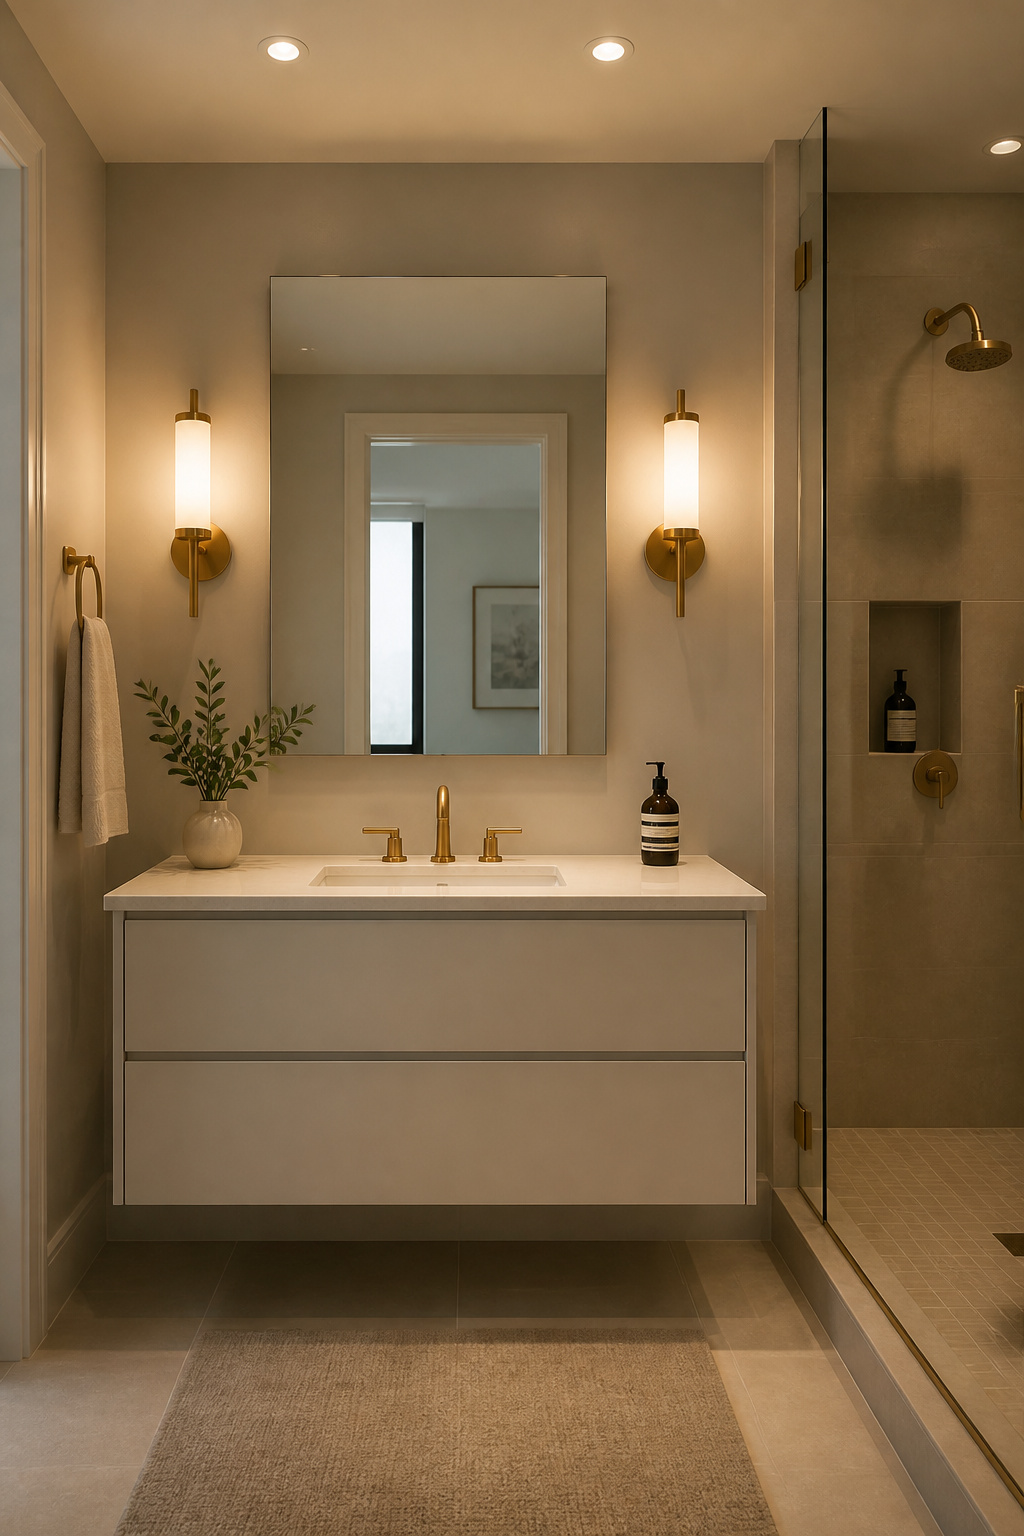
3. Floating Vanities That Open Up the Floor and Visually Expand the Room
The floating vanity delivers the best value-per-dollar in a small bathroom remodel. Mount it at 14–18 inches above the floor, and the continuous tile beneath it extends the visible floor plane — the eye reads it as open space, and the room feels longer than it measures.
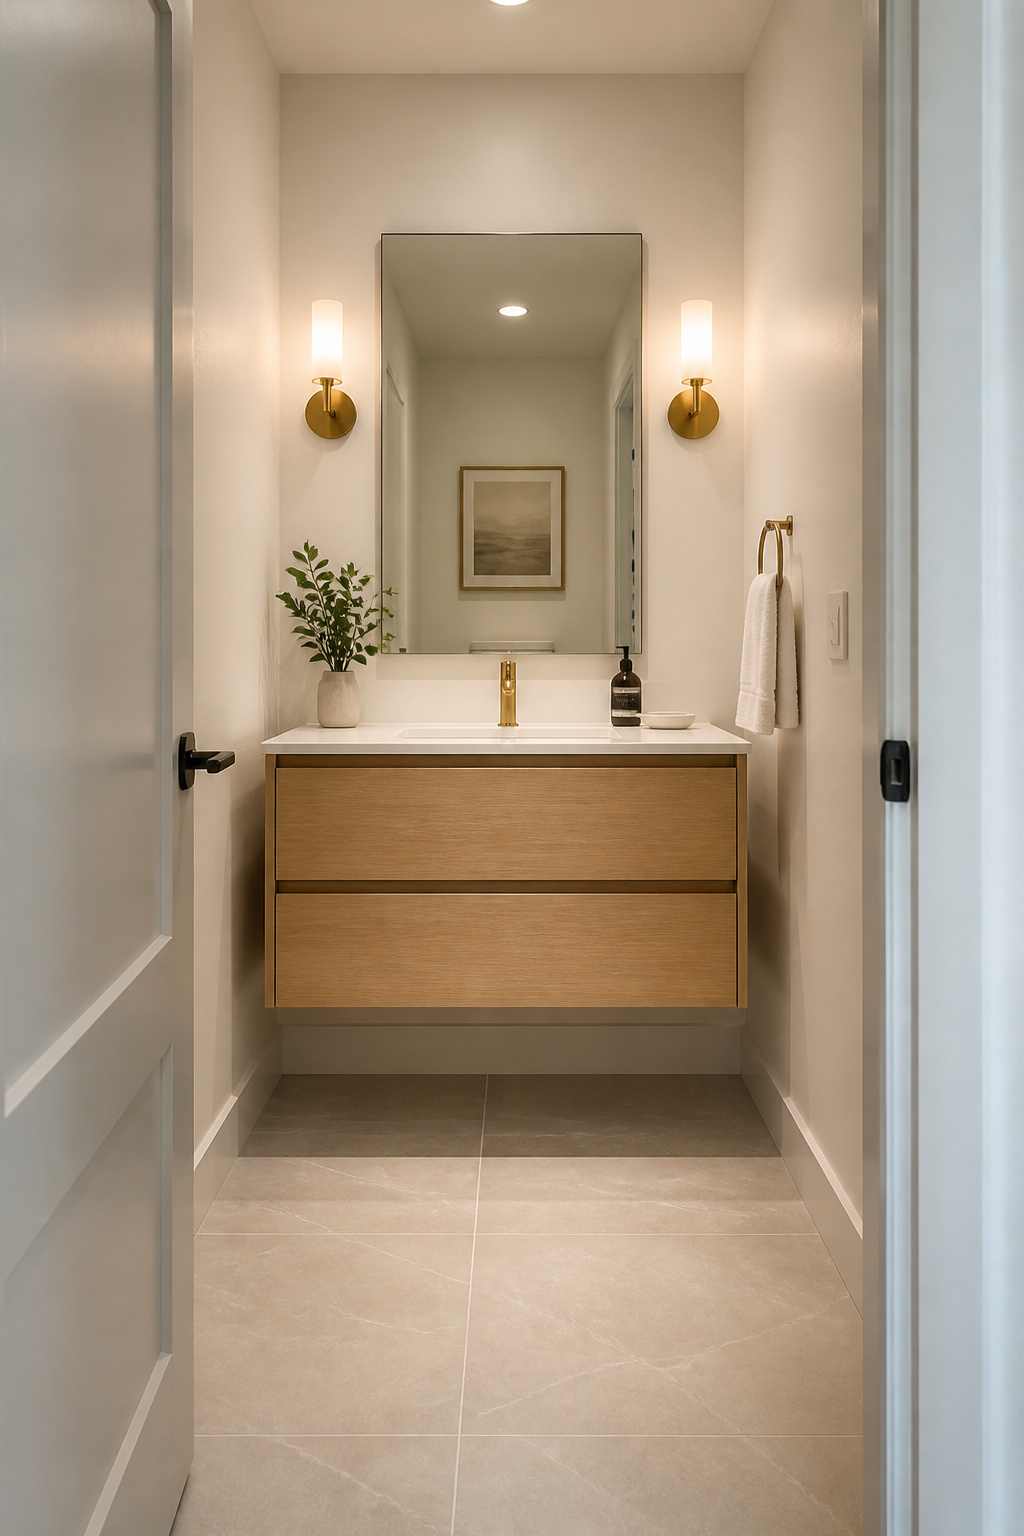
For small bathrooms under 50 square feet, a 24-inch wide floating vanity is the right choice. It’s wide enough for a proper undermount sink and narrow enough to preserve a clear traffic path. Depth runs 18–21 inches — shallower than standard floor-mounted vanities by 3–5 inches, which matters in a 5×7 layout where every inch of floor depth is earned.
Installation Notes
Floating vanities must anchor to studs, not just drywall. In homes built before 1940, stud spacing may be 20 or 24 inches on centre rather than the modern 16-inch standard. If the vanity width doesn’t align with studs, 2×4 blocking must be added between them — which means opening the wall. Budget an extra $150–$300 for the blocking and wall repair when this is the case.
Cost to install a floating vanity runs $576–$871 for the unit in 2026; wall-mounted models add $200–$500 in additional labour. The visual pairing that maximises the effect: a floating vanity above large-format floor tile. The continuous tile surface runs beneath the vanity, meets the wall, and the whole floor plane reads as uninterrupted. For a broader look at how vanity selection shapes a tight space, these vanity ideas for tiny bathrooms are worth reviewing before committing to a style.
4. Large-Format Tiles That Make a Small Bathroom Remodel Feel Significantly Bigger
The most counterintuitive principle in small bathrooms: use bigger tiles, not smaller ones. The instinct is to scale down — smaller room, smaller tile. What you get instead is a floor covered in a grid of grout lines that the eye reads as breaks, and the brain interprets many breaks as a smaller, more fragmented space.
A standard 12×12 tile in a 35-square-foot bathroom creates roughly 100 grout line intersections. A 24×24 tile in the same space creates approximately 20. That’s an 80% reduction in visual interruptions. The surface reads as a single continuous plane, and the eye travels across it without stopping.
The practical sweet spot for small bathroom floors is the 24×24 square tile or the 12×24 plank tile. The 24×24 creates balanced symmetry; the 12×24 plank laid lengthwise makes a narrow bathroom read as longer. Both run $8–$18 per square foot installed — more than standard tile due to levelling clips and handling, but not dramatically more.
The technique that takes this furthest: carry the same tile from the floor up the shower wall. When the floor tile and shower floor tile are the same material laid in the same direction, the boundary between the bathroom and the shower disappears. The room reads as one open plane from the door to the back wall. Confirm your tile is rated for both floor and wall use — check the PEI rating and the wet-area slip coefficient (COF above 0.42) before purchasing. For how tile choices shape the shower specifically, this resource on choosing the perfect shower surround tile covers the decision in useful depth.
Avoid high-polish porcelain on bathroom floors: it photographs beautifully and is a genuine hazard when wet. Matte or lightly textured finishes are the right call here.
5. A Recessed Niche in the Shower Wall Instead of Surface-Mounted Shelving
A surface-mounted shower caddie protrudes 4–6 inches from the wall. In a 36×36 inch shower, that’s meaningful physical obstruction — and visually, it’s noise. Soap bottles, shampoo, a razor, conditioner: all of it on display, jutting into your limited shower space.
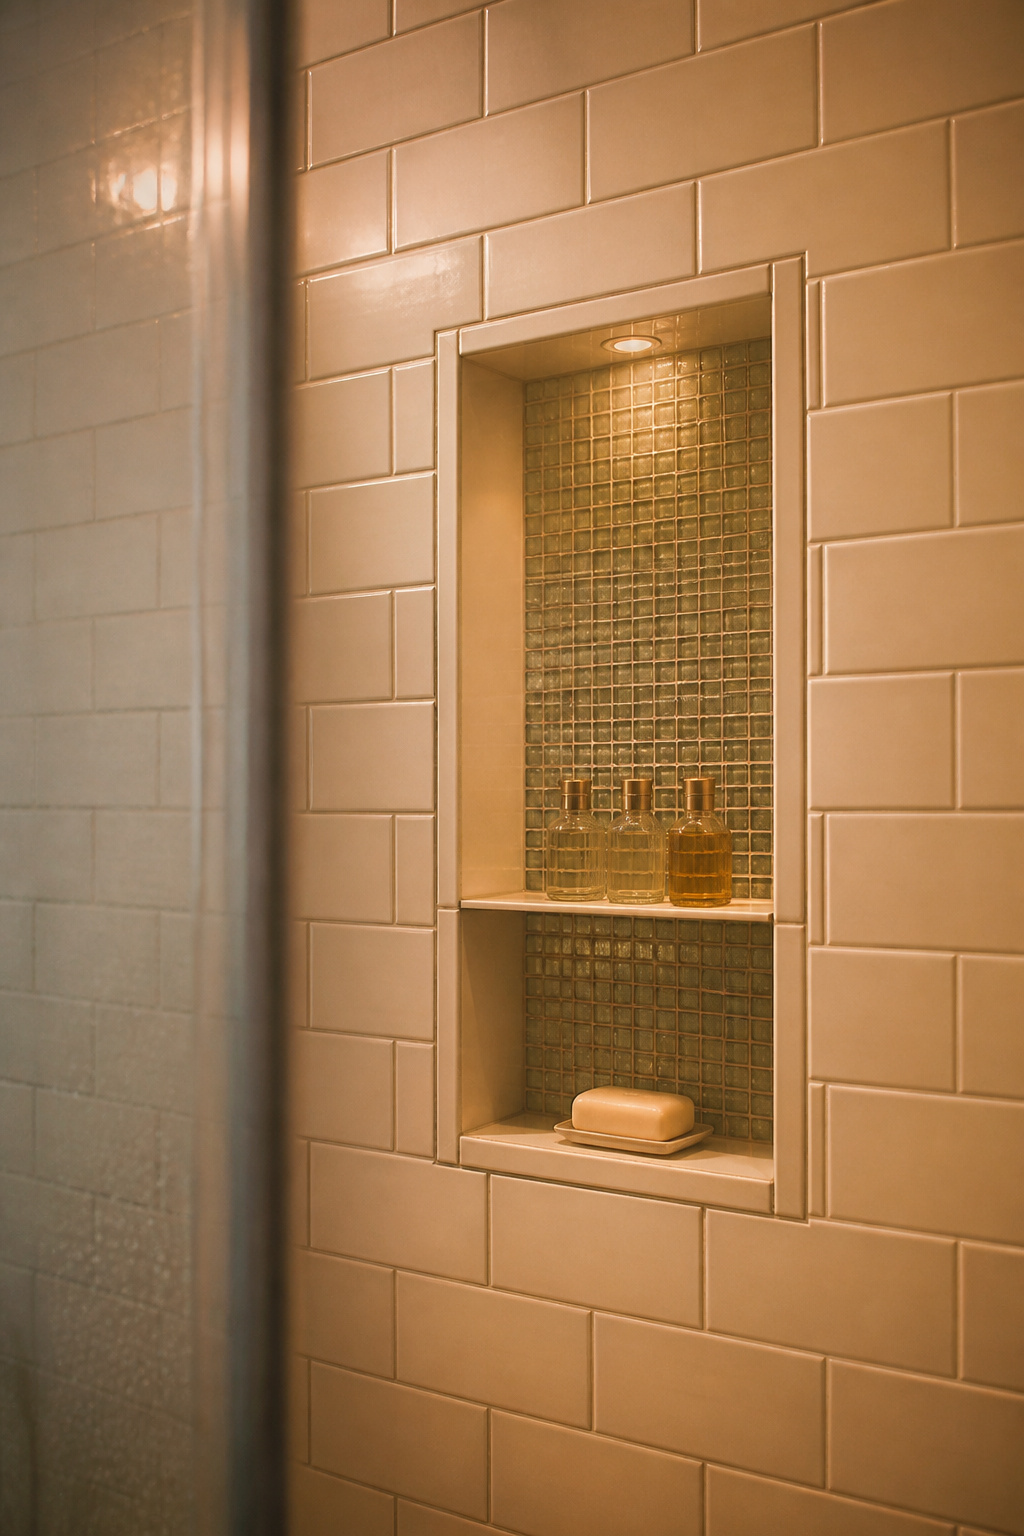
A recessed niche sits flush with the wall, adding zero depth to the shower footprint while providing 3.5 inches of storage depth — exactly the depth between studs in standard framing. A tiled niche with matching shower tile disappears into the wall. A niche tiled in a contrasting material becomes an intentional accent that adds architectural interest without adding visual clutter.
Standard stud spacing of 16 inches on centre gives a usable niche interior of 14.5 inches, which comfortably fits 12-inch tile on both sides with small grout joints. The most popular prefab niche is the Schluter Kerdi-Board-SN in the 12×20 inch size — wide enough for a standard shampoo bottle on its side, tall enough to stack three products without crowding. It arrives pre-waterproofed with a Kerdi-Band frame, costs $30–$80, and installs in under an hour.
The waterproofing step cannot be skipped. For a custom niche built from cement board, apply two to three coats of a liquid membrane like RedGard, allowing 24 hours between coats — budget $50–$150 for the application. And one non-negotiable location rule: never build a niche into an exterior wall. Exterior walls are insulated, and a niche cuts through that insulation, creating a thermal bridge and condensation risk that will cause tile failure within a few years.
6. Pocket Doors and Barn Doors That Reclaim Swing Space for Better Use
A standard 2-foot-8-inch interior bathroom door sweeps through approximately 10 square feet of floor space when open. In a 5×7 bathroom — 35 total square feet — that moving zone is 16% of the entire room, sitting in front of the toilet or vanity and doing nothing but blocking access.
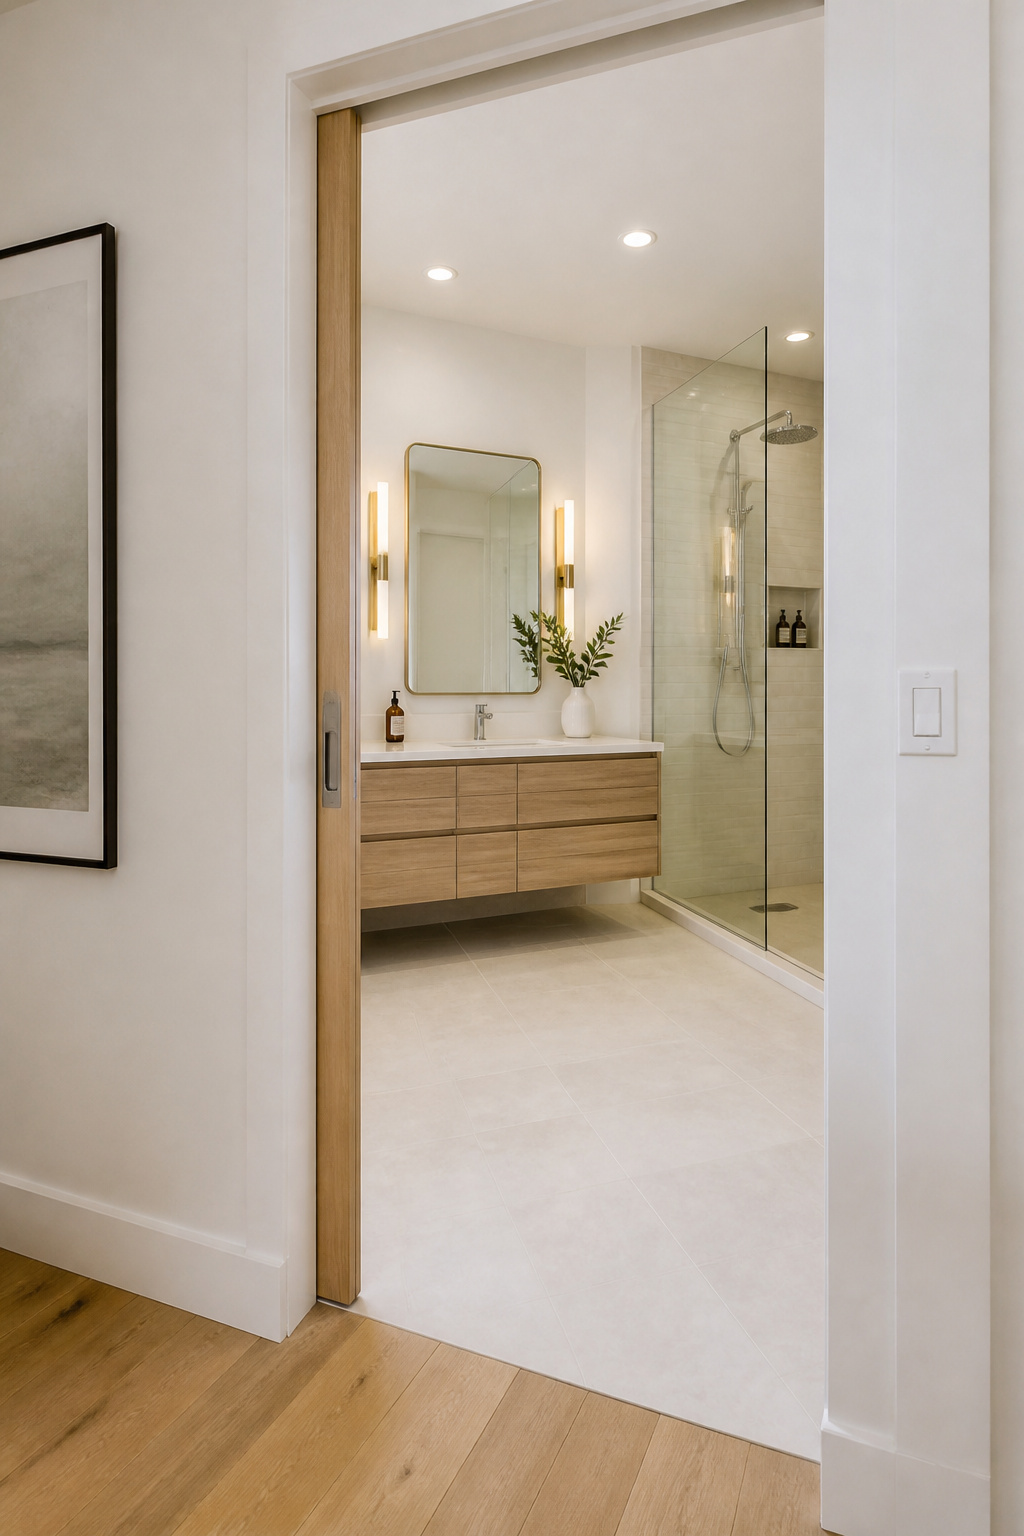
A pocket door that slides into the wall eliminates that zone entirely. The door disappears when open, the floor plan reads as one continuous space, and you recover usable floor from a feature of the room that was previously consuming it while contributing nothing.
The cost is real: a retrofit pocket door runs $1,550–$2,950, compared to $500–$1,850 for new construction. The rough opening requires approximately twice the door width, which typically means enlarging the existing doorframe. Also, any plumbing, electrical, or insulation in the wall the door will slide into must be relocated first — a common complication in older homes where bathroom plumbing runs along exterior walls.
Barn doors are the alternative when a pocket door retrofit isn’t feasible. A barn door slides on an exterior rail above the doorframe, requiring no wall modification. Hardware kits run $80–$350; the door can be any flat-panel slab. The trade-off: a barn door needs 3–4 inches of wall space on the latch side to park when open, and the gap at the edges is larger than a pocket door — a real consideration where privacy matters. For a 1908 Craftsman bungalow, I typically specify a board-and-batten sliding door in a period-appropriate finish — it suits the architectural style and sidesteps the wall modification that older plaster walls often don’t tolerate well.
7. Medicine Cabinets With Mirror Fronts: The Classic Small Bathroom Storage Move
A recessed medicine cabinet does something almost no other storage solution does: it borrows space that was already wasted. The cavity between studs — 3.5 inches deep, 14.5 inches wide — does nothing by default. A standard medicine cabinet converts it into three shelves of storage without claiming any floor, counter, or protruding wall depth.
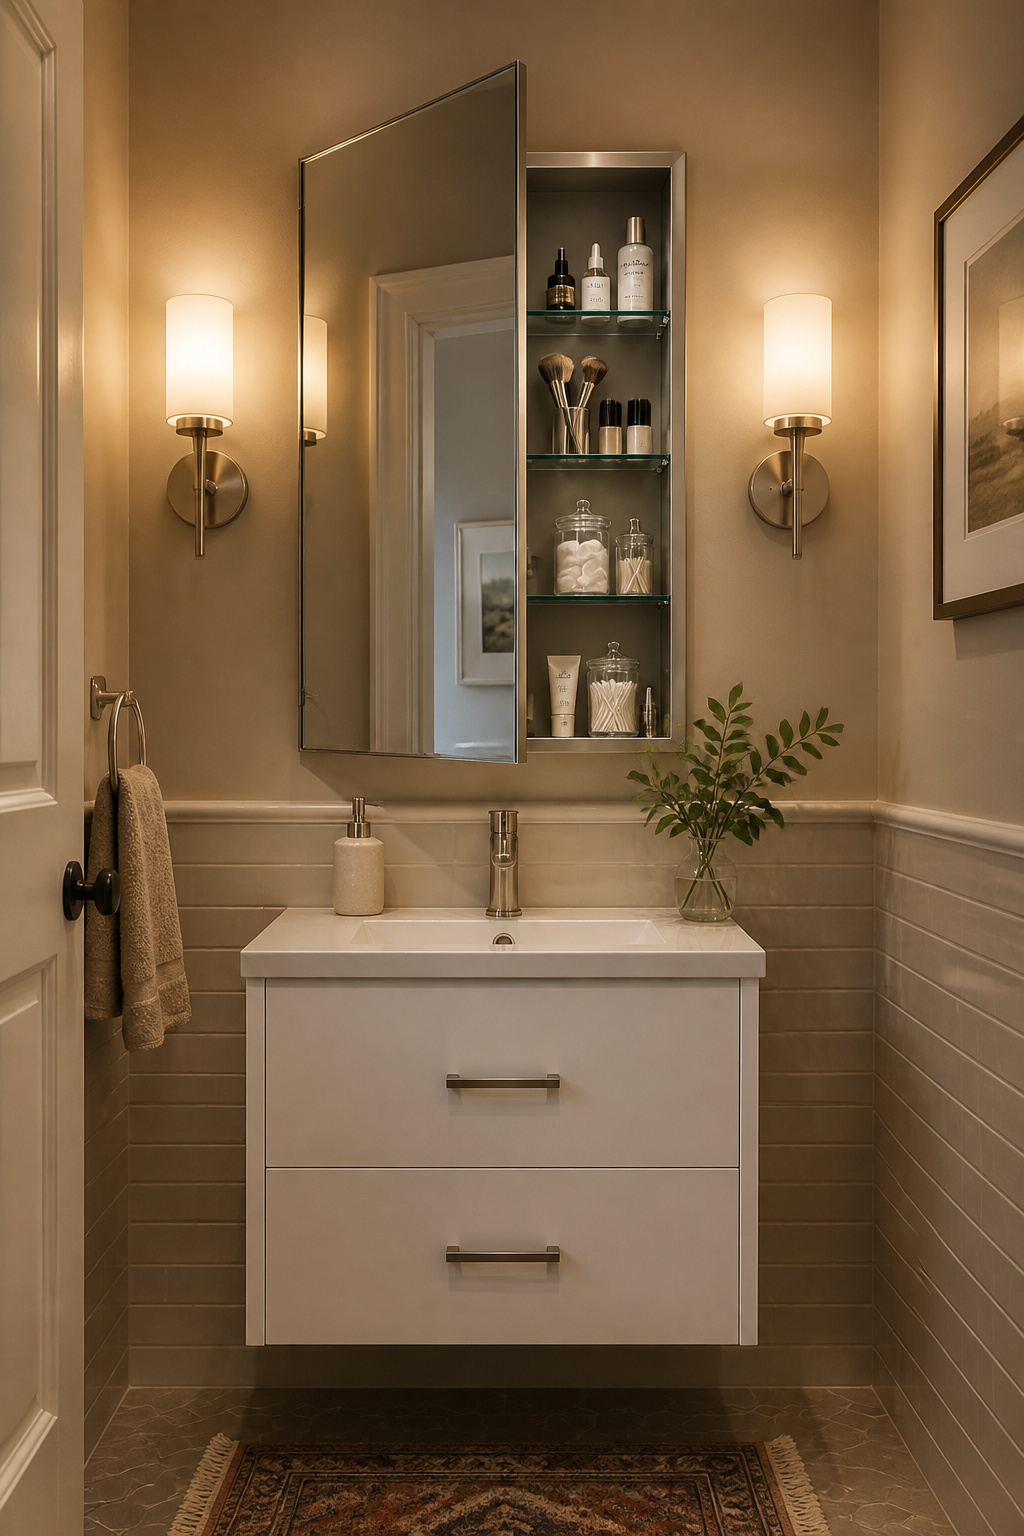
The mirror-front version is the one to choose in a small bathroom: storage, mirror, and a light-reflective surface in one unit. A 14×18 inch cabinet fits between two studs without cutting any framing — the simplest installation. A 24×30 inch cabinet spans one and a half stud bays and requires cutting through one stud and adding a header; manageable, but add $100–$200 to the installation cost. A 36×30 inch version spans two bays — maximum storage from a single opening, but requires careful framing assessment before ordering.
In homes built before 1940, stud spacing is often 20 or 24 inches on centre rather than the modern 16-inch standard. That irregular spacing is actually an advantage in some cases: a wider bay means a wider cabinet without touching any framing. Always probe the wall with a stud finder before ordering. Plaster-over-lath walls, common in pre-1950 homes, require different cutting tools than drywall — plan for this before you begin.
When recessing isn’t possible — over tile, or on an exterior wall — surface-mount models are the fallback. Choose a frameless model with a full-overlay mirrored door: the frameless edge reads cleaner in a small bathroom and maximises the reflective surface area.
8. Paint and Grout Color Strategy That Visually Stretches the Space
Paint is the last decision in a small bathroom remodel, but it shapes how every earlier decision reads. Get the finish wrong and the walls peel; get the colour wrong and the room feels smaller than it measures.
On finish first: semi-gloss is the correct choice for bathroom walls. It reflects 30–50% of incident light, repels moisture, resists mildew, and wipes clean. Satin is an acceptable second choice for bathrooms with flatter walls — it’s more forgiving of the plaster irregularities common in historic homes. Eggshell and flat finishes absorb moisture and will peel within a year in any regularly used bathroom. That’s not a preference; it’s a physics problem.
On colour: light warm neutrals remain the most reliable choice. They reflect light rather than absorbing it, and in a bathroom without a window, every reflected lumen matters. Warm whites — Benjamin Moore Chantilly Lace, Sherwin-Williams Pure White — have less clinical bite than stark whites and work with a wide range of fixture metals.
Dark walls can also work — if the lighting compensates. A deep navy or charcoal wall requires at least 100 lumens per square foot of total light output to avoid reading as oppressive. The dark colour’s receding quality makes walls feel like they’re stepping back rather than closing in, which counterintuitively creates a sense of space. This is a high-execution strategy; get the lighting wrong and it looks like a cave.
On grout: match it to the tile for a quieter, more expansive floor plane. Gray or greige grout is the practical choice — neutral enough to blend with most tile colours, dark enough to resist staining.
9. Vertical Storage Solutions That Use Wall Height Instead of Floor Space
A small bathroom’s floor plan is finite. The wall space above shoulder height is almost always unused. The renovation that ignores vertical storage is leaving the most accessible square footage on the table.
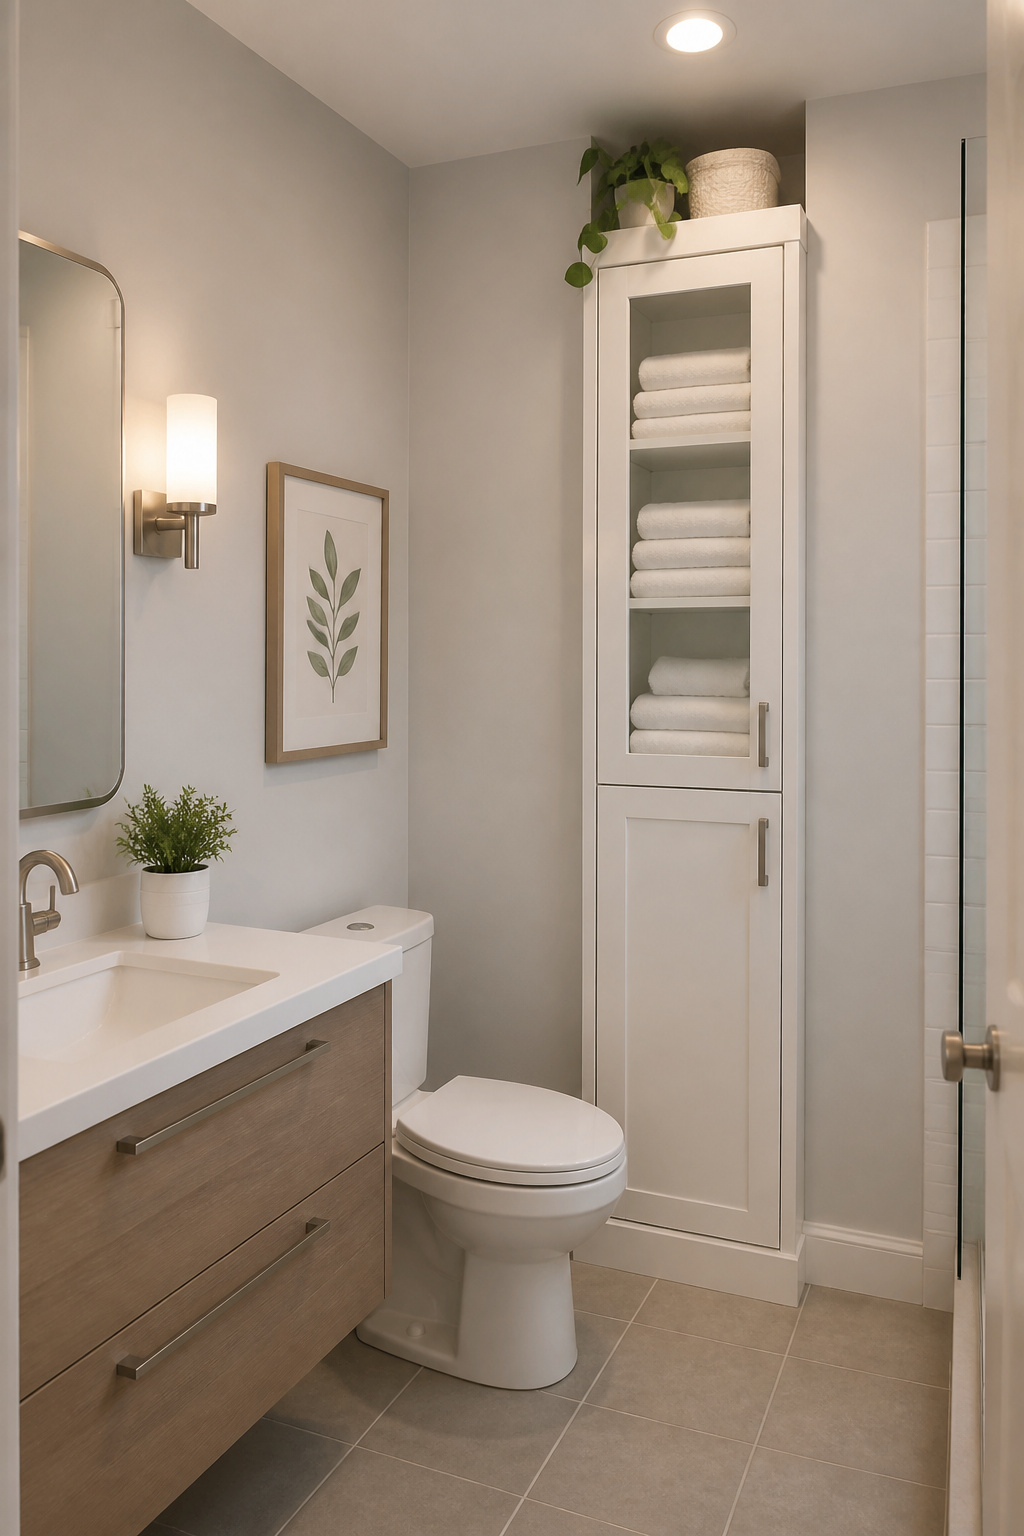
Over-toilet storage units are the most efficient intervention here: a standard 4-tier unit measures 24 inches long by 10 inches wide by 68 inches tall, claiming only 2.5 square feet of floor while providing approximately 12 square feet of shelf surface. Freestanding units require no wall modification; wall-anchored units are more stable and the better choice in households with children.
The 6–10 inches of clearance above the toilet tank is the zone to work with: standard tank height is 28–32 inches, so floating shelves begin at 34–42 inches from the floor. Keep shelf depth to 10–12 inches maximum — deeper shelves require full arm extension to reach the back, which is awkward in a tight space. Load capacity for floating shelves anchored into studs runs 20–40 pounds. Drywall-anchor-only installations are limited to 10–15 pounds — always locate studs before installing bathroom shelving.
The open-vs-closed debate: in a small bathroom, closed cabinetry almost always produces a cleaner result. Open shelves display everything on them, which means every product and bottle becomes visual information. A tall closed linen tower stores linens and supplies invisibly while providing a vertical anchor that makes the room feel intentional rather than improvised.
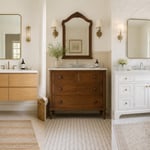
10. A Statement Tile Accent Wall That Elevates a Small Bathroom Remodel Without Overwhelming It
In a small bathroom, patterned or textured tile on all four walls is too much. The pattern surrounds you and the room closes in. One accent wall — a single plane of distinctive tile — creates a focal point instead of an enclosure.

The visual mechanics are straightforward: a feature wall gives the eye somewhere to land, and the brain reads this as depth — the room appears to extend toward that wall rather than stop at it. The three plain walls provide visual rest, and the contrast makes both more effective.
The vanity wall is typically the strongest choice: it’s the first thing you see from the doorway, the most photographed surface, and the wall that anchors the room’s identity. The shower back wall — visible through the glass from the doorway — is the second best choice, naturally framed by the enclosure like a picture within a picture.
For the tile itself, smaller-scale patterns work better than large-format tile on a feature wall in a small bathroom. Zellige tile, the Moroccan handmade terracotta now widely reproduced, runs $8–$30 per square foot installed and produces a rich, tactile wall with natural variation in colour and glaze that no two rooms share exactly. Herringbone patterns read as sophisticated but add $3–$5 per square foot in labour; straight stack or horizontal offset patterns are faster to execute and still carry strong visual interest.
11. Choosing the Right Toilet: Compact Designs That Fit Without Compromising Comfort
Toilet selection is where historic home renovation and small bathroom remodelling intersect in a practically important way. Homes built before 1960 frequently have 10-inch or 14-inch rough-in measurements rather than the 12-inch standard that nearly every toilet sold today assumes. The rough-in is measured from the finished wall behind the toilet to the centre of the floor drain. Get this measurement wrong and the toilet won’t fit — or will leave a visible gap at the back.
Always measure before purchasing. TOTO, American Standard, and Kohler all make toilets in 10-inch rough-in versions — less common on retail shelves, so plan to order rather than carry one home from a big-box store. Budget 2–3 extra weeks for special-order delivery before scheduling the plumber.
For the fixture itself, compact elongated toilets are the right choice for most small bathroom remodels. They provide the ergonomic comfort of an elongated bowl in a depth of 25–27 inches rather than the standard 29–31 inches — a 4-inch gain in a tight bathroom is meaningful. The TOTO Ultramax II is the most referenced example in this category.
Wall-hung toilets hide the tank inside a wall-mounted carrier frame, eliminating the floor connection entirely. The floating effect mirrors a floating vanity and produces a striking visual result. The trade-off is cost: wall-hung toilet systems run $800–$2,000 for the carrier and tank plus labour for wall modification. Corner toilets — with a triangular tank that nests into a 90-degree corner — are the genuine last resort. They work, but the look is distinctive. Try compact elongated models first.
12. Lighting Strategy for Small Bath Renovations: Sconces, Recessed, and Mirror-Mounted
A single overhead fixture in a small bathroom is the lighting equivalent of a ceiling fan in a windowless room: functional enough to tolerate, but not solving the actual problem. Overhead-only lighting casts harsh shadows from the brow and nose downward at the mirror — the effect that makes everyone look worse in a bathroom than anywhere else — and fails to illuminate the shower or floor plan adequately.
The solution is layered lighting: recessed ambient fill plus side-mounted sconces at the mirror. These two circuits do different jobs and need different control — ideally both on separate dimmers, which costs an extra $30–$60 per circuit and transforms the bathroom from a single-mode task room to a space that shifts between full-brightness grooming and softer evening use.
Mirror Lighting
For the mirror sconces, mount them at 60–66 inches from the floor — approximately eye level — and space them so there are 18–24 inches of mirror between each sconce and the mirror’s centre line. On a 36-inch wide mirror, that positions the sconce centres approximately 27–30 inches apart. This placement eliminates top-down shadows and replicates the even, face-level light of a professional makeup studio.
Colour temperature is not a small detail: specify 2,700K–2,800K for bathroom fixtures. This is warm enough to be flattering and skin-accurate without the amber cast of bulbs below 2,700K. Above 3,000K reads as clinical — fine for a surgeon’s scrub room, unflattering in a residential bathroom.
For the ambient fill, 4-inch recessed cans positioned 24–30 inches from each wall distribute light evenly across the floor plan. Specify IC-rated and moisture-rated trim for any recessed fixture within 3 feet of the shower or tub — a code requirement in most jurisdictions. For a deeper look at how to approach the full lighting scheme, these bathroom vanity lighting principles are worth working through before finalising the electrical rough-in.
13. Mirrors: Going Large, Going Full-Wall, and Creating Depth That Doubles the Space
The standard rule — match the mirror width to the vanity — is the wrong rule for a small bathroom. A mirror sized exactly to the vanity creates a visual cage: the eye sees the vanity, sees the mirror edge, and stops. It reads as a contained zone rather than an open one.
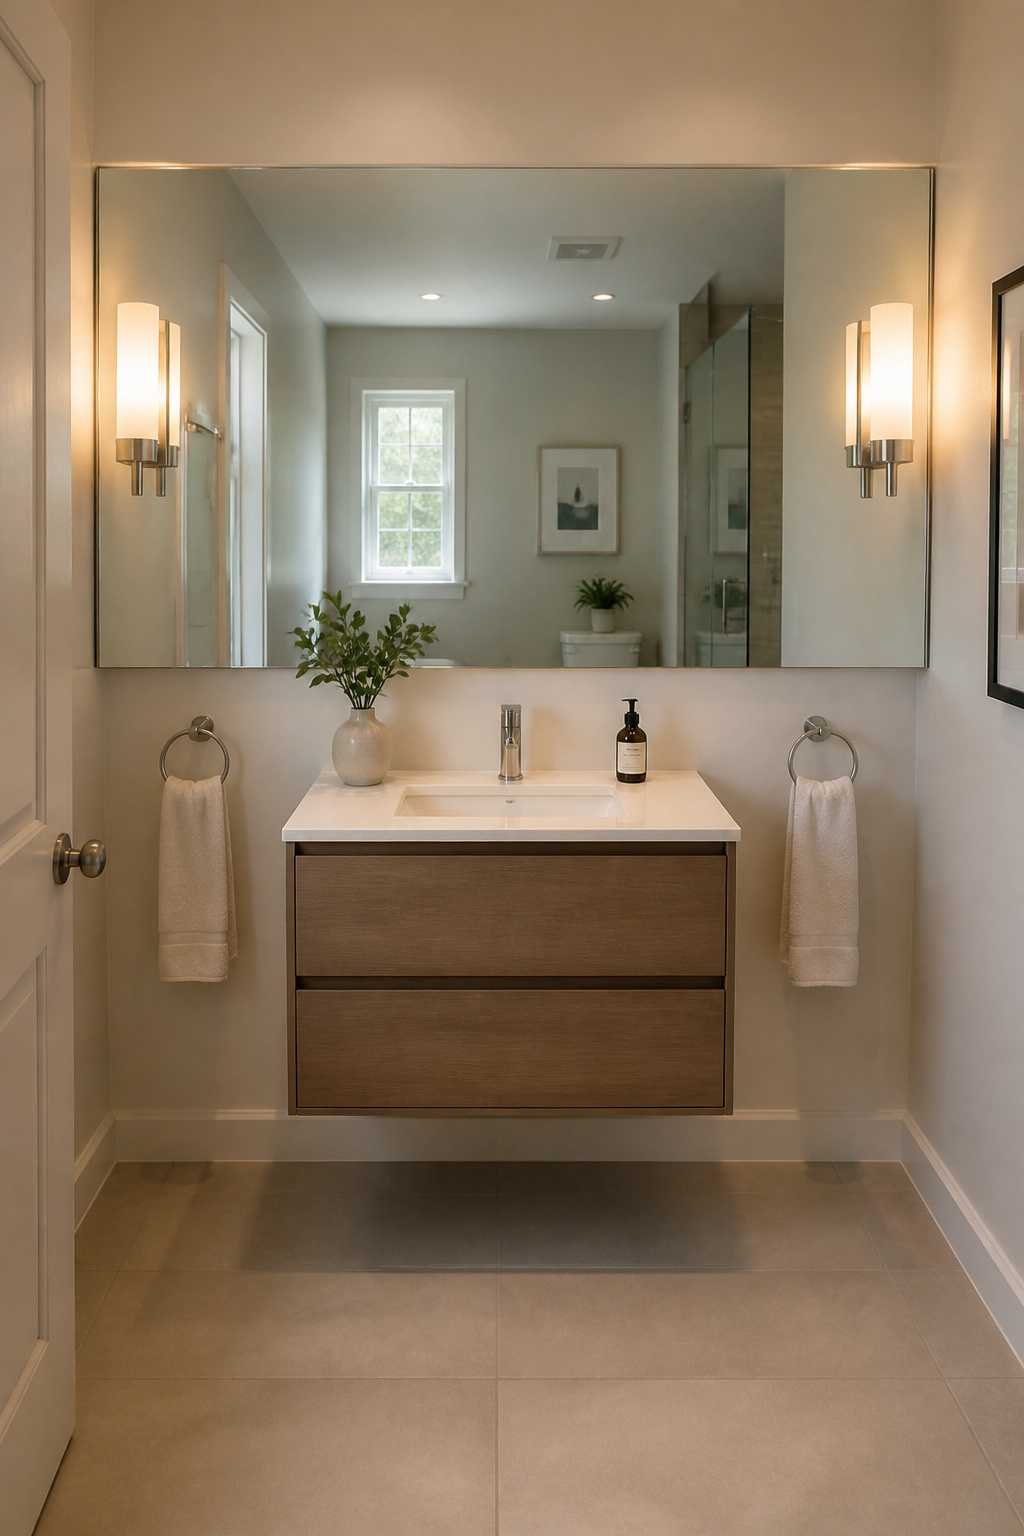
The right move: go 6–12 inches wider than the vanity on each side. A 48-inch wide mirror above a 36-inch wide vanity widens the perceived boundary of the vanity wall — the eye reads the mirror edge as the extent of the vanity zone, not the vanity itself. The room feels wider. It costs the same as a correctly-sized mirror and has a meaningfully better effect.
Frameless mirrors amplify this. They float on the wall with no visual mass at the edges, so the reflective surface appears to extend further than it does. Beveled-edge frameless mirrors add dimension without the weight of a frame.
Full-wall mirrors — floor to ceiling, wall to wall — are the most dramatic intervention. Heavy mirrors require anchoring into studs; toggle bolts are not adequate for a full-wall installation. LED backlit mirrors are heavier still and require hardwired electrical connections. If you’re installing over tile, use a carbide or diamond-tipped drill bit and confirm the wall backing can bear the mirror’s full weight. Budget $15–$40 per square foot for the mirror glass plus $200–$400 for professional installation of a full-wall configuration.
One placement note: if the bathroom has a window, position the mirror to reflect it. Reflected natural light bounces across the room and fundamentally changes the spatial experience — it’s the fastest way to make a dark small bathroom feel twice as large without touching the floor plan.
14. Period-Appropriate Fixtures That Add Historic Character to a Small Bathroom Remodel
Most of the classic plumbing fixture designs still available today were established in the first three decades of the twentieth century. A small bathroom remodel in an older home has an enormous library of historically appropriate choices to draw from, and reproduction hardware quality has never been higher.
Matching fixtures to the architectural period produces a result that feels intentional rather than assembled. Victorian homes (1880–1901) call for cross-handle faucets in polished nickel or unlacquered brass, pedestal sinks, and if the bathroom is large enough, a clawfoot tub. Craftsman and Arts and Crafts homes (1900–1930) suit lever handles, simpler lines, wall-mount sinks, and oil-rubbed bronze or matte chrome finishes. Art Deco bathrooms (1920–1940) were streamlined and chrome-heavy, with geometric tile patterns and pastel porcelain in seafoam, pink, or black.
For reproduction hardware, three suppliers cover most of the period range. Rohl’s Perrin & Rowe line produces period-inspired faucets and bath fittings with modern internal mechanics in unlacquered brass, polished nickel, and oil-rubbed bronze. Rejuvenation (Portland, Oregon) specialises in pre-1940 reproduction lighting and bath accessories designed with period accuracy. The Period Bath Supply Company maintains one of the most thorough catalogs of Victorian and Edwardian reproduction plumbing — the right resource when sourcing matching hardware for a specific architectural era. For broader period inspiration, these vintage bathroom inspiration ideas cover the full historical range with visual examples.
If you’re sourcing authentic vintage fixtures from salvage, inspect three things: the threads on inlet valves (worn threads cannot be re-tapped without specialist equipment), the porcelain body condition (crazing is cosmetic and acceptable; chips exposing cast iron will rust), and the drain assembly (most vintage drains need adapter fittings to connect to modern P-trap configurations). The most common mistake in period bathroom restoration is mixing fixtures from different architectural eras — a Victorian pull-chain toilet beside a 1970s chrome faucet reads as confused rather than eclectic.
15. Smart Accessories: Hooks, Towel Bars, and Organizers That Keep a Small Bathroom Functional
The final square foot of a small bathroom is found on walls, the back of the door, and surfaces that most renovations treat as afterthoughts. Getting these right doesn’t require structural work — just a clear system and the discipline to execute it in a consistent hardware finish.
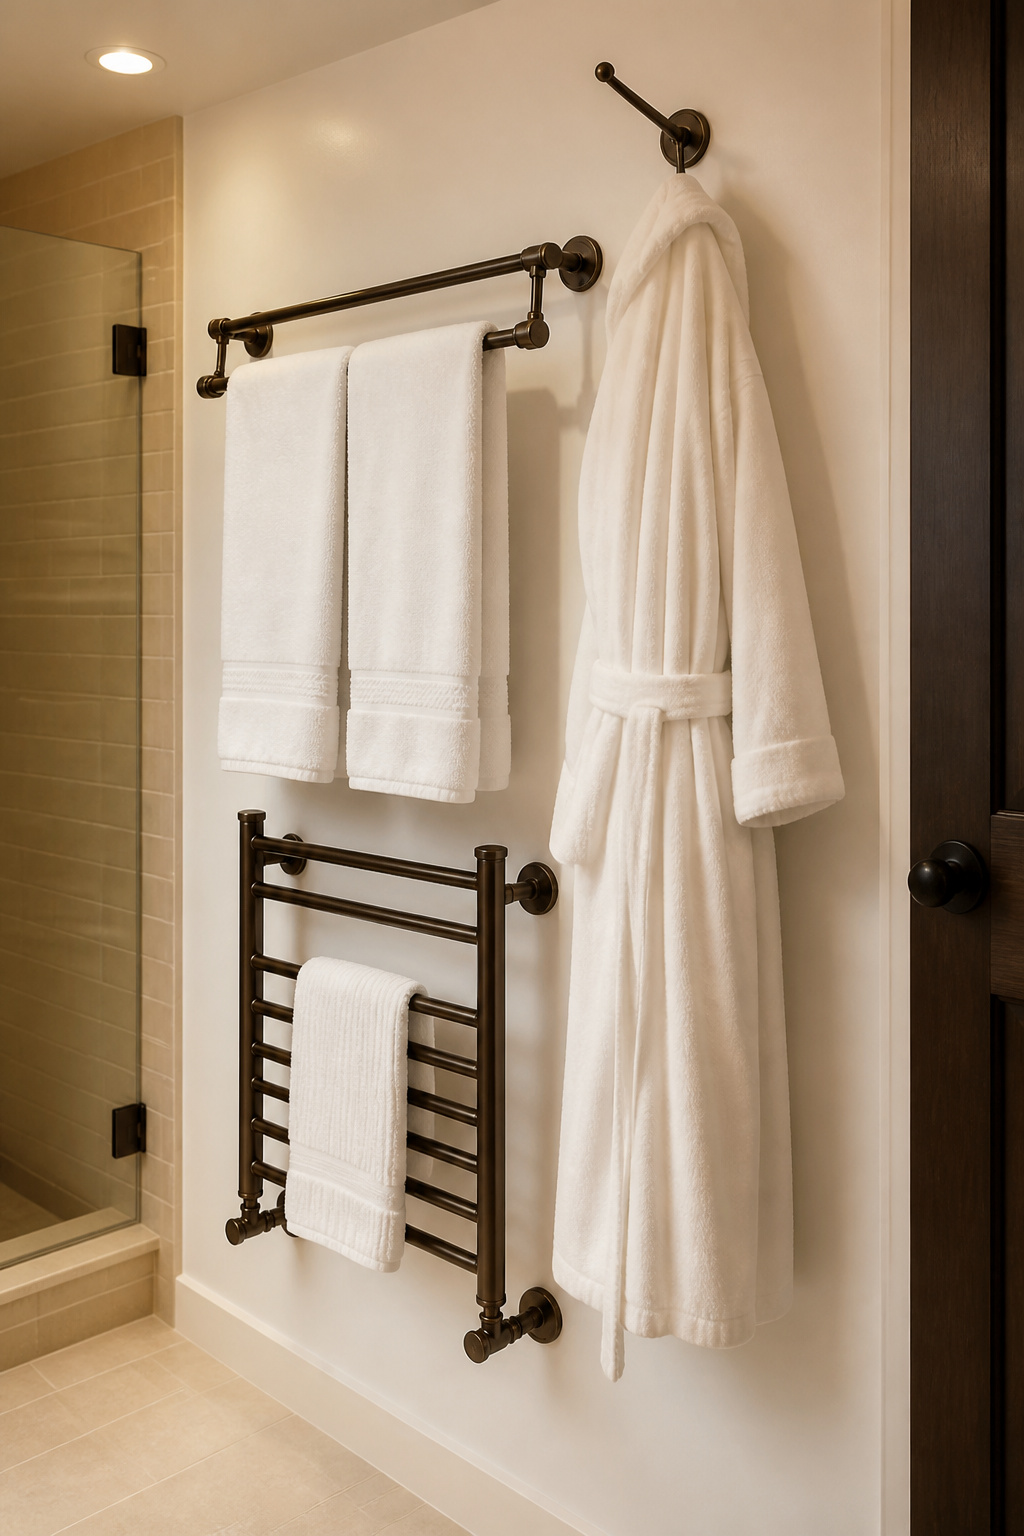
Layered hanging is the principle: standard towel bar height is 48 inches from the floor. A second bar at 32 inches creates a two-tier zone — hand towel below, bath towel above. Robe hooks mounted at 65–70 inches claim items that would otherwise pile on the floor. This three-level system uses approximately 15 inches of horizontal wall space and organises everything a bathroom regularly needs to store — vertically, with nothing on the floor.
A heated towel rail adds both function and a mild luxury. Hardwired electric models cost $200–$600 for the unit plus $150–$300 for electrical installation. They eliminate the faintly damp-towel smell that plagues windowless bathrooms without a dedicated exhaust fan. Plug-in models ($80–$200) are the no-permit alternative, but require an available outlet within reach — often the limiting factor in older bathrooms where outlets are sparse.
The back of the bathroom door is the most consistently underused storage surface in the home. A full-height over-door organiser adds 6–12 pockets of storage with no wall modification, no drilling, and no permit. In a bathroom that’s already been renovated, it’s the single highest-ROI storage upgrade available — an hour to install, a noticeable difference in counter clutter immediately.
On hardware finish: choose one metal and commit to it across every accessory — towel bars, toilet paper holder, robe hooks, faucet, drain cover, and sconce backplates. A bathroom with three different metal finishes looks unfinished regardless of how good the individual pieces are. In a historic home, match the finish to the architectural period: unlacquered brass for Victorian, oil-rubbed bronze for Craftsman, polished chrome for Art Deco.
Prioritizing Your Small Bathroom Remodel: Where to Spend and Where to Save
Every small bathroom remodel involves a budget that runs out before the wishlist does. The way to get the most out of that budget is to spend in the right sequence — and to know which decisions have 20-year consequences and which are next-season corrections.
Spend on layout reconfiguration, waterproofing, and tile work first. These decisions are structural — they determine how the bathroom functions and whether it holds up over decades, not just how it looks in the first year. A waterproofing failure discovered after tile is installed costs $3,000–$8,000 to remediate. A layout that works costs the same tile as one that doesn’t, but serves you differently for the life of the house.
The second tier — floating vanity, lighting, mirrors — is where visible transformation happens. Buyers notice these. They lift a bathroom from functional to considered. Budget here after the structural decisions are resolved.
Accessories, paint, and small organisers are last. They’re also the cheapest to change when preferences evolve, which means spending heavily on them at renovation time is often a mistake.
A rough sequence for a small bathroom remodel: demolition and subfloor inspection first. Then plumbing rough-in, electrical rough-in, waterproofing, tile, fixtures and vanity, mirrors and lighting, and accessories and paint last. This order protects the expensive decisions from the consequences of the structural ones. Budget 10–15% of the total project cost as a contingency for older homes — hidden plumbing, asbestos-containing materials in pre-1980 vinyl floor tile, deteriorated subfloor — these are routine findings in bathrooms that haven’t been touched since the 1950s. The contingency isn’t pessimism. It’s the difference between a renovation that finishes on schedule and one that stalls when the tile setter discovers the subfloor needs replacing.
The 40-square-foot Craftsman bathroom I mentioned at the start of this article now has a floating vanity, a curbless shower, period-appropriate hardware in oil-rubbed bronze, and large-format 12×24 porcelain tile laid lengthwise. It feels like a different room. It’s still 40 square feet — but the decisions made in that space changed how every inch of it is experienced.